Task 5.2 - Create a Custom Task Executer
Task Overview
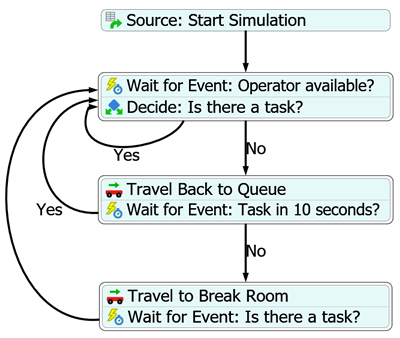
In this tutorial task, you'll learn how to modify an existing task executer by modeling an operator that returns back to a default location after performing a task. If the operator doesn't get a new task to do within a given amount of time, he will go to a break room and wait for more work. When you're finished, your model should look similar to the following image:

Step 1 Add Activities to a Task Executer Process Flow
In this step, you'll add activities to an object process flow to build a custom fixed resource that will receive three flow items, process the items in a batch, and then release them to the next downstream resource. When you're finished, your process flow should look similar to the following image:
For now, you'll merely add and connect these activities to the process flow. You'll edit the properties to add the functionality in a later step.
To add and connect these activities:
- On the main toolbar, click the Process Flow button to open a menu. Point to Add a Task Executer Process Flow, then select Blank.
- In Properties in the Process Flow Name box, delete the current text and rename the process flow OperatorLogic.
- From the Library, add a Schedule Source activity (under Token Creation).
- From the Library, add the following activities to create a stacked block:
- A Wait for Event activity
- A Decide activity
- From the Library, add the following activities to create a second stacked block:
- A Travel activity
- A Wait for Event activity
- From the Library, add the following activities to create a third stacked block:
- A Travel activity
- A Wait for Event activity
- For clarity, rename these activities as:
- Create a connector from the following activities:
- From the Source: Start Simulation to the Wait for Event: Operator available? activity
- From the Decide: Is there a task? to the Travel Back to Queue activity
- From the Wait for Event: Task in 10 seconds? to the Travel to Break Room activity
- Click the connector going from the Decide: Is there a task? activity to the Travel Back to Queue activity to select it.
- In Properties in the Name box, type
No. - Repeat the previous step for the connector going from the Wait for Event: Task in 10 seconds? to the Travel to Break Room activity.
- Create connectors that loop from the end of the three stacked blocks back to the Wait for Event: Operator available? activity.
- Click the connector looping from the Decide: Is there a task? activity to the Wait for Event: Operator available? activity to select it.
- In Properties in the Name box, type
Yes. - Repeat the previous step for the connector looping from the Wait for Event: Task in 10 seconds? to the Wait for Event: Operator available? activity.
| Activity | New Name |
|---|---|
| Source | Source: Start Simulation |
| First Wait for Event | Wait for Event: Operator available? |
| Decide | Decide: Is there a task? |
| First Travel | Travel Back to Queue |
| Second Wait for Event | Wait for Event: Task in 10 seconds? |
| Second Travel | Travel to Break Room |
| Third Wait for Event | Wait for Event: Is there a task? |
Consider saving your simulation model.
Step 2 Edit the First Block of Activities
In this step, you'll edit the properties for the first three process flow activities. First, you'll have to first attach the operator as an instance to the process flow. This will make it possible for you to use the current keyword to dynamically refer to the operator. This makes it easier to scale more complex models: you can add additional operators as attachments to the process flow without having to copy the process flow for each object.
The following is an overview of how the first three activities will function:
| Activity | Explanation |
|---|---|
| Source: Start Simulation | This Scheduled Source activity will create one token as soon as the simulation starts and sends the token to the Wait for Event activity. After it creates this token, it won't create any additional tokens. The one token will simply loop continuously through the other two activities until the simulation ends. You'll use the default properties for this activity. |
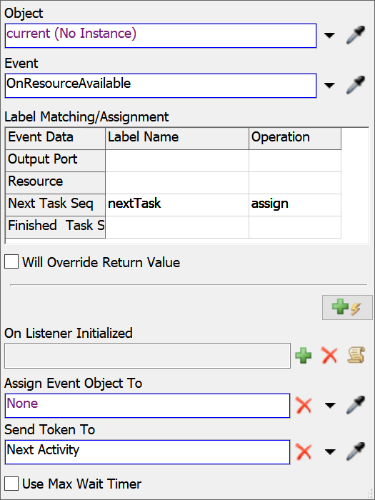
| Wait for Event: Operator available? | Wait for Event activities are event-listening activities. That means a token will wait at this activity until the event that is being listened to occurs. This Wait for Event activity will listen to when the operator becomes available at the end of each task or task sequence. If the operator has been assigned another task sequence, it will add a label called nextTask that will contain a reference to this task. |
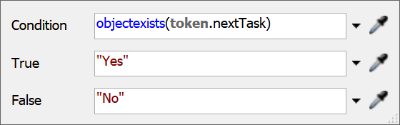
| Decide: Is there a task? | This Decide activity will check the nextTask label. If this label has a reference to a valid task sequence, it will send it through the connector named Yes and the token will loop through these activities again. If not, it will send the token through the connector named No and begin the next sequence of activities. |
To edit these properties:
- Click a blank space in the process flow to ensure nothing is selected.
- In Properties under the Process Flow Instances
group, find the Attached Objects (instances) list. Click
the Sampler button
 to enter sampling mode.
 - In the 3D model, click the Operator to sample it.
- Click the Wait for Event: Operator available? activity
to select it. In Properties, confirm that the Object box
displays
current (No Instance). - Next to the Event box, click the
Sampler button
to enter sampling mode.
- In the 3D model, click the Operator to open a menu. Select On Resource Available to sample this event.
- Now find the Label Matching/Assignment table. In the
Next Task Seq row under the Label
Name column, type
nextTask. - Click in the cell under the Operation column to open a menu. Select assign.
- Click the Decide: Is there a task activity to select it. In Properties, click the arrow next to the Send Token To box to open a menu. Select Conditional Decide to open some picklist options.
- In the Condition box, type
token.nextTask. - In the True box, type
"Yes". - In the False box, type
"No".
Consider saving your simulation model.
Step 3 Edit the Second Block of Activities
In this step, you'll edit the properties for the rest of the process flow activities. The following is an overview of how each activity will function:
| Activity | Explanation |
|---|---|
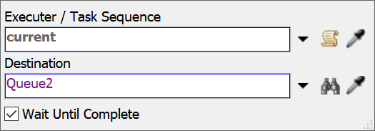
| Travel Back to Queue | If a token reaches this activity, it will send the operator to the Queue to check for loading tasks. |
| Wait for Event: Task in 10 seconds? | The operator will wait at the queue for 10 seconds. If a loading task becomes available in 10 seconds, the token will loop back to the first stacked block and the process flow will repeat itself. If there isn't a task within 10 seconds, the token will move to the next activity. |
| Travel to Break Room | If a token reaches this activity, it will send the operator to the Break Room. |
| Wait for Event: Is there a task? | The operator will wait in the Break Room until another loading task becomes available. |
To edit these properties:
- Click the Travel Back to Queue activity to select it. In Properties, click the arrow next to Executer / Task Sequence box to open a menu. Select current (Instance Object) to select it.
- Next to the Destination box, click the
Sampler button
to enter sampling mode.
- In the 3D model, click Queue2 to open a menu. Select Queue2.
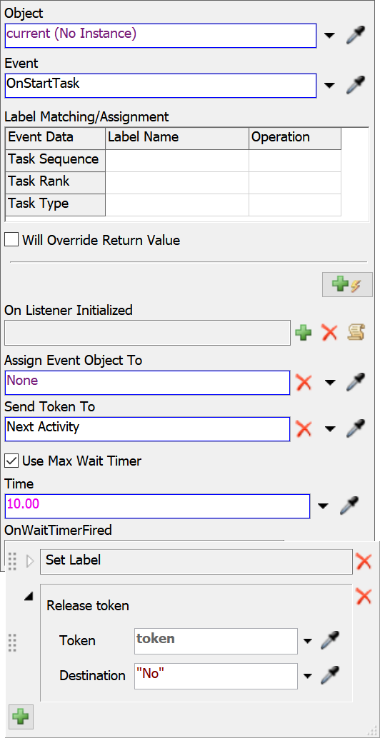
- Click the Wait for Event: Task in 10 seconds? activity
to select it. In Properties, confirm that the Object
box displays
current (No Instance). - Next to the Event box, click the
Sampler button
to enter sampling mode.
- In the 3D model, click the Operator to open a menu. Select On Start Task to sample this event.
- Check the Use Max Wait Timer box.
- In the Time box, type
10.00 - Next to the OnWaitTimerFired click the
Edit Properties button
 to open some picklist
options.
to open some picklist
options. - Click the arrow next to the Release Token to expand it.
- In the Destination box, type
"No". - Click the Travel to Break Room activity to select it. In Properties, click the arrow next to Executer / Task Sequence box to open a menu. Select current (Instance Object) to select it.
- Next to the Destination box, click the
Sampler button
to enter sampling mode.
- In the 3D model, click Break Room to open a menu. Select Break Room.
- Click the Wait for Event: Task in 10 seconds? activity
to select it. In Properties, confirm that the Object box
displays
current (No Instance). - Next to the Event box, click the
Sampler button
to enter sampling mode.
- In the 3D model, click the Operator to open a menu. Select On Start Task to sample this event.
Consider saving your simulation model.
Step 4 Run the Model
At this point the model is ready. Reset and run. You should see the operator transporting items to the processors. When the operator finishes a transport operation and has nothing to do, you should see the token move through process flow and direct him to travel to the queue. Then if he is idle at the queue for 10 seconds, he will travel to the break room and wait there.
Conclusion
This concludes the Creating Custom Objects Tutorial. Hopefully you can see how process flow allows you to create easy, customizable custom objects for your simulation model.