Validating Data in Global Tables
Overview and Key Concepts
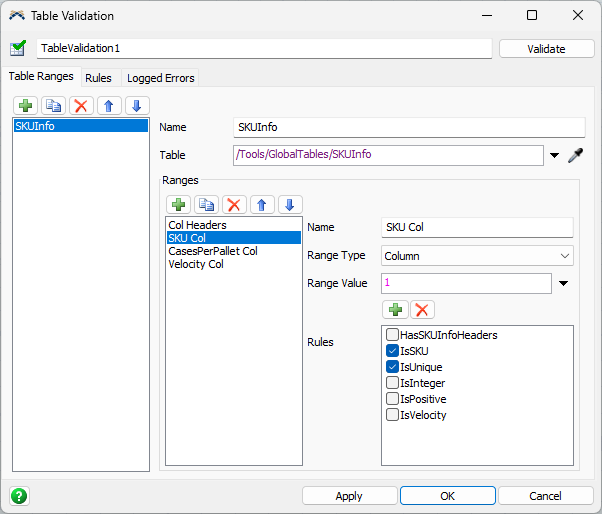
Once data has been imported into FlexSim, it is critical to validate that data. For example, your model may assume that a given table has a specific set of columns, and that the first column has number data, and the second has text data, and so on. In order to check these kinds of assumptions, FlexSim provides the Table Validation tool:
You can use a single Table Validation tool to validate all of the tables in your model. However, you can have more than one, allowing you to organize them as you need.
Configuring a Table Validation tool involves the following steps:
- Specify one or more tables to validate.
- For each table, specify one or more ranges of data. A range is a subset of data from the table, such as a column or row.
- Specify a set of rules. A rule is a test that the data in a range must pass.
- For each range, specify which rules the range must pass.
Once a Table Validation tool is configured, you can then validate the data by pressing the Validate button. When validating data, the Table Validation tool visits each value in each range and checks that value against all the rules connected to the range. If any value does not pass the test, the Table Validation tool logs an error.
In addition to using the Validate button, you can also use the FlexScript API:
TableValidation("MyTableValidation").validate()This way, if your model automatically updates its data, you can also ensure that the data is immediately validated.
Why Validate Input Data?
All models make assumptions about input data. If the input data does not match those assumptions, it will lead to incorrect model behavior. One way to think about a simulation model is as a function that transforms input data to results. If the input data is invalid, then then results are unlikely to be trustworthy.
In addition to creating trustworthy results, validating input data also saves you time. Configuring the Table Validation tool takes only few minutes, and considering that bad data can often waste hours of time, it is worth it.
Common Validation Tasks
This section describes some of the more common validation tasks you might need in a model. The steps for each task assume you already have a Global Table in your model.
Checking Column Headers
You can use the Table Validation tool to check that a table's columns are present, and that they have the right names. You can configure the Table Validation tool with these steps:
- Go to the Table Ranges tab:

- Click the Add button
 and choose the desired
Global Table from the menu. This only needs to be done once per Global Table.
If you've already added the Global Table to the Table Validation tool, select the desired
table in the list.
and choose the desired
Global Table from the menu. This only needs to be done once per Global Table.
If you've already added the Global Table to the Table Validation tool, select the desired
table in the list.
- In the Ranges area, use the Add button
to add a Range to the selected table:
Note that while the image above shows only one range, each table can have many ranges.
- Change the Range Type to Column Headers
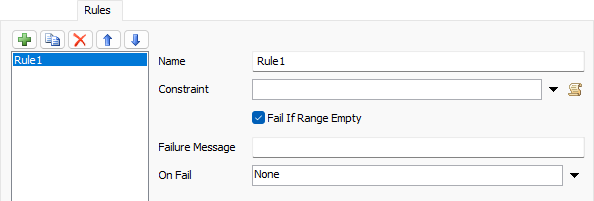
- Near the Rules area, use the Add button
to add a new rule and connect it to this range. The window will move to the Rules
tab automatically, and a new rule will be selected:
- Click the Picklist button
 , point to
Set Rules, and choose Values Form Exact Set.
, point to
Set Rules, and choose Values Form Exact Set. - Edit the array of values to match the expected column names. For example, if
your table has the columns SKU, Order, and Quantity, the array of values
would look like this:

During validation, the Table Validation tool will visit each column header and verify that the nth header matches the nth value in the array. If the header doesn't match the value, this rule will fail, logging an error.
Checking Number Data in a Column
You can use the Table Validation tool to check that all values in a column are set to the Number data type. You can configure the Table Validation tool with these steps:
- Follow steps 1-3 in the Checking Column Headers section to make sure the Global Table is in the Table Validation tool's list, and to add a new range to that table.
- Make sure the Range Type is set to Column
- In the Range Value field, specify the number or name of the column you want to check.
- Near the Rules area, use the Add button
to add a new rule and connect it to this range. The window will move to the Rules
tab automatically, and a new rule will be selected.
- Click the Picklist button , point to
Number Rules, and choose Is Number.
During validation, the Table Validation tool will visit each value in the specified column and verify that the value is a number.
Checking for Leading or Trailing Whitespace in a Column
One common issue with imported data is leading or trailing spaces in text data. It is very difficult to see this error visually. You can use the Table Validation tool to avoid this issue. You can configure the Table Validation tool with these steps:
- Follow steps 1-3 in the Checking Column Headers section to make sure the Global Table is in the Table Validation tool's list, and to add a new range to that table.
- Make sure the Range Type is set to Column
- In the Range Value field, specify the number or name of the column you want to check.
- Near the Rules area, use the Add button
to add a new rule and connect it to this range. The window will move to the Rules
tab automatically, and a new rule will be selected.
- Click the Picklist button , point to
Text Rules, and choose No Trailing or Leading Space.
During validation, the Table Validation tool will visit each value in the specified column and verify that the value is text, and that it doesn't leading or trailing spaces.
Other Common Column Checks
Unique Values - Many tables have a column where
all values are assumed to be unique. You can use the Table Validation
tool to check this. Add a new Rule.
Click the Picklist button on the Constraint, point to
Set Rules and choose Value is Unique. Then connect the rule to
any range.
Values Found in a Second Table - In many cases, data is split
into multiple tables. The tables are related by columns with shared data.
For example, you might have a SKU table with one row per SKU and an Order
table with one row per order. The order table might have a SKU column where the SKU value
is assumed to be present in the SKU table. You can use the Table Validation
tool to check this. Add a new Rule.
Click the Picklist button on the Constraint, point to
Set Rules and choose Value is in Table Column, and use the popup
to specify the source column. Then connect the rule to any range.
Values in Order - Some tables have a column with a column
that is assumed to be in sorted order. You can use the Table Validation
tool to check this. Add a new Rule. Click the Picklist button on the Constraint, point to
Sorting and choose Is Sorted. Then connect the rule to
any range.
Repairing Invalid Values
Each rule in the Table Validation tool has an On Fail callback. You can use this callback to repair data that doesn't pass the rule. For example, if a rule indicates that a value must be an integer, then the text "4" would fail the rule. However, you could use the On Fail callback to convert the text to a number. If the callback returns a 1, you won't see an error in the log for the repaired value.
Another common task is to convert a column from text to node values. You can use the Table Validation tool to accomplish this task during validation. You can configure the Table Validation tool with these steps, assuming you have a table with valid object names or paths:
- Follow steps 1-3 in the Checking Column Headers section to make sure the Global Table is in the Table Validation tool's list, and to add a new range to that table.
- In the Range Value field, specify the number or name of the column you want to check.
- Near the Rules area, use the Add button
to add a new rule and connect it to this range. The window will move to the Rules
tab automatically, and a new rule will be selected.
- Click the Constraint picklist button , point to
Node Rules, and choose Is Valid Node.
- Click the On Fail picklist button
and choose Convert to Node.
When the Table Validation tool validates the table, it will first check whether the value is a node. For each non-node value, the rule will fail and call the On Fail callback. The callback will then try to find the node by path.
Once your data is properly validated, you're ready to use that data as part of your simulation model. For more information, continue to the next topic: Using Data in Global Tables.