Connecting To External Code
Overview
In addition to using FlexSim's internal FlexScript modeling language, FlexSim allows you to connect to external code. You can connect to external python code, as well as C/C++ code.
The Code Editor
Connecting to external code happens through the code editor.
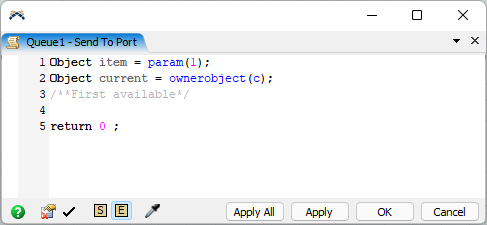
At the bottom of the window is a  button, standing
for External. Press this button to toggle the code node for an external connection.
When you press it, a dialog will appear telling you that
connecting to external code requires a different text format, asking if you want to proceed.
button, standing
for External. Press this button to toggle the code node for an external connection.
When you press it, a dialog will appear telling you that
connecting to external code requires a different text format, asking if you want to proceed.
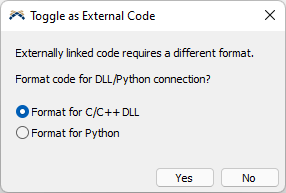
Choose which language you want to format it for, and press OK. It will change the code to be formatted for an external connection.
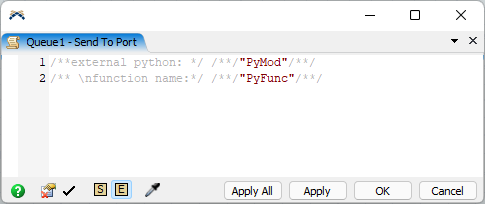
Code that is formatted for an external connection takes the form:
<prefix> "<module_id>" "<function_id>"
There may be gray markup comments around the text. This allows edit fields to display it in a readable way. You can ignore them or remove them. The different identifiers and their meanings depend on the language you are connecting to, and are explained in their respective sections below.
Connecting to Python
When connecting to python, the text must take the format:
external python "<python_module_name>" "<python_function_name>"
The prefix (the text before the first double quote) may be decorated with other text such
as markup, a colon, etc., but it must contain the text external python.
The
<python_module_name> must be the name of a python module, i.e. the
name of a python file, excluding the .py file extension. This module may be a standard
python module that is part of your currently active python environment, or it may be
a python module that you have placed in your model directory, or a subdirectory of your
model.
The
<python_function_name> must be the name of a globally accessible
function that is defined in that python module.
Once you have defined the correct connection string, FlexSim will call the defined python function whenever the node is evaluated, i.e. whenever treenode.evaluate() is called on that node. You can configure this in standard library object fields, like OnEntry or OnExit triggers, or you can set up your own nodes and call them directly from FlexScript. For example, you can define a user command that connects to python, or you can define a label node that holds this connection string, and simply call:
Variant decision = current.labels["PythonCode"].evaluate()
You can pass parameters into the function, and get the return value out, then continue in your FlexScript logic.
Minimal FlexSim API in Python
FlexSim does not provide a robust programming API for accessing FlexSim classes and commands from python. This is intentional. The goal in providing python access is to allow users to implement algorithms in python that are intended to be used in live systems. FlexSim thus becomes a virtual commissioning environment, where functionality can be robustly tested before being deployed to a live system. As such, calling FlexSim-specific commands and methods within python would create a tight binding requirement between python and FlexSim, defeating the purpose of using python.
FlexSim's design enforces a loose coupling between FlexSim and python. The single integrating functionality is to convert FlexSim types to and from python types. When a python function is called from FlexSim, FlexSim converts passed parameters to native python objects. Maps are converted to python dicts, Arrays a converted to python lists, strings are converted to python strings, and numbers are converted to python floats. Then, when the python function returns, the return value is converted back to FlexSim native types.
When to use Python vs. FlexScript
Given the minimal FlexSim programming API provided in python, the choice of which language to use in which situation is important. We suggest the following guidelines in making this choice.
Use FlexScript to:
- Write large blocks of code - FlexScript's raw execution speed is orders of magnitude faster than python's, and simply converting to and from python native types is computationally non-trivial. Thus, if you are writing a lot of logic, with nested looping, etc. then we suggest using FlexScript.
- Access FlexSim APIs directly - As mentioned above, python does not provide access to FlexScript's classes and commands. As such, if you need to access these, use FlexScript.
Use python to:
- Implement functionality intended for use in a live system - If you are implementing functionality that you want to later integrate directly into your factory/system, then you should implement it in python.
- Use python libraries for making optimal decisions - For example, you may want to use a solver like gurobi or cplex to make some optimal decision in your model. This may be to find an optimal schedule for the day, or to decide how much ordered material to ship from which supplier to which retailer in a supply chain simulation. This goal overlaps with the first reason above, namely you want to use the same decision making in the simulation that you would use in a live system. Here you should use python to implement this functionality.
- Use python libraries for data processing/interchange - For example, you may use a library like pandas to export or import data to/from a format that is not supported by FlexSim internally, such as HDF5, Parquet, etc.
Connecting to a C/C++ DLL
FlexSim also lets you connect a code field to an external C/C++ dll. The advantage of this is two-fold. First, and probably most important, it gives you the full advantages of C/C++, including execution speed, connectivity to third party functionality, C++'s standard template library, etc. Second, it allows you to hide your code if you would like to protect certain intellectual property.
When connecting to a dll, the connection text must follow the format:
"relative/path/to/mydll.dll" "function_id"
You can put anything before, between, or after the two sets of quotes (i.e. it
doesn't need a specific <prefix> like python). The first
quotes should contain a path to a dll, relative to your model. The second quote should
contain the name of a globally accessible, non-name-mangled function in the DLL. The
function must have a specific signature, explained below.

Building Your DLL
There are multiple steps involved with building the DLL so that it properly connects with Flexsim. First, download the DLL Maker Visual Studio project. It can be accessed in downloads section of your FlexSim account page. Second, you add a function to some C++ source file in the project. An example function is provided in the DLL Maker project:
#include "FlexsimDefs.h"
visible double mydllfunction1(FLEXSIMINTERFACE)
{
	pt("This will print to the Output Console");pr();
	return 0;
}
First you should include flexsimdefs.h. This defines certain macros as well as declares the Flexsim commands, so you can have access to those commands. Then the declaration should be as follows:
visible double the_function_name(FLEXSIMINTERFACE)Once you've declared the function appropriately, you can access parameters and write code similar to how you would write code in a trigger or other code piece in Flexsim. Access parameters passed in with parnode(), parval(), etc.
Putting the DLL in the Proper Location
The location where the dll is placed is very important, so you'll want to configure your Visual Studio project to place the DLL in the proper location. Here are some suggestions for configuring the Visual Studio project if you are building your dll just to be used for a specific model.
- Place the DLL Maker folder in the same directory as the model .fsm file that you have saved. Then open Visual Studio by double-clicking on DLL Maker\DLL Maker.vcxproj.
- In the Solution Explorer on the left, right-click on the DLL Maker project (not Solution 'DLL Maker', but the project icon below that), and choose Properties.
- In the "Configuration" drop-down at the top, choose "All Configurations".
- In the tree on the left go to Configuration Properties > Linker > General.
- In the Output File field, type: ../dllname.dll (replace "dllname.dll" with whatever you want to name your dll). Then click OK.
This will cause the Project to put the dll into your model directory, so that when you configure your dll path in Flexsim, you can just put it as "dllname.dll" since it's already in the same directory as your model.
Once you've defined the function on the dll side, built it and placed it in the correct location, the code node that you have configured previously will properly connect to the dll.
Rebuilding the DLL While Flexsim is Still Open
Often you may want to rebuild the DLL after Flexsim has already connected to it. If you don't explicitly disconnect Flexsim from using those dlls, Visual Studio will give you build errors saying it can't write to the dll file. To disconnect, choose from Flexsim's menu: File|System|Disconnect DLLs. If you have draw code that connects to the dll, you'll need to first minimize all your ortho/perspective windows, then choose File|System|Disconnect DLLs.