GUI View Attributes Reference
alignrightposition
These attributes signal that the control's position is "locked" to the right or bottom margin of the control's container window. They should container number data, and the value represents the offset distance from the container window's right or bottom margin, in pixels, that the control's position will be "locked" to. For example, if you give a button control an alignrightposition attribute with a value of 100, then as you resize the window, the button's x position will automatically change so that its button's position (or left side) is 100 pixels from the right edge of the window.
alignrightmargin
These attributes signal that the control's margin is "locked" to the right or bottom margin of the control's container window. They should contain number data, and the value represents the offset distance from the container window's right or bottom margin, in pixels, that the control's margin will be "locked" to. For example, if you give a button control an alignrightmargin attribute with a value of 10, then as you resize the window, the button will automatically resize so that its right margin is 10 pixels from the right edge of the window.
alignbottomposition
These attributes signal that the control's position is "locked" to the right or bottom margin of the control's container window. They should container number data, and the value represents the offset distance from the container window's right or bottom margin, in pixels, that the control's position will be "locked" to. For example, if you give a button control an alignrightposition attribute with a value of 100, then as you resize the window, the button's x position will automatically change so that its button's position (or left side) is 100 pixels from the right edge of the window.
alignbottommargin
These attributes signal that the control's margin is "locked" to the right or bottom margin of the control's container window. They should contain number data, and the value represents the offset distance from the container window's right or bottom margin, in pixels, that the control's margin will be "locked" to. For example, if you give a button control an alignrightmargin attribute with a value of 10, then as you resize the window, the button will automatically resize so that its right margin is 10 pixels from the right edge of the window.
aligncenterx
These attributes signal that the control should be center aligned with its container control. The attributes should contain number data, and their value represents an offset from the center position.
aligncentery
These attributes signal that the control should be center aligned with its container control. The attributes should contain number data, and their value represents an offset from the center position.
apply
If the apply attribute is added to a button, then FlexSim will call applylinks() on the button's owner view when the button is pressed. The attribute needs no data.
beveltype
The beveltype attribute specifies what the border of a panel should look like. The attribute should have number data with a value between 0 and 2. A value of 0 will cause no border to be drawn. A value of 1 causes a one pixel sunken border to be drawn. A value of 2 causes a 2 pixel border to be drawn.
bitmap
Using a bitmap attribute, a bitmap image can be applied to a given view/control.
- Panel - Simply add the bitmap attribute to the panel and give it the path to the bitmap file (like button\up_arrow.bmp), then give the panel a viewfocus attribute with the following text: "..>bitmap". This will cause the bitmap to be shown on the panel.
- Static - The bitmap attribute causes the static control to show a bitmap instead of text. The attribute should have text data that defines a path to the bitmap file, starting at the FlexSim main directory. The file must be a .bmp file. You can also specify within the bitmap file certain areas a "transparent", meaning the standard background color of the view will show through. To do this, the bitmap must be created in index color mode 24 bits per pixel, and the color that Windows will designate as transparent is the color R: 192 G: 192 B: 192.
- Checkbox - The bitmap attribute causes the checkbox to have a bitmap next to it instead of text. It should be created the same as the static view type was created.
- Radiobutton - The bitmap attribute causes the radiobutton to have a bitmap next to it instead of text. This one is also created in the same way as the static view type was created.
- Button - The bitmap specifies a bitmap to be shown on the button. It should contain text data specifying a file path to the bitmap, starting at the FlexSim main directory. If the bitmap attribute is present then the name of the button will not be shown.
cellheight
This attribute establishes the height of a given cell. It can be used in a couple of different views.
- Table - This attribute specifies the height, in pixels, of each row in a table. Unlike table columns however, all table rows must be the same.
- Icongrid - This attribute allows you to define the height, in pixels, of each rectangle in the icongrid. It should have number data containing the desired height.
cellwidth
This attribute establishes the width of a given cell. It can be used in a couple of different views.
- Table - This attribute specifies the default column width, in pixels. The attribute should have number data with the value in pixels. The attribute can also contain subnodes. Each subnode should have number data that defines the column width of an individual column. The first subnode defines the column width of the row header column while the second subnode defines the first column's width, and so forth.
- Icongrid - The attribute allows you to define the width, in pixels, of each rectangle in the icongrid. It should have number data containing the desired width.
- Tree - The attribute lets you specify how wide, in pixels, each node's name will be shown.
close
For a Button, if the close attribute is added, then FlexSim will close the button's owner view when the button is pressed.
coldlink
This attribute is used to link a control with a value in the model. For example, an edit control with a coldlink to the max content (or another value of an attribute or variable node) of a queue will show the max content as a text in the edit control. It is a "cold" link because it is only refreshed when the window is opened, and only applied when the Apply or OK button is pressed. The coldlink attribute should contain text data that is a path to the node that holds the linked data. The path starts at the coldlink node itself. You can use the applylinks() command to apply or refresh the coldlink. The first parameter is a node that is the start location for a recursive search. The second parameter is optional. The command will recursively search the window's tree structure and find any coldlinks (and hotlinks) and apply the coldlinks to the object's attributes. If the optional second parameter is 1, then instead of applying the coldlinks to the object, the applylinks() command will refresh the window's values as defined by the object's values. Below is a list of the different areas of GUI building that use coldlinks and the attributes purpose in each case.
- Edit View - This attribute defines what will appear in the text of the control. If the linked code contains number data, then the value will be copied into the control's text with the precision that the user specified in the main Edit menu. If you were to use a coldlink for a static you would find the attribute allows you to have the text be dynamic based and an attribute of the object.
- Static View - This attribute simply defines the text of the static control. Because the text of the static control is not editable, the links are not applied as they would be for other controls. You can also use the setviewtext() and getviewtext() to explicitly get and set the text of the control. This can similarly be done for an Edit control as well.
- Checkbox - This attribute links the state of the checkbox to a value in an attribute of the object. The node that it links to should hold number data and have a value of 1 or 0. 1 will cause the box to be checked, 0 will cause the box to be unchecked. You can also explicitly check the box with setchecked() or get whether it is checked with getchecked() (1 means checked, 0 means unchecked).
- Radiobutton - The attribute links the state of the radibutton to a value in an attribute of the object. The node that you link to should hold number data and have a value of 1 or 0. 1 will cause the button to be checked, 0 will cause the button to be unchecked). Radio buttons present a problem because in order to have them work using just a coldlink, you would need to connect each one to an individual node's value. Hence you would need 5 nodes in the object's attributes with only one having the value of 1 and the rest having 0. What users often want instead of this is to have a set of radiobuttons that reflect one value. For example, if a node has value 1, then radio button 1 should be checked; for value 2, radio button 2 should be checked, and so forth. In order to do this you would need to write your own code in a coldlinkx or in the OnOpen of the window. Alternatively, you can use a combobox control. The combobox control fulfills the same functional requirement of choosing one of several options, but packages it all into one control that can be linked to a value on one node.
- Button - The coldlink works as stated at the beginning and simply designates what will be shown as the button's text.
- Script - The attribute simply links the text of the script control to the text of a node on the object and works like documented earlier.
- Tracker - The attribute simply links the tracker or statusbar to a value on a node and it works like documented earlier.
- Statusbar - The attribute simply links the tracker or statusbar to a value on a node and it works like documented earlier.
coldlinkname
This attribute is just like the coldlink, except it links with the name of the node specified by the coldlink's path.
coldlinknamex
This attribute is just like the coldlinkname, except that instead of holding text data with a path to the involved node, the coldlinknamex holds flexscript code that returns the node whose name should be linked to.
coldlinkx
This attribute is like a coldlink, except that instead of holding text data with a path to the involved node, the coldlinkx holds flexscript code. The flexscript function should return a reference to the node that the view should link to. If 0 is returned, then nothing will be applied or refreshed for the control. Within the function there are 3 access variables. c is a reference to the control itself. i is a reference to the object focus of the view (the same as node("@>objectfocus+",c)). Eventdata is either 1 or 0. If 0, then the coldlinks function is being executed in order to refresh the control according to the object's variable. If 1, then the coldlinkx is being executed in order to apply the value to the object's variable. Please note that when the coldlinkx function is called, the return value, or in other words the reference to the linked node, is not remembered by the window. Each time the control needs to be refreshed or applied, the coldlinkx function is called again. This means that the coldlinkx function can actually be called many times throughout the life of the window.
connectorsize
This attribute determines the size of the arrows drawn at the ends of connections between connected objects in a 3D view.
graphaxes
In a Graph, if this attribute is present, then the grid will show the min and max values of the x and y range for the graph. The attribute does not need any data.
graphbars
This attribute has many diverse uses and purposes in GUI building. Below is a list of the different areas of GUI building that use graphbars and the attributes purpose in each case.
- Histogram - This attribute signifies that the graph will be shown as bars. The attribute needs no data.
- Line Chart - Add this attribute to have a bar drawn from 0 to the y value at each point in the graph. The attribute needs no data.
- Bar Chart - Add this attribute to have a bar drawn from 0 to the y value at each point in the graph. The attribute needs no data.
- Scatter Plot - Add this attribute to have a bar drawn from 0 to the y value at each point in the graph. The attribute needs no data.
graphgrid
In a Graph, if this attribute is present, then a grid will be shown as a background for the graph. The width of the grid does not correlate to any set value range in the graph, but is rather for comparative purposes, for example to compare the height of two bars in the graph. The attribute does not need any data.
graphhistodata
In a Histogram, If this attribute is present, then the graph will show a histogram. The attribute should have text data containing a path to a node that contains "bucket" sub-nodes. The number of sub-nodes should be the number specified by the viewfocus plus 2. The first sub-node will be designated as the "underflow" node, where any values less than the minimum range value of the histogram will be added to this node. The last node is "overflow" for values that are greater than the histogram's maximum range. Every other sub-node represents the histogram value for the "bucket" for the sub-node's corresponding interval.
graphlines
This attribute has many diverse uses and purposes in GUI building. Below is a list of the different areas of GUI building that use graphlines and the attributes purpose in each case.
- Line Chart - Add this attribute to have a line drawn between consecutive points in the graph. The attribute needs no data.
- Bar Chart - Add this attribute to have a line drawn between consecutive points in the graph. The attribute needs no data.
- Scatter Plot - Add this attribute to have a line drawn between consecutive points in the graph. The attribute needs no data.
graphpie
In a Pie Chart, this attribute signifies that the graph will be shown as a pie chart. The attribute needs no data.
graphpoints
This attribute has many diverse uses and purposes in GUI building. Below is a list of the different areas of GUI building that use graphpoints and the attributes purpose in each case.
- Line Chart - Add this attribute to have a dot drawn at each point in the graph. The attribute needs no data.
- Bar Chart - Add this attribute to have a dot drawn at each point in the graph. The attribute needs no data.
- Scatter Plot - Add this attribute to have a dot drawn at each point in the graph. The attribute needs no data.
graphpiedata
In a Pie Chart, this attribute should have text data the contains a path to a node with sub-nodes. Each sub-node's name will be show in the pie chart's legend, and should have number data that is the value for that item in the pie chart. The sum of all sub-nodes of the focus node will represent a full 360 degree circle, and the each sub-node's value represents a chunk of the pie.
graphstep
This attribute has many diverse uses and purposes in GUI building. Below is a list of the different areas of GUI building that use graphstep and the attributes purpose in each case.
- Line Chart - If this attribute and the graphlines
attribute are present, then each line will be drawn first horizontally and then
vertically to the next point, creating a stair-step effect instead of diagonal lines.
- Bar Chart - If this attribute and the graphlines
attribute are present, then each line will be drawn first horizontally and then
vertically to the next point, creating a stair-step effect instead of diagonal lines.
- Scatter Plot - If this attribute and the graphlines attribute are present, then each line will be drawn first horizontally and then vertically to the next point, creating a stair-step effect instead of diagonal lines.
graphtitle
In a Graph, if this attribute is present, then the grid will show a title for the graph. This is usually the text data on the viewfocus node except in the case of a histogram, where it is the text data on the graphhistodata focus. The attribute does not need any data.
graphxy
This attribute has many diverse uses and purposes in GUI building. Below is a list of the different areas of GUI building that use graphxy and the attributes purpose in each case.
- Line Chart - Add this attribute to make each sub-node pair be interpreted as an x/y value. If this attribute is not present, then each sub-node (not sub-node pair) will be interpreted as a y value, and the points will be evenly distributed across the x-axis, the first point with the x value 1, the second with x-value 2, and so forth. You may want to leave this attribute out if you want to display a bar chart where the bars are evenly distributed across the x axis.
- Bar Chart - Add this attribute to make each sub-node pair be interpreted as an x/y value. If this attribute is not present, then each sub-node (not sub-node pair) will be interpreted as a y value, and the points will be evenly distributed across the x-axis, the first point with the x value 1, the second with x-value 2, and so forth. You may want to leave this attribute out if you want to display a bar chart where the bars are evenly distributed across the x axis.
- Scatter Plot - Add this attribute to make each sub-node pair be interpreted as an x/y value. If this attribute is not present, then each sub-node (not sub-node pair) will be interpreted as a y value, and the points will be evenly distributed across the x-axis, the first point with the x value 1, the second with x-value 2, and so forth. You may want to leave this attribute out if you want to display a bar chart where the bars are evenly distributed across the x axis.
grayed
This attribute causes the control to be disabled, graying the control and disallowing the user from manipulating the control. It should container number data; 1 means grayed, 0 means not grayed. Once a control has been initialized, the "grayed" state of the control will not change by simply changing the value of the grayed attribute. Because of this, and because the "grayed" state of a control is very dependent on certain parameters of objects, and can change during the life of the window, it is usually more practical to use the windowgray() command to change the "grayed" state of a control. This command does not require you to even have a grayed attribute, so the grayed attribute, for the most part, is unneeded.
gridfog
This attribute determines how much fog will cover the grid on a scale from 0 to 1. Typically small numbers work better than larger ones.
gridlinecolor
This attribute determines the color of the gridlines. The 3 subnodes of this attribute determine the red, green, and blue color components used to draw the grid in a 3D view.
gridlinewidth
This attribute determines the width of the grid lines drawn in a 3D view.
gridx
If the graphgrid attribute is present, then you can also add a gridx attribute, which specifies the x grid interval.
gridy
If the graphgrid attribute is present, then you can also add a gridy attribute, which specifies the y grid interval.
gridz
If the graphgrid attribute is present, then you can also add a gridz attribute, which specifies the z grid interval.
hotlink
This attribute is used to link a control with a value in the model, just like the coldlink mentioned above. It is a "hot" link because the value shown in the control is continuously refreshed each time the window is repainted. Otherwise the hotlink is exactly the same as the coldlink.
hotlinkname
This attribute is just like the hotlink, except it links with the name of the node specified by the coldlink's path. It can be used in a static or edit control in the same way you would use a coldlinkname.
hotlinkx
This attribute can be used in a static, edit, or checkbox control in the same way you would use a coldlinkx, except that it will dynamically update like a hotlink.
itemcurrent
This attribute has many diverse uses and purposes in GUI building. Below is a list of the different areas of GUI building that use itemcurrent and the attributes purpose in each case.
- Check Box - The itemcurrent attribute is actually added to the checkbox when an instance is created. Usually it signifies whether the box is checked, but it may not always. Use getchecked() to get the check state of the box.
- Radio Button - Again, the itemcurrent attribute is added to the radiobutton automatically when an instance is created. Usually it signifies whether the box is checked, but it may not always. Use getchecked() to get the check state of the box.
- Combobox - The itemcurrent attribute is also a required attribute. It should have number data, and it specifies which attribute is currently selected.
- Listbox - The itemcurrent attribute is also required. It also acts just like the itemcurrent attribute of the combobox.
- Tracker - The itemcurrent attribute is a required attribute. Its value holds the current value that has been selected for the tracker.
- Tabcontrol - The itemcurrent attribute is required. It allows you to know which tab is currently selected. It should contain number data whose value will be set whenever the user chooses a tab.
items
This attribute has many diverse uses and purposes in GUI building. Below is a list of the different areas of GUI building that use items and the attributes purpose in each case.
- Combobox - The items attribute is a required attribute. It should contain subnodes. Each subnode represents an option in the combobox. The subnode's name specifies the text that will be shown in the option. You can manually add subnodes and give them names if your combobox options do not change. Often you will want the options in the combobox to be dynamic. You can do this by writing code in an OnOpen or some other trigger that populates the items attribute dynamically. Access the items attribute with the items() attribute command, clear the contents of it, then add nodes into the items attribute with nodeinsertinto(), then set their names with setname(). Once you've populated the list, set the itemcurrent attribute's value to the rank of the option that you would like the combobox to reference by default, then call comborefresh() to refresh the combobox windows options according to the new items list.
- Listbox - The items attribute is required on the listbox. It represents the list of options in the list box. It acts just like the items attribute in the combobox.
noformat
This attribute has many diverse uses and purposes in GUI building. Below is a list of the different areas of GUI building that use noformat and the attributes purpose in each case.
- Script - The noformat attribute causes the script control to be unformatted, meaning no code highlighting, line numbers, or folding will be done to the text of the control.
- Table View - Like the script control, the table control uses the Scintilla text editor. By adding the noformat attribute, Scintilla features like code highlighting, line numbers, folding, etc. are disabled. Usually this attribute should be present as it makes quick table editing easier.
- Tree View - If this attribute is present, then when text data is edited it will not be formatted for code.
objectfocus
In a dialog view, this attribute will specify a path to the object that a given window instance will point to. The createview() command contains a parameter that specifies the objectfocus, the objectfocus attribute will be filled with that parameter when the window is opened.
pagelist
In a tabcontrol view, the pagelist attribute allows you to have an external source for the pages of the tab control. The attribute should have text data specifying a path to a node that contains subnodes. Each of the subnodes should contain text data that is a path to the page control. The pagelist attribute is used quite often in object Properties windows.
palettewindow
In a dialog view, this attribute will cause the window's title bar to be smaller and look more like a tool window. The window will also always appear on top of other windows. The attribute needs no data.
pickcopydataonly
In a combobox view, the pickcopydataonly attribute causes the combobox to execute special functionality that allows for the implementation of FlexSim code pick lists. Although it could be used for other purposes, the main purpose is for code pick lists. In simple terms, the attribute causes the text of a given items subnode to be copied to a linked variable on the object. If you add the pickcopydataonly attribute, you will need to also add a pickprimary attribute and a picklist attribute. The pickprimary attribute acts much like a coldlink attribute. It links the combobox to an attribute of the object. When the combobox is initialized, the template code for the node referred to by pickprimary is copied into the combobox's items attribute as the first, or default, option. Then the referenced picklist is copied into the items attribute as additional options for the combobox. When the links are applied, then the text of the currently selected item is copied back to the node referenced by pickprimary. Note here that the subnodes of the items attribute now will have text data, and whatever item is picked, its text data is copied to the pickprimary reference. The existence of the pickcopydataonly attribute also affects some additional features with regards to the picklist attribute. The picklist attribute can contain subnodes that refer to other pick lists. If present, the subnodes should contain text data that is a path to a pick list, just like the picklist attribute itself. These pick lists will be appended on to the options of the combobox. Thus you can have the combobox provide a concatenated list of options from several different locations. The need for this feature came up because often different pick options may share a general list of options, but then have a unique list as well. For example, a setup time pick list may have all of the same options as the cycle time pick list, but it also needs a "If Item Type Changes" option. So this feature allows the setup time pick list to mainly use the cycle time's "shared" pick list, but then add an additional option specific to a setup time. Another feature that is available when the pickcopydataonly attribute is used is with using code headers. If the main pick list node that is referred to by the picklist attribute contains text data, then that text data will be appended to the front of any of the options. This allows for a common header section for all options, and lets the options themselves just implement the relevant code and not worry about the headers. This also allows for easy maintenance if the header changes. For example, a header section may contain the code: "treenode current = ownerobject(c);". This code will be appended in front of the actual code for a given option. This method is used for all standard pick list comboboxes in FlexSim, so you can find examples of this quite easily. You can also give the combobox a picklistheader attribute with text data designating the header code to use instead of what is found on the referenced pick list node.
pickitem
In the combobox view, the pickitem attribute causes the combobox to be linked to a number value on the object. The attribute does not need any data. If you give the combobox this attribute, then you will also need to give the combobox a coldlink attribute. For example, if you give the combobox a pickitem attribute and a coldlink with the text: @>objectfocus+>variables/arrivalmode, then this will link the combobox with the arrivalmode variable on the object. If the user chooses the second option in the combobox, then the arrivalmode variable will be given a value of 2. A third option selected results in a value of 3, and so forth. As an example, the Source's Properties page uses this attribute to tie the "Arrival Style" combobox to the Source's arrivalmode variable.
picklist
In the combobox view, the picklist attribute allows you to redirect where the list of options is located. You may want to do this if you use several comboboxes in different GUIs, but all of the comboboxes use the same list of options. The picklist attribute should have text data which is a path to the pick list, starting at the picklist attribute. The pick list that is referred to should be structured just like the items attribute, with subnodes whose names designate the option text. When the window is opened, the referenced pick list will be copied into the items attribute of the combobox.
pickprimary
In the combobox view, this attribute is used with pickcopydataonly, as explained above.
picture
In the icongrid view, this is used in conjunction with viewfocus, and should contain a path to a picture file that will be displayed in the icongrid.
rangeexp
In the tracker view, this attribute tells the tracker to exponentially increase the value as the locator is dragged to the right, instead of linearly. It should have number data specifying the factor to exponentially increase by. The run speed control at the bottom of the FlexSim window uses this attribute.
rangemin
In the tracker view, the rangemin attributes specify the minimum values of the tracker. They should have number data specifying the minimum value.
rangemax
In the tracker view, the rangemax attributes specify the maximum values of the tracker. They should have number data specifying the maximum value.
spatialsx
This specifies the X size of the control it is on.
spatialsy
This specifies the Y size of the control it is on.
spatialx
This specifies the X location of the control it is on.
spatialy
This specifies the Y location of the control it is on.
statusbar
If this attribute is added to a 3D view and has a numerical value of 1, then a status bar will be drawn at the base of the view. An example of this can be found at the base of the standard 3D view.
tooltip
This attribute defines a tip that will pop-up when the mouse hovers over the control for a certain amount of time. The attribute should have text data containing the text that should be shown.
viewbackgroundcolor
This attribute defines the text background of the control. For a 3D or planar view, it defines the background color of the scene. The attribute should have 3 sub-nodes, each with number data between 0 and 1 corresponding to the red, green and blue components respectively. This attribute can be added to almost every view.
viewconnectioncolor
This attribute specifies the connection colors. The attribute should have 3 sub-nodes, each with number data between 0 and 1 corresponding to the red, green and blue components respectively.
viewfar
This attribute defines the far clipping plane distance.
viewfield
This attribute defines the field-of-view angle in degrees.
viewfirstperson
This attribute uses the firstperson camera mode in a view.
viewfocus
This attribute has many diverse uses and purposes in GUI building. Below is a list of the different areas of GUI building that use viewfocus and the attributes purpose in each case.
- Graph View - The viewfocus attribute is required. It should have text data containing a path to a node that contains data for the graph. The structure of the data depends on the type of graph. If the graph is a pie chart, then the view focus node should have text data that specifies the name of the chart. If the graph is a line graph, scatter plot, or bar graph, then again the viewfocus node should have text data that specifies the title of the chart, and the viewfocus should have sub-nodes. Every odd-numbered sub-node will represent a point on the x axis, and every even-numbered sub-node represent its corresponding y value. If the graph is a histogram, then the viewfocus node should have three sub-nodes, each having number data. The first sub-node should be the minimum value of the histogram range. The second sub-node should be the maximum value of the histogram range. The third sub-node should be the number of "buckets" or divisions in the histogram.
- Icongrid View - The viewfocus attribute is a required attribute. It should have text data that contains a path to the view focus of the icon grid. The icongrid will display each subnode of the view focus as a drag-able rectangle. In order for a given sub-node to be displayed, it must have object data, and it must have a picture attribute. If not, the object will not be shown at all in the icongrid. The picture attribute of the object may contain text data that specifies a path to a bitmap file, starting in the FlexSim main directory. If the path is valid, then the picture will be shown in the object's rectangle. Otherwise, only the name of the object will be shown.
- Ortho/Perspective View - This attribute defines what the ortho view is "looking at". It should contain text data with a path to the node containing the objects to be viewed.
- Planer View - This attribute defines what the planar view is "looking at". It should contain text data with a path to the node containing the objects to be viewed.
- Table View - The viewfocus attribute is required for the table control. It specifies what the table will "point at". It is similar to the objectfocus attribute. It should have text data that is a path to the node that contains the table information. There are two options for the structure of the table node itself. It can be a list, meaning it contains a number of subnodes. If the table node is a list, then the table control will show just one column of data, and the text in each entry is the data, either text or number, of each of the subnodes in the list. The row headers of the table are defined by the names of each subnode. The other option is to have the table node be an actual table. In this case the table node contains a set of subnodes. Each subnode is one row in the table, and it contains subnodes, each being an individual entry in the table. The number of columns that will be shown in the table is defined by the number of subnodes of the first row. Row headers again are defined by the names of each row node. Column headers are defined by the names of the subnodes of the first row node. Please note that with a table, it is a direct view into the table data. This means that any changes made in an entry in the table will be applied as soon as you click off of the entry. This is different than using coldlink in other controls, where changes are only made when the user hits the Apply button. This is why the table control uses the viewfocus attribute, because it is a direct view into the data of a model, just like an ortho or perspective control.
- Tree View - The viewfocus specifies the focus of the tree view. It should have text data with a path to the node that will be the head of the tree.
viewfog
This attribute defines the fog density factor. It is normally a number between 0 and 1, where 0 is equivalent to none and 1 is equivalent to the maximum value.
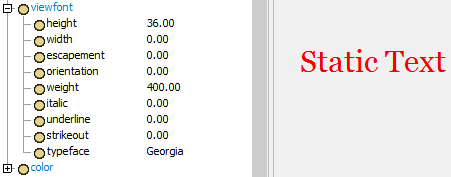
viewfont
This attribute only applies to Windows Common Controls. It defines the font that the control will use. The viewfont attribute is a wrapper around the Windows API CreateFont() command. Add this attribute and give it sub-nodes defining the different parameters that will be passed into CreateFont(), as shown in the figure below. You can refer to Microsoft's Windows API documentation for more information on this.
viewfull
This attribute is used to specify that the window it is placed is does not have a title bar.
viewhideallbases
This attribute hides all objects 2D shapes in a view.
viewhideallconnectors
This attribute hides all port connectors in a view.
viewhidealldrawcontent
This attribute hides all 3D shapes in a view.
viewhidealllabels
This attribute causes the objects' names not to be shown, but only their pictures. The attribute should have number data with a value of 1.
viewhiderouting
This attribute hides all object routing lines in a view.
viewlightaspos
This attribute sets the light as directional or a point. To set it the light to directional, the value needs to be 0. To set it the light to a point, the value needs to be 1.
viewlights
This attribute must be the parent of a list of nodes each having viewlightx, viewlighty, viewlightz, viewlightr, viewlightg, viewlightb, viewlightaspos attributes. The subnodes define the position and color of directional lights or point light sources used in the 3D view.
viewlightr
This attribute corresponds to the red color component of the light.
viewlightg
This attribute corresponds to the green color component of the light.
viewlightb
This attribute corresponds to the blue color component of the light.
viewlightx
This attribute sets the x position of a point light source or the x component of a directional light source.
viewlighty
This attribute sets the y position of a point light source or the y component of a directional light source.
viewlightz
This attribute sets the z position of a point light source or the z component of a directional light source.
viewmagnification
This attribute is only used with ortho views and planer views, and specifies the magnification or "zoom" of the view.
viewnear
This attribute defines the near clipping plane distance.
viewpointradius
This attribute is only used with perspective views, and specifies the camera's distance from the focal point.
viewpointrx
This attribute specifies the RX viewing angle of the view.
viewpointry
This attribute specifies the RY viewing angle of the view.
viewpointrz
This attribute specifies the RZ viewing angle of the view.
viewpointx
This attribute specifies the X focal point of the view.
viewpointy
This attribute specifies the Y focal point of the view.
viewpointz
This attribute specifies the Z focal point of the view.
viewprojectiontype
The viewprojectiontype attribute specifies whether the view is an ortho or a perspective view. It has number data, 1 signifying ortho, 0 signifying perspective.
viewshowgrid
This attribute enables or disable the showing of grid in a view. It should have number data with the value of 1, meaning show the grid and the value of 0, meaning don't show the grid.
viewshowheads
This attribute shows or hides all node ranks and node indices in a view. It should have number data with the value of 1, meaning show the node ranks and the value of 0, meaning hide the node ranks.
viewsnaptogrid
This attribute enables or disable the grid snapping in a view. It should have number data with the value of 1, meaning enable snap to grid and the value of 0, meaning disable snap to grid.
viewsyncupdate
This attribute enables or disable the repainting of all views when object editing is done. It should have number data with the value of 1, meaning enable repainting and the value of 0, meaning disable repainting.
viewwindowclean
This attribute specifies that when the window is closed, the underlying view tree is to be deleted. It is automatically managed by the FlexSim engine.
viewwindowopen
When a view is opened, this attribute is set to 1.
viewwindowsource
This attribute is required if you want the icongrid to be draggable. It should have number data with the value of 1, meaning yes you want the user to be able to drag objects from the icongrid onto other views.
viewwindowtype
This is the type of the window. Window types have specific values associated with them. When you create a window or drag out a control on the window it is given this attribute with a numeric value representing the window type. Window types are associated with window controls like buttons, radio buttons, check boxes, edits, listboxes, etc. As well as controls like groupbox, panel, table, graph, tree icongrid, etc. All the window types can be found in the online documentation in the View Attributes Reference section.
windowtitle
This attribute defines the title of the window. It should have text data defining the title. Otherwise the viewfocus path is used.
wordwrap
This attribute specify wrapping text in the editor. If the value is 0, then there is no text wrapping.