Extending FlexScript
Overview and Key Concepts
The Module SDK can be used to extend the FlexScript language by adding commands and FlexScript classes. For example, the AGV module adds commands like cpdistance() and cpnumconnections(). The AGV module also adds FlexScript classes like AGV and AGV.Trailer.
In order to add a new FlexScript class, your module must include a C++ dll. FlexScript classes are usually based on a C++ class. Similarly, new commands can be defined in C++, and the FlexScript command can call the C++ definition. New commands can also be defined purely in FlexScript, without requiring a C++ dll.
This topic assumes you have already created a module. For more information on creating a module, and on adding a C++ dll to a module, see the Quick Start topic.
Adding a New Command
A module can add a new command to FlexScript. Unlike a User Command, a command added by a module is available in every model.
In order to add a new command, follow these steps:
- Open a Tree view in FlexSim.
- Navigate to the following node:
MAIN:/project/exec/usercommandlist. - Add a subnode with the name of your module, if you haven't already. All the commands added by your module should be added under that subnode.
- Add the module subnode to your module as an Addition, if you haven't already.
- Inside your module's subnode, add a subnode with the FlexScript name of the command.
The complete path to that node might look like this:
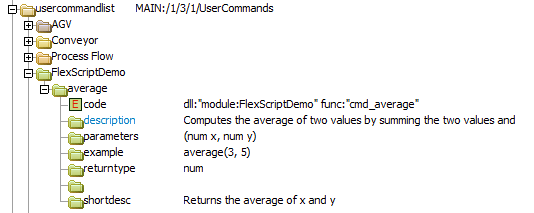
MAIN:/project/exec/usercommandlist/MyModule/mycommand - Add subnodes as follows:
Rank Suggested Name Data Type Notes 1 code String Toggled either FlexScript or DLL. If FlexScript, the value is the definition of the command. If DLL, the value is specially formatted text that points to a function in the dll, discussed after this table. 2 description String The value is the full description of the command. Used to generate documentation. 3 parameters String The value is the parameter list of the FlexScript command. The parameter list is used by the FlexScript parser to determine if the command is being called correctly. For more information, see User Commands. 4 example String The value is an example of FlexScript using your command. This is used when generating documentation. 5 returntype String The value is the return type of the FlexScript command. For more information, see User Commands. 6 This node has no name and no data. It is only required if you add the next node. 7 shortdesc String This node is optional. The value is a short description of the command. This is used when generating documentation for the command. It also appears in the tooltip when you hover over the command in a script window.
Defining a Command using C++
Any node can be configured so that when it is evaluated, it forwards the call and parameters to a function defined in a dll, and gets the return type back out. If that node defined the first subnode of a command, then that command will call a dll function.
To configure a node to call a C++ function, right-click the node, point to Build, and choose Toggle Node as DLL. Also be sure to add Text data. The text value is a specially formatted string, as follows:
dll:"module:[MyModule]" func:"[MyCommand]"The value of the C++ node should match the value above, except you'll replace [MyModule] with the name of your module, and [MyCommand] with the name of the command.
On the C++ side, you'll add a command with a specific signature:
__declspec(dllexport) Variant command_name(FLEXSIMINTERFACE)The name of the command is arbitrary, but all the other elements are required.
For example, suppose a module called FlexScriptDemo had the following function defined:
double average(double x, double y) {
    return (x + y) / 2.0;
}
To make this function callable, you would define a wrapper function with the correct signature, and call the original in that function:
__declspec(dllexport) Variant cmd_average(FLEXSIMINTERFACE) {
// param(n) is a Variant. You can cast a Variant to a double,
// and a double can cast to a Variant.
    return average(param(1), param(2));
}
Your module would add the FlexScriptDemo subnode, and add the average command as follows:
Once all these elements are in place, you'll be able to call the
average command in FlexScript.
Adding a New FlexScript Class
A module can add a new FlexScript class. A FlexScript class is always based on a C++ class defined in the module's dll. There are three general steps to adding a new FlexScript class:
- Implement a C++ class in your module.
- Implement the bindInterface() method for that class.
- Use the module to add a special node to FlexSim's tree.
Adding a Class for SimpleDataType and CouplingDataType Derivatives
The SimpleDataType class provides a virtual method:
virtual void bindInterface();If your class inherits SimpleDataType or CouplingDataType, you can override this method. The following code shows an example for a simple Circle class:
class Circle : public SimpleDataType
{
public:
  double radius;
  double _getRadius() { return radius; }
  void _setRadius(double newValue) { radius = newValue; }

  double sliceArea(double sliceAngle);
  double _getArea();
  __declspec(property(get = _getArea)) double area;

  static Circle* init(TreeNode* target, double radius = 0);
  virtual void bind() override;
  virtual const char* getClassFactory() override { return "FlexScriptDemo::Circle"; }

  virtual void bindInterface() override {
      bindTypedProperty(radius, double, &Circle::_getRadius, &Circle::_setRadius);
      bindTypedProperty(area, double, &Circle::_getArea, nullptr);
      bindMethod(sliceArea, Circle, "double sliceArea(double sliceAngle)");
      bindMethod(init, Circle, "Circle init(treenode target, double radius = 0)", BIND_METHOD_STATIC);
  }
};
The bindInterface() method above exposes the following methods and properties to FlexScript:
- radius - a property that can get or set a double value.
- area - a read-only property gets a double value. It is read-only because there is no provided "setter" function.
- sliceArea() - a method that accepts a double and returns a double.
- init() - a static method that adds circle data to a node.
Once you have implemented the bindInterface() method, you also
need to add a node so that FlexSim will call that method for your class.
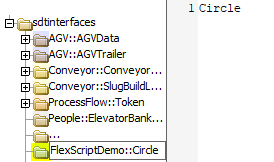
Your module should add a node at:
MAIN:/project/exec/globals/sdtinterfacesThe name of the node should be the name returned by
getClassFactory(). The value of the node should be the
FlexScript name for the class. If the module were called FlexScriptDemo,
that node would look like this:
Once the node is added to the module, you'll need to save defaults, and close FlexSim. FlexScript classes are only added when the application starts.
Here is some example FlexScript, using the Circle class:
treenode circleNode = Model.find("Tools").subnodes.assert("circle");
Circle circle = Circle.init(circleNode);
circle.radius = 1.5;
return circle.area; // returns 9.42
It is good practice to create the same API for a class in C++ and in FlexScript. For example, the Circle class has the same methods and properties in C++ and in FlexScript. The previous example code looks very similar in C++:
treenode circleNode = Model::find("Tools")->subnodes._assert("circle");
Circle* circle = Circle::init(circleNode);
circle->radius = 1.5;
return circle->area; // returns 9.42
Adding a Class for ObjectDataType Derivatives
Since ObjectDataType inherits SimpleDataType, you'll still
override the bindInterface() method. The main difference
is that your module will add a node in the object's library node,
rather than in the sdtinterfaces node.
The interface node should be placed in the eventfunctions node of the library object for that class. The node should be named flexScriptInterface, The value of the node should be the name of the FlexScript class.
For example, the List class implements bindInterface().
You can see the interface node for the List class at:
MAIN:/project/library/List>behaviour/eventfunctions/flexScriptInterfaceAdding a Class for General C++ Classes
Most FlexScript classes are based on SimpleDataType or ObjectDataType classes in C++. These classes are bound to nodes in the tree. However, you may need to add a class that isn't bound to nodes in the tree. For example, FlexSim provides the Vec3 class. This class provides helpful properties and methods, but is not bound to a node in the tree.
Modules can add this kind of class. First, you need to define a C++ class that has the following method:
static void bindInterface();Note that this method is not inherited from a parent class. It must have this
name and signature, and it must be static. The implementation of this method can call
bindMethod() and bindTypedProperty() and the other
binding methods your class needs.
For non-tree classes, you'll need to bind this class using the
bindClass() method, called from another class'
bindInterface() method.
For more information, review the example code provided in the next section.
Example Code
The following file provides a C++ example for each of the previous topics:
If you follow the steps in the Quick Start for creating a module and adding a dll, you can replace the default module.cpp file with the example file.
The example code includes the following elements:
- Point - a class demonstrating how to implement a general C++ class.
- _PointBinder - a class demonstrating
how to call
bindClass()frombindInterface(). This example provides a special class for that purpose. However, you can callbindClass()from anybindInterface()that has a corresponding interface node in the tree. - Circle - a SimpleDataType class with simple properties and methods.
- Heap - a SimpleDataType that encapsulates an STL container. This class also demonstrates binding custom data structures.
- Mound - an ObjectDataType class that uses a collection of Heap objects. Classes that inherit ObjectDataType rather than FlexSimObject are often used as Tools. Group, StatisticsCollector, and List all inherit ObjectDataType directly.
- average - a function that calculates the average of two numbers.
In addition to the example code provided in this topic, you can find examples of using bindInterface() in the AStar module:
- CouplingDataType Example - Traveler.cpp contains the Traveler class implementation for bindInterface(). The Traveler class inherits the CouplingDataType class.
- ObjectDataType Example - AStarNavigator.cpp contains the AStarNavigator class implmentation of bindInterface(). This class inherits the Navigator class, which is derived from the ObjectDataType class. In addition to binding its own interface, it also binds the interfaces for many non-sdt helper classes.
- General C++ Class Examples - AStarTypes.cpp contains the bindInterface() implementations for many general C++ classes, such as the TravelPath class.