Importing Data into Global Tables
Key Concepts about Importing Data
FlexSim provides fully-featured tools to automate importing data from an Excel workbook or a SQL database. These tools make it easy to extract data from a workbook or database and dump it into a Global Table. FlexSim also has simple commands for copying data from a CSV file to a Global Table.
Before importing data, you must first create the Global Tables you plan to use as destinations. Give each table a meaningful name. When you import data, the table will be overwritten so that it will have the same rows, columns, and values as the source data. The table's name will remain constant.
Import Timing and Digital Twins
In general, data should be imported before running the model. The two most common times for importing data are when the model is reset and when the model is opened. The Excel tool and the Database Connector both provide a checkbox for whether to import on reset. You can also add code to the On Model Reset trigger or the On Model Open trigger to import your data.
Many customers use FlexSim to create a digital twin of their facility. FlexSim is an excellent tool for this task. The best approach is to set up a model so that when it opens (or when the user pushes a custom button) it imports the current state of the real system. Once imported, the model can apply the new data so that time zero in the model represents the present, or the time that the import happened. When the simulation runs, it will then be making predictions about the future state of the system.
Validating Data After Import
When a model is built on table data, the model usually makes assumptions about that data. If those assumptions are not true, then the model won't function properly. FlexSim provides a Table Validation tool you can use to check all your assumptions after the data is imported. For more information, see the Validating Data section.
Importing Data from Excel
FlexSim provides its Excel tool for importing data from an Excel workbook:
You can open the tool using the Excel button  in the main toolbar. You can also open the tool by using the Toolbox. Click the green plus button
 , point to Connectivity, and choose
Excel Import/Export.
, point to Connectivity, and choose
Excel Import/Export.
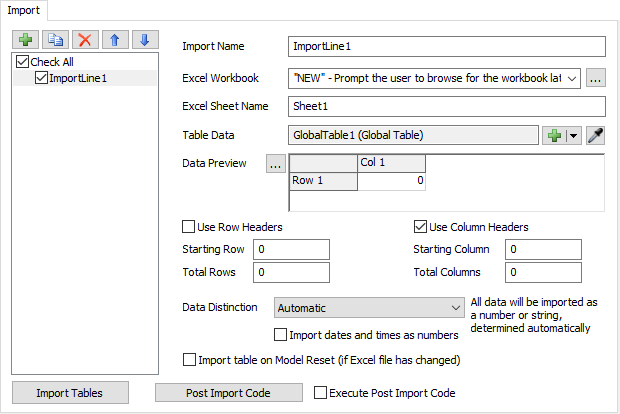
The Import tab allows you to specify a list of import lines. For each import line, you specify a source sheet in a workbook. You also specify a destination table, often a Global Table. You also specify whether to use the first row of data as the column headers, and whether to use the first column of data as the row headers. When the import happens, the data from the specified sheets will be copied into the target table. For more information about specifying an import, see Excel Import.
To run the import from FlexScript (such as a model trigger or custom button), you can use the following code:
excelmultitableimport()Importing Data from a SQL Database
FlexSim provides a Database Connector tool for importing data from as SQL database.You can add one Database Connector for each database connection the model uses. The first step in using the Database Connector is to configure your connection:
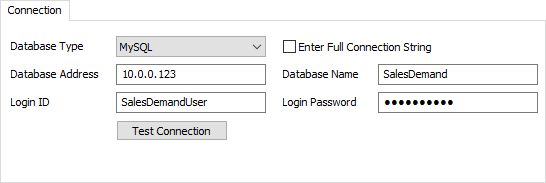
You can connect to to most SQL databases, including any database with an ODBC driver.
Once you have specified your connection details, you can set up your imports:
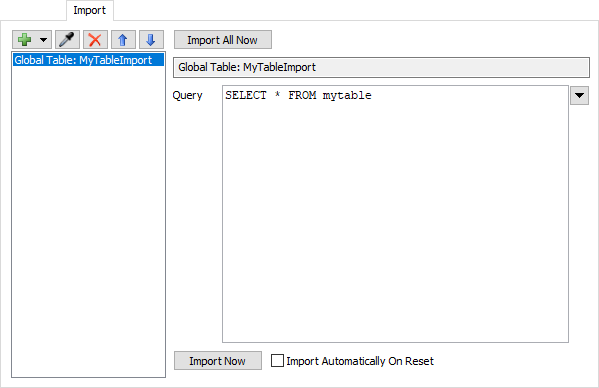
Each import is a query that runs on the database. The result of the query is dumped to the target
Global Table. The column headers are set to the names specified in the SELECT statement of the
query, and the row headers are left blank.
To run the import from FlexScript (such as a model trigger or custom button), you can use the following code:
// This code applies to the current software version only.
// It is not guaranteed to work in future versions.
string connectorName = "DatabaseConnector1";
string path = "Tools/DatabaseConnectors/" + connectorName;
treenode connector = Model.find(path);
if (connector) {
	function_s(connector, "importAll");
}
Importing CSV Files
FlexSim provides a FlexScript command called importtable()
that dumps a CSV file into a Global Table.
string sourceFile = modeldir() + "Data.csv";
Table destinationTable = Table("MyGlobalTable");
importtable(destinationTable, sourceFile, 1);
As shown in the previous example, you can use the modeldir() command
to get the path to the current model file. This makes it convenient to use
CSV files found in the same directory as the model.
The previous example assumes that the first row in the CSV file contains column headers.
For more information on all the parameters to the importtable() command,
see this documentation:
importtable().
Once your data has been successfully imported, you can validate that it meets your assumptions. To learn more, continue to the next topic: Validating Data in Global Tables.