Using Data in Global Tables
Overview and Key Concepts
Once you have imported and validated your data, you are ready to begin using that data as part of your model. This topic describes a few of the common approaches for using Global Tables.
Creating Items from Table Rows
One common type of table is a table of initial inventory. Each row in this kind of table indicates a quantity of items, the SKU for those items, and the location of those items. The model needs to create the items specified in the table at time zero. Use the following steps to create a simple model that creates initial inventory based on a table:
Step 1: Adding Queues and a Global Table
- In FlexSim, create a new model.
- Add three queues to the model. By default, they should be named Queue1, Queue2, and Queue3.
- Add a new Global Table. By default, the table should be named GlobalTable1. For instructions on how to add a Global Table to a model, see Adding Global Tables to a Model.
- Change the number of rows to 10 and change the number of columns to 3. For instructions on how to resize a table, see Editing Global Table Data.
- Use the Copy to Clipboard
button to copy the table to your clipboard.
Alternatively, you can select the data and copy it using Ctrl-C or the right-click menu.
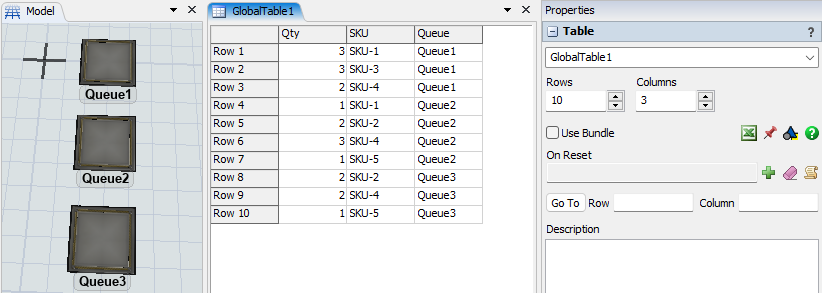
Qty	SKU	Queue
3	SKU-1	Queue1
3	SKU-3	Queue1
2	SKU-4	Queue1
1	SKU-1	Queue2
2	SKU-2	Queue2
3	SKU-4	Queue2
1	SKU-5	Queue2
2	SKU-2	Queue3
2	SKU-4	Queue3
1	SKU-5	Queue3
- Click on the column header of the first column in the new global table. Paste the data using Ctrl-V or through the right-click menu.
The following image shows the model with the 3D view and table view visible:
Step 2: Adding a Process Flow
You'll use some Process Flow activities to create the items specified in the table. Follow these steps:
- In the Toolbox, click the Add button
 , point to Process Flow,
and choose General. This will add a new General Process Flow
to your model.
, point to Process Flow,
and choose General. This will add a new General Process Flow
to your model.
- In the new Process Flow, add a Scheduled Source
 activity.
 - In the Arrivals table, click on the Quantity value in the first row.
- Set the Arrival 1: Quantity field to the following code:
Table("GlobalTable1").numRows - Use the Add button to add a new label assignment.
- Set the Name of the label to Row
- Set the Value of the label to
tokenIndex. The following image shows the activity as it should look at this point: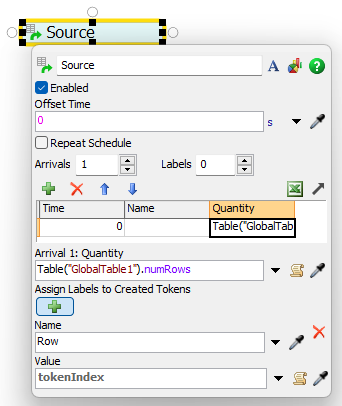
- In the new Process Flow, add a Create Object
 activity.
 - For the Quantity field, click the Picklist button
 and choose By Global Table Lookup. Configure the popup as follows:
- For the Table field, click the Picklist button ,
point to Global Tables, and choose GlobalTable1.
- For the Row field, click the Picklist button ,
point to Labels, and choose token.Row.
- Set the Column field to
1: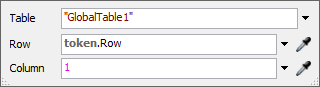
- For the Table field, click the Picklist button
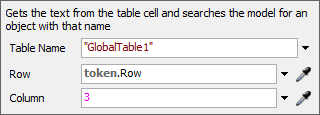
- For the Create Object activity's Create field,
click the Picklist button and choose
By Global Table Lookup. Configure the popup like the previous step, but set the
Column field to
3.
- In the Assign Labels to Created Objects area, use the Add button to add a new label assignment.
- Set the Name of the label to
SKU. - For the Value field,
click the Picklist button , point to
Table, and choose By Global Table Lookup.
- Configure the popup as you did in previous steps, except set the Column
field to
2. - Connect the Scheduled Source to the Create Object activity.
When you reset and run the model, flowitems will be created in each queue with the correct SKU label as specified by the Global Table. Try changing values in the table and then resetting and running the model again.
Creating Events from Global Table Rows
Another common type of table is an event history table. This kind of table might be contain a history of order arrivals, customer arrivals, machine breakdowns, or any other event. You can use Process Flow to re-create these events in a simulation model. This section contains steps for re-creating a simple order history. Follow these steps to get started:
- In FlexSim, create a new model.
- Add a new Global Table. By default, the table should be named GlobalTable1. For instructions on how to add a Global Table to a model, see Adding Global Tables to a Model.
- Change the number of rows to 7 and change the number of columns to 2. For instructions on how to resize a table, see Editing Global Table Data.
- Use the Copy to Clipboard
button to copy the table to your clipboard.
Alternatively, you can select the data and copy it using Ctrl-C or the right-click menu.
OrderID	ReleaseTime
1014	3.62
1015	6.90
1016	10.78
1017	10.97
1017	11.40
1018	12.18
1019	13.31
- Click on the column header of the first column in the new global table. Paste the data using Ctrl-V or through the right-click menu.
- In the Toolbox, click the Add button
, point to Process Flow,
and choose General. This will add a new General Process Flow
to your model.
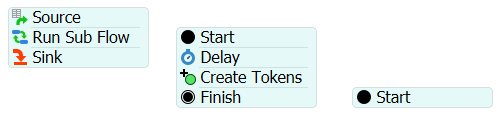
- Create the following activities in the Process Flow:
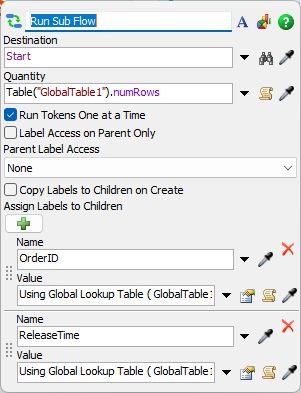
- Configure the Run Sub Flow activity:
- For the Destination field, click the Sampler
button
 and click the nearby Start activity.
- Set the Quantity field to the following code:
Table("GlobalTable1").numRows - Check the Run Tokens One at a Time box.
- Uncheck the Label Access on Parent Only box.
- Set Parent Label Access to Read
- In the Assign Labels to Children area, click the Add
button to add a new label assignment.
- Set the Name of the label to
OrderID. - For the value of the label, click the
Picklist button ,
point to Table, and choose By Global Table Lookup.
- In the popup, use the Table picklist button to choose GlobalTable1.
Use the Row picklist button to choose
creationRank. Set the Column value to1. Click off the popup to close it. - In the Assign Labels to Children area, click the Add
button to add a new label assignment.
- Set the Name of the label to
ReleaseTime. - Use the By Global Table Lookup as in the previous steps, but specify Column
2.
- For the Destination field, click the Sampler
button
- Configure the Delay activity. Set the Delay Time
value to the following:
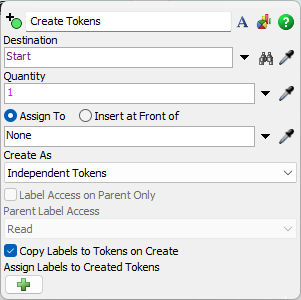
token.ReleaseTime - Model.time - Configure the Create Tokens activity:
- Use the Destination sampler to choose the nearby Start activity.
- Set the Create As property to Independent Tokens.
- Check the Copy Labels to Tokens On Create box.
When you reset and run the model, tokens will appear on the final Start activity at the times specified in the table. You can click on a token to verify that its entry time matches the time in the table.