The Storage System
Overview and Key Concepts
The Storage System tool provides global settings and functionality for all Storage.Objects within a model.
This tool can query all Slots across all Storage Objects. You can use this ability to find the correct place in storage for inbound inventory. For more This tool can also query all Storage.Items across all Storage Objects. You can use this ability to find the correct item to pull from storage for outbound inventory. You can configure this tool to optimize these queries.
This tool also allows you to specify one or more Address Schemes for the model. Most Warehouse Management Systems (WMS) record an item's location using an adress, which is a combination of numbers, letters, and separators that uniquely identify a slot. You can use Address Schemes on the Storage System to interpret slot addresses from an external WMS for use in the simulation model.
This tools also specifies the complete look of each type of Storage Object. You can customize how an object looks by adding or removing surfaces, as well as settings the texture and color of each surface. You can also choose to display information about each slot visually. For example, you could display a square of a certain color, depending on a slot's label value.
This tool also has events. You can listen to the events of any Slot, as items enter, exit, or are assigned to a slot.
In FlexScript, you can access this tool using
Storage.system.
Storage.Item and Storage.Slot.Item
There are two classes for working with flowitems in the Storage System. The first is Storage.Item. You can use this class by using the Storage.Item constructor:
Object item; // a flowitem reference
Storage.Item storageItem = Storage.Item(item);
The above code will assert Storage.Item data for the given flowitem. A Storage.Item
object is the Storage System's record of the flowitem. To assign an item to a slot,
you set the assignedSlot property to the desired slot:
Slot slot; // a slot reference;
storageItem.assignedSlot = slot;If you assign a slot, and then move the flowitem into the Storage Object containing the slot, the flowitem will be placed in the correct slot.
The second flowitem-based class is Storage.Slot.Item. This class accessed from a specific slot:
Slot slot; // a slot reference
Storage.Slot.Item slotItem = slot.slotItems[1];
When you assign a Storage.Item to a slot, the slot creates
a Storage.Slot.Item object. Each slot keeps a list
of items (accessed through slotItems) that have been assigned
to the slot, or that are currently in the slot. The Storage System's methods
findItem()
and
queryItems()
search each slot's list of Storage.Slot.Item objects. When you
virtualize a flowitem, the Storage.Slot.Item object remains.
Finding Slots
A slot can have labels. For example, you could add a SKU label to each slot, indicating which SKU can be stored in that slot. You could then write code like the following to find a slot for an item, based on the item's SKU label:
Storage.Slot slot = Storage.system.findSlot(
	"WHERE SKU = $1.SKU AND slot.hasSpace($1)", 0, item
);
You can then check whether the query succeeded using an if statement:
if (slot) {
	// Assign the item to the slot, so that slot.hasSpace() will
	// account for this item in future searches.
	storageItem.assignedSlot = slot;
}
In cases like this, you can choose to index the SKU label on the slots.
If you index a label (like the SKU label), then the query that runs
in the findSlot() method won't have to search all
slots in the system, and can limit the search to just the slots that
have the matching label. If you change a slot label that has been
indexed, the index will automatically update.
Finding Items
When you want to retrieve an item from storage, it is often acceptable to retrieve an item that has certain attributes, rather than retrieving a specific item. For example, if your items in inventory have a SKU label, you could find the item based on its SKU:
Storage.Slot.Item slotItem = Storage.system.findItem(
	"WHERE Type = $1", 0, 2
);
You can then check whether the query succeeded with an if statement:
if (slotItem) {
	// Unassign the assignedSlot to make it "outbound".
	// Outbound items are excluded by default when using findItem().
	slotItem.storageItem.assignedSlot = 0;
}
In cases like this, you can choose to index the SKU label
on the items. If you index item labels, the query that runs
in the findItem() method won't have to search
all items in the system, and can limit the search to just
items that have a matching label.
Virtual Items
For models with high quantities of flowitems in inventory (10,000+ items), memory use and draw speed can both become issues. In these situations, you can choose to virtualize items. This means that when an item enters a Storage Object, the item itself is destroyed. The Storage System will keep essential label values and visual properties about the item. This information is kept on the Storage.Slot.Item object for that item. If you attempt to access a virtual item, the item will immediately be unvirtualized, meaning the flowitem will be recreated with the saved label values and visual properties.
Because only minimal information is kept, virtualizing items can save significant memory. In addition, virtual items are also able to draw significantly faster. The drawback is that the flowitem is destroyed, which can make some models a little more difficult to create.
Address Schemes
In warehousing, an Address is text that uniquely identifies a slot. As an arbitrary example, consider these addresses:
"3-5-07052", "1-1-05061"Using an Address Scheme, you can tell the Storage System how to interpret these strings, and get the correct Slot. In this example, you would specify the following components:
- A number. This is the Zone of the slot.
- A hyphen. This separates the Zone from the rest of the address.
- A number. This is the Aisle of the slot.
- A hyphen. This separates the Aisle number from the rest of the address.
- A two-digit number. This is the Bay number.
- A two-digit number. This is the Level number.
- A one-digit number. This is the Slot number.
Once you have defined an Address Scheme, you can use the getSlot() method to find a slot in the model based on an address:
Storage.Slot slot = Storage.system.getSlot("3-5-07052");You can also access the address of a given slot:
string addr = slot.address;You can define more than one Address Scheme. The Storage System will use the first scheme that matches the input value to resolve the address.
Events
For information on events, see the Event Listening page.
The Storage System object has the following events:
On Slot Entry
This event is fired when any item enters a slot in any Storage Object. When this event fires it will execute the on slot entry trigger where you can execute custom logic using FlexScript or preconfigured pick options.
It has the following parameters:
| Event Parameter | Type | Explanation |
|---|---|---|
| Slot | Storage.Slot | The slot entered by the flowitem. |
| Item | Object | The flowitem entering the slot. |
On Slot Exit
This event is fired when any item exits a slot in any Storage Object. When this event fires it will execute the on slot exit trigger where you can execute custom logic using FlexScript or preconfigured pick options.
It has the following parameters:
| Event Parameter | Type | Explanation |
|---|---|---|
| Slot | Storage.Slot | The slot exited by the flowitem. |
| Item | Object | The flowitem exiting the slot. |
On Slot Assign
This event is fired when any item is assigned to a slot in any Storage Object. When this event fires it will execute the on slot assign trigger where you can execute custom logic using FlexScript or preconfigured pick options.
It has the following parameters:
| Event Parameter | Type | Explanation |
|---|---|---|
| Slot | Storage.Slot | The slot the flowitem has been assigned to. |
| Item | Object | The flowitem assigned to the slot. |
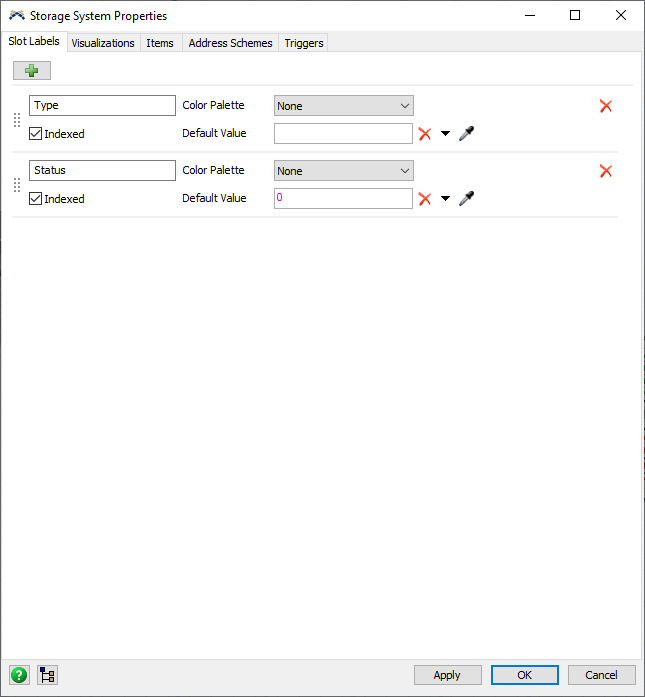
The Slot Labels Tab
The Slot Labels tab has the following properties:
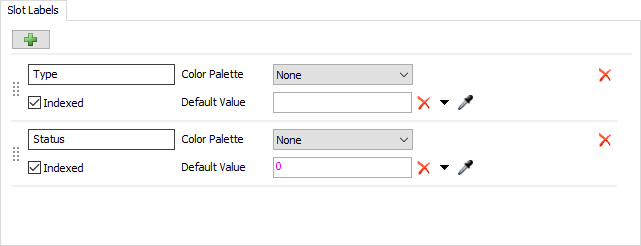
Labels List
You can add labels to the Slot Labels list. This list is consulted when you read or write any Slot Label, either in FlexScript or in a query.
When you read a slot's label, the slot first checks for its own Type label. If it has the Type label, then it returns the value of the label. If the slot doesn't have the Type label, then it checks the Slot Labels list on the Storage Object. If the Type label is listed there, then the default value for that label is returned. Otherwise, you will get an exception for trying to read a non-existent label. This is true for any label access on a slot, including in a query.
Writing a slot label value has much the same behavior as any other object with dynamic labels; if the label is not present, it will be added to the slot. Then the label will be set to the new value. However, a slot will also check the Slot Labels list, to see if the label is indexed. If it is, the Storage System will immediately update the index for that label.
Choosing to index a label means that queries can filter using this label without searching through all slots, which can significantly improve performance. For example, if you wish to filter slots using a SKU label, you would add the SKU label to the list, and mark it as indexed. Then, the following query would have improved performance:
Storage.system.findSlot("WHERE SKU = $1.SKU", 0, item);For more information about what queries can benefit from an index, see the SQL Queries topic.
Each entry in the Labels List has the following properties:
- Label Name - Specifies the name of the label to add to the Labels List.
- Color Palette - Specifies which color palette to use for the Slot Painter, as well as in label color based visualizations.
- Indexed - Check this box to index the label with an unordered index.
- Default Value - Specifies the default value if a slot doesn't have this label.
The Visualizations Tab
The Visualizations tab has the following properties:
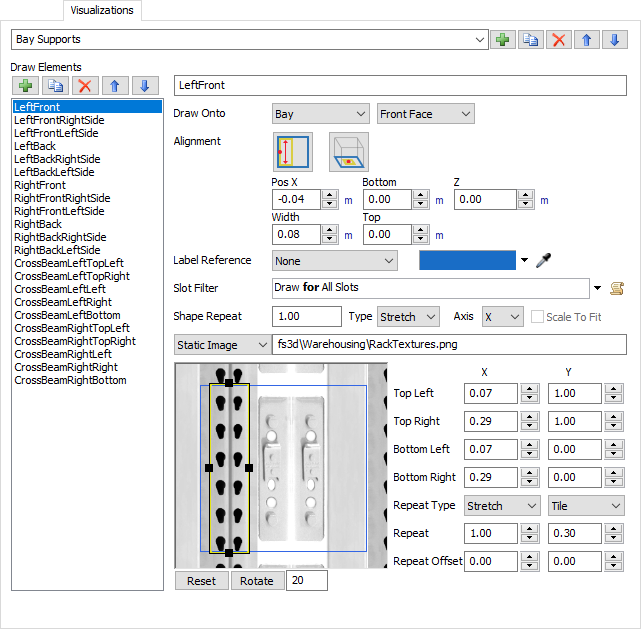
Visualizations Area
You can use the Visualizations Area to rename, add, duplicate, remove, or reorder visualizations. You can also choose which visualization you wish to currently edit. A visualization defines all aspects of how a particular Storage Object draws. Each Storage Object can use one of the visualizations to display correctly.
Draw Elements Area
The Draw Elements Area allows you to edit details about each of the draw elements used by a particular visualization. It has the following properties:
- Draw Elements List - This list shows all the elements of the current visualization. You can use this list to add, duplicate, remove and reorder the visualization elements in the list.
- Element Name - Use this field to specify the name of the selected Draw Element.
- Draw Onto - Use these two fields to specify the extent of the element's coordinate system, as well as which face the element belongs on.
- Alignment - Use these two fields to specify the origin of the draw element's coordinate system.
- Pos X/Width - For certain alignments, you can specify the starting x position of the element, as well as the width of the element.
- PosY/Height - For certain alignments, you can specify the starting y position of the element, as well as the height of the element.
- Left/Right - For certain alignments, you can specify the position of the left and right sides.
- Top/Bottom - For cetain alignments, you can specify the position of the top and bottom sides of the element.
- Z - Specifies the Z position of the draw element, relative to the element's coordinate system.
- Label Reference - Specifies a Slot Label to reference for this draw element.
- Color - Specifies how the element should be colored.
- Slot Filter - Determines whether the slot should draw the given element. If the element is drawing onto something that contains many slots, this function is evaluated for all slots within the element. If the function returns true for any slot, the element is drawn.
- Shape Repeat - Specifies the Repeat of the element. If the Type is Stretch, then this value specifies how many instances of the image will appear. If the type is Tile, then this value specifies the distance between instances in model units. If the Type is Tile and Scale to Fit is checked, then this value is the minimum distance between instances.
- Type - Specifies the method to use to repeat a texture. Possible options are Stretch or Tile.
- Axis - Specifies which axis to repeat along.
- Scale To Fit - Check this box to scale to fit. This will evenly place as many instances as possible along the face while keeping the minimum distance between instances.
For Draw Elements that deal with images or color, the following properties will also be present, for both the x and y directions:
- Image Type - Specifies whether the image is static or dyanmic. If you choose Static Image, then you must also specify the path to an image. If you choose Dynamic Image, then you must specify code that will return an image, based on the slot.
- Corner Positions - You can specify the coordinates of a rectangle to use for the image. In this way, a single image can be used for multiple draw elements. Only the part of the image shown within these coordinates will appear on the draw element.
- Repeat Type - Choose the type of repeat. Possible options are Stretch or Tile.
- Repeat - If the Repeat Type is Stretch, this value specifies a scaling factor to apply to the image. If the Repeat Type is Tile, then this value specifies the distance (in model units) to show the texture over before repeating.
- Repeat Offset - Choose the offset of the repeat.
- Reset - Click this button to reset the texture coordinates to include the entire image.
- Rotate - Click this button to rotate the capture area of the image by the specified number of degrees.
For Draw Elements that deal with text, the following properties will also be present:
- Draw Text - Specify what text to draw.
- Justification - Specify whether the text should be left, center, or right justified.
- Alignment - Specify whether the text should be top, middle, or bottom aligned.
- Word Wrap - Specify whether the text should wrap.
- Text Scale - Specify the height of the text relative to the height of the element.
- Scale to File - Check this box to scale the text vertically until it fits horizontally within the text.
For Draw Elements that deal with wireframes, the following properties will also be present:
- Line Width - Specify how thick (in pixels) to draw the lines of a wireframe.
For Draw Elements that reference other visualizations, the following properties will be present:
- Visualization - Specifies which other visualization to include as part of the current visualization.
The Items Tab
The Items tab has the following properties:
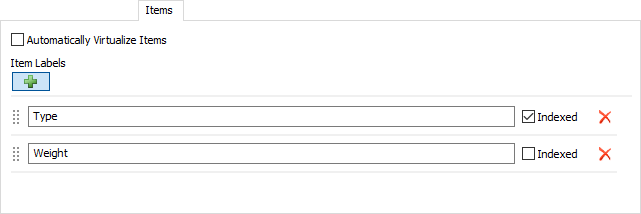
Automatically Virtualize Items
You can check this box to virtualize items. This means that when an item is placed in a slot, the item will be destroyed. The Storage System will preserve minimal information about that item, such as its spatial and color information. This way, the item will still be drawn. In addition, any labels listed in the Item Labels list will also be preserved. When you later need to access the item (perhaps to retrieve it from storage), the item will be recreated as soon as it is accessed.
Item Labels
You can use this list to enumerate the key labels you expect your items to have. There are two possible reasons to list a label here:
- You want to preserve the labels in this list during virtualization, and/or
- You want to index the item label.
Storage.Slot.Item slotItem = Storage.system.findItem(
	"WHERE Type = $1", 0, 2
);The Address Schemes Tab
You can use this tab to define one or more address schemes. An address scheme is most useful when you have input data that uses per-slot identifiers. For example, you might have a table that represents a snapshot of inventory in a warehouse, describing the items in each slot. Or you might have a table that describes the slots that pickers picked from in order to fulfill an order. In either case, the slot is usually identified with an address. The address is a sequence of numbers, letters, and separators that uniquely identify a slot. Setting up an address scheme allows the Storage System to interpret an address and return the correct slot, using the getSlot() method.
When trying to find a slot by address, the storage system will the list of schemes one at a time, to see if the given address matches the scheme. When it finds a matching scheme, then the storage system parses each component of the scheme. First, the storage system will extract the Zone ID and Aisle ID from the address. It will then find all storage objects that have the matching Zone and Aisle IDs. the storage system will extract the Bay, Level, and Slot ID from the address, and check each of the storage objects in the matching zone and aisle for that slot.
In order for the search to work correctly, you must configure each rack object correctly. If you address scheme includes a Zone and Aisle ID, you should set those values on each rack object. You should also make sure that the values for each rack's address mapping is configured correctly. For more information, see the Address Mapping Panel topic.
The Address Schemes tab has the following properties:
Scheme List Area
You can use this area to rename, add, duplicate, remove, and reorder address schemes.
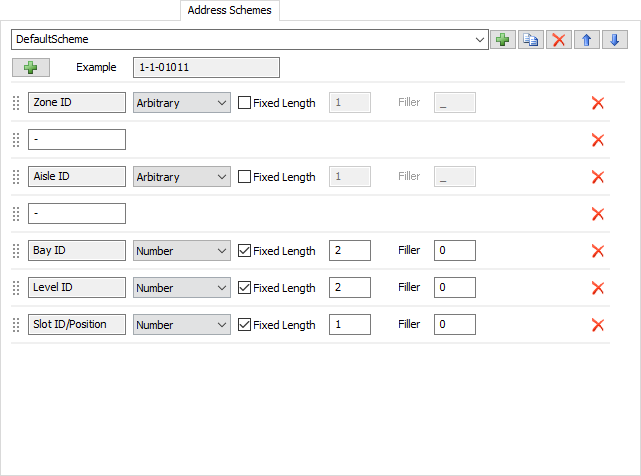
Scheme Component Area
You can use this area of the tab to add, remove, and reorder components in the address scheme. Each component has the following properties:
- Component Type - Displays the type of component (Zone ID, Aisle ID, etc.). If the component is a separator, you can edit this field to contain the text of the separator.
- Numbering Type - Specifies whether a component is numbered using numbers or letters. The Zone and Aisle ID can be arbitrary text, in addition to letters or numbers. Bay, Level, and Slot IDs will respect the address mapping settings. For example, if an address contains the value "D" for a bay, and a storage object has a start bay of 2 and a bay stride of 2, then Bay "D" would indicate the second bay in that object; the first bay would be considered Bay "B".
- Fixed Length - Check this box to indicate that the address component has a fixed number of characters. If so, the component value will be extracted by the number of characters. Otherwise, the component value will include all characters until the next separator.
- Length - If Fixed Length is checked, you can use this field to indicate the number of characters in the component.
- Filler - If Fixed Length is checked, you can indicate leading characters that can be ignored. For example, a Bay ID might be "007", a fixed-length component with a length of 3 and a filler of "0".
The scheme component area has an example field that shows an example address, based on the scheme. You can compare that example with actual addresses to verify that the pattern matches correctly.
The Triggers Tab
The Storage System has three available triggers:
- On Slot Entry
- On Slot Exit
- On Slot Assign