Reinforcement Learning Training
Training Overview
Before beginning to train a reinforcement learning algorithm, you should ensure that you have reviewed Key Concepts About Reinforcement Learning. As part of preparing for training, you should have downloaded the included python scripts and configured an environment to run them. Now, we will modify and use those scripts as an example of how you can train a reinforcement learning algorithm using a FlexSim model as the environment where the agent learns.
Preparing a FlexSim Model
Before we execute any scripts to begin training, we must first configure a FlexSim model so that it is ready to respond to the functions involved in training a reinforcement learning algorithm. For this example, we will build a simple example model so that we can focus on the reinforcement learning rather than on the simulation model itself.
In the model, we will have items that arrive with random item types between 1 and 5. We will process those items using a processor with a setup time that varies when changing item types. We will train an algorithm to pick which item to process next in order to maximize throughput. We will let the algorithm learn to minimize changeover times rather than explicitly programming rules to govern which item to pull next.
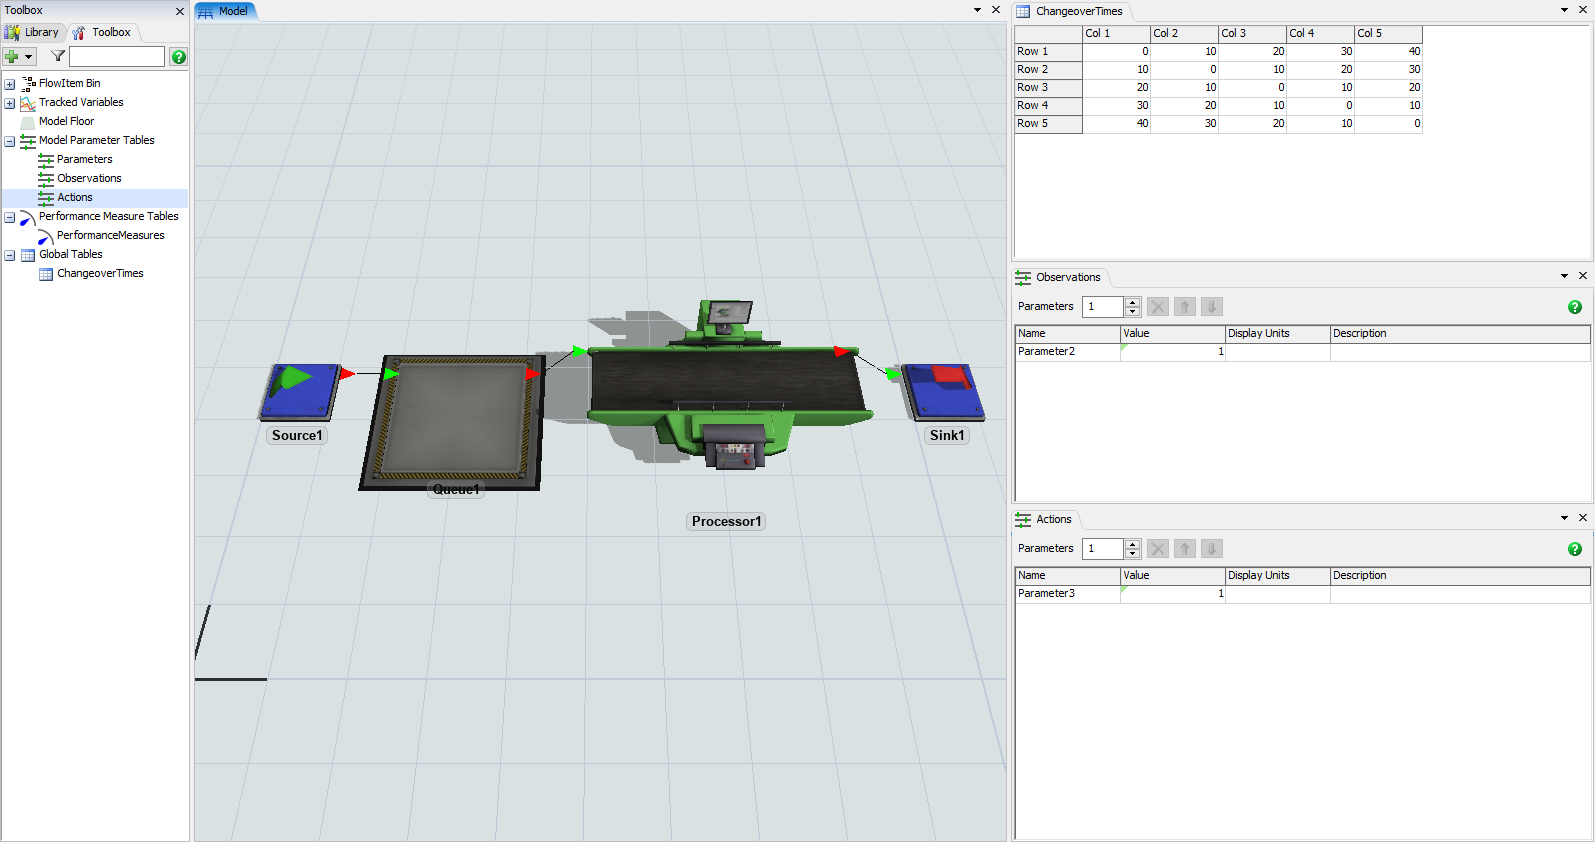
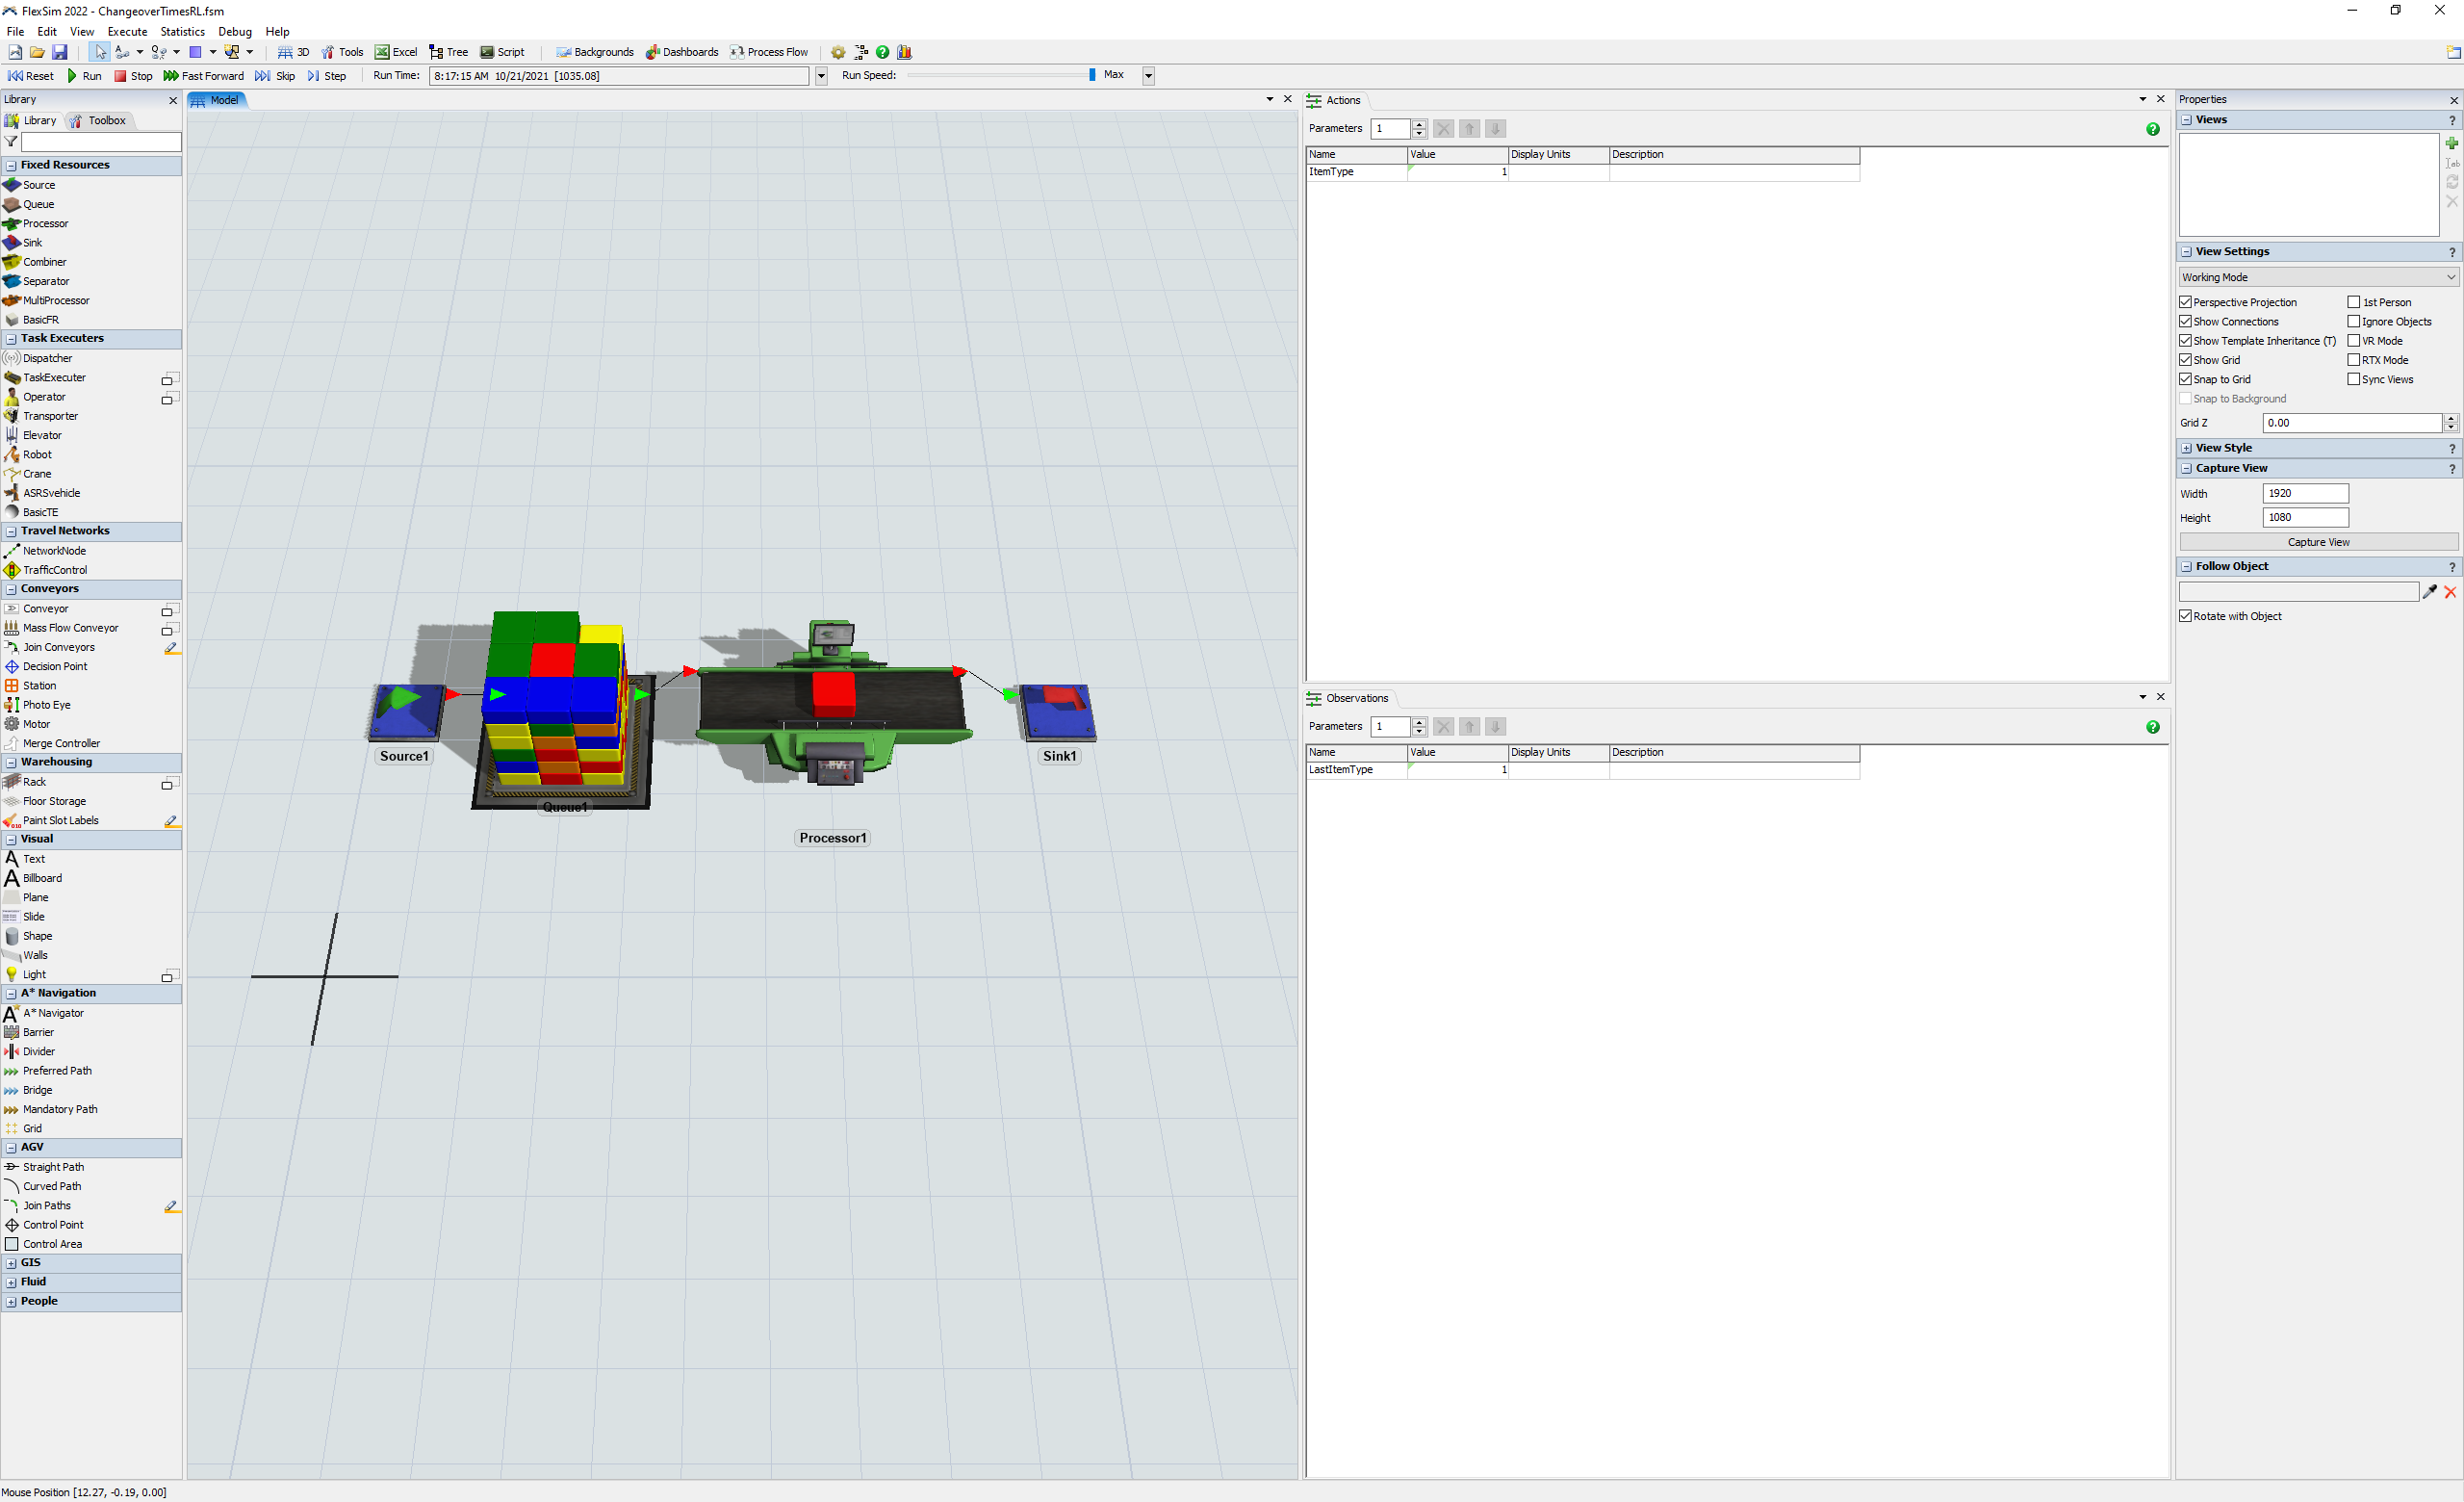
Step 1 Creating a Simple Model
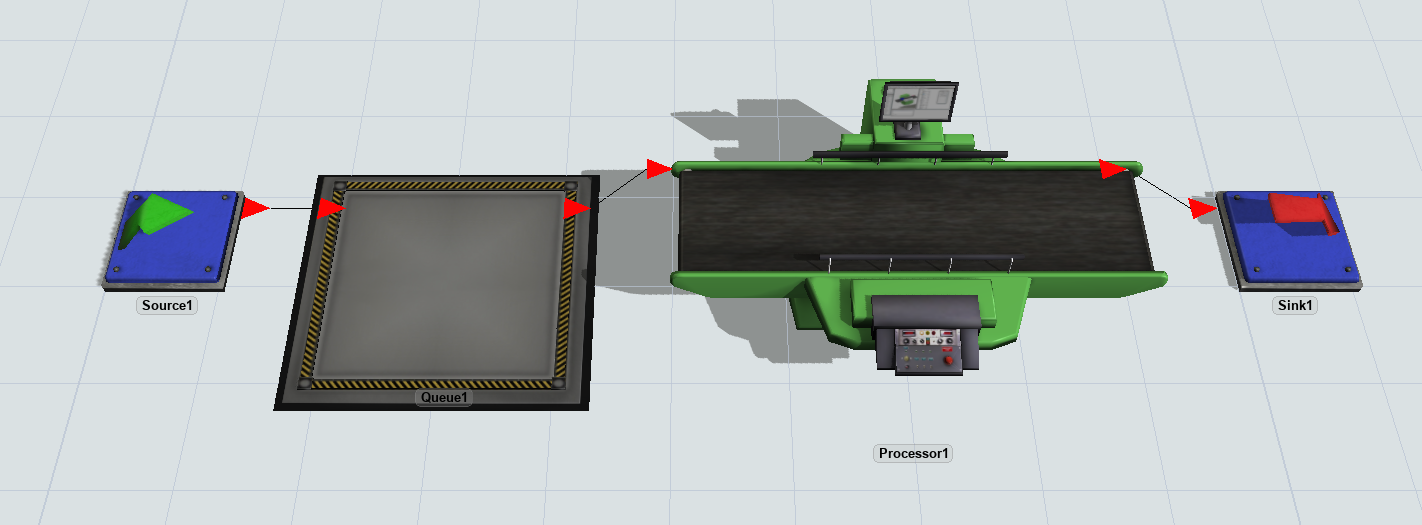
- Drag a Source, Queue, Processor, and Sink into a new model.
- Connect the objects as shown below.
- In the Toolbox pane, add a Global Table.
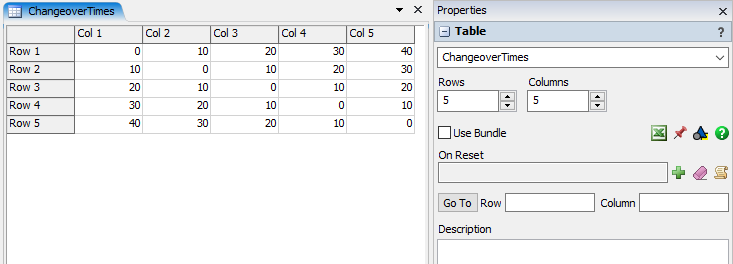
- In the Global Table's Properties pane, change the name to ChangeoverTimes and set the number of rows and columns to 5.
- Enter the following data into the table. Each cell represents the amount of setup time required when processing different item types. For example, changing from item type 1 to 4 requires 30 seconds of setup time.
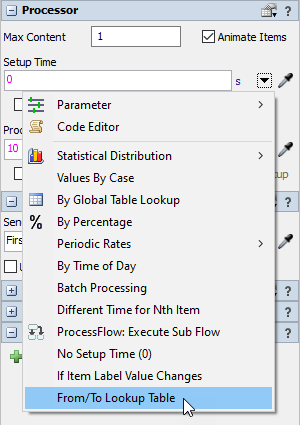
- Click on the Processor to edit its Properties.
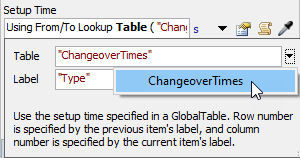
- In the Setup Time field, select From/To Lookup Table from the dropdown.
- Select ChangeoverTimes for the Table and leave the Label as "Type".
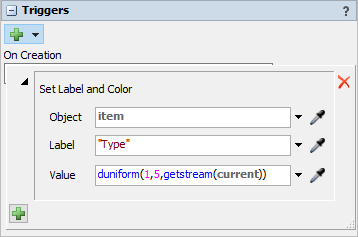
- Click on the Source to edit its Properties.
- Add an On Creation trigger and select Data > Set Label and Color.
- Modify the Value to be
duniform(1,5,getstream(current)) - Save the model with the name ChangeoverTimesRL.fsm
- Reset and Run the model. Verify that the processor includes a setup time when changing item types.
Step 2 Preparing Action and Observation Parameters
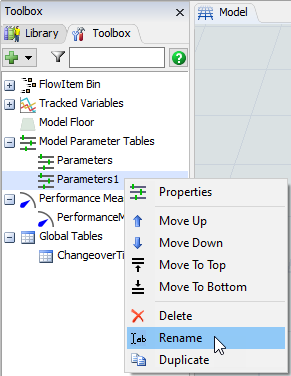
- In the Toolbox pane, add a Statistics > Model Parameter Table.
- Right-click on the new Parameters1 table and select Rename.
- Type Observations as the new name for the table.
- In the Toolbox pane, add another Statistics > Model Parameter Table.
- Right-click on the new Parameters1 table and select Rename.
- Type Actions as the new name for the table.
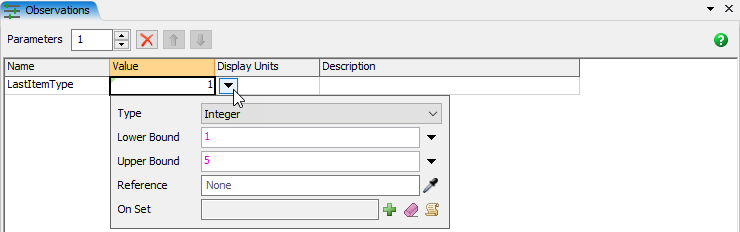
- In the Observations table view, rename Parameter2 to LastItemType.
- In the Observations table view, click on the cell showing the value 1.
- Click on the dropdown button to open a popup to modify the properties of that Parameter.
- Change the Type to Integer and the Upper Bound to 5.
- Click on blank space in the Observations table view to apply and close the popup.
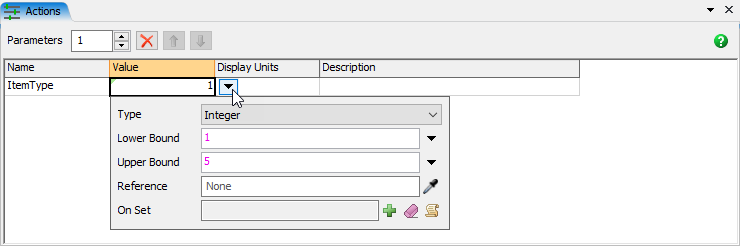
- In the Actions table view, rename Parameter3 to ItemType.
- In the Actions table view, click on the cell showing the value 1.
- Click on the dropdown button to open a popup to modify the properties of that Parameter.
- Change the Type to Integer and the Upper Bound to 5.
- Click on blank space in the Actions table view to apply and close the popup.
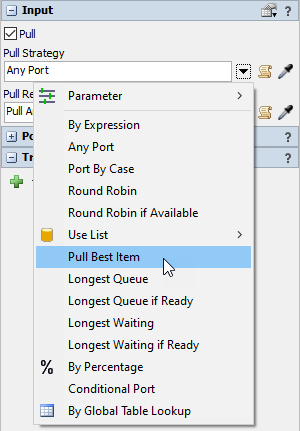
- Click on the processor. In the Properties pane, expand the Input panel and check the Pull box.
- In the Pull Strategy dropdown, select the Pull Best Item option.
- Change the Label dropdown to Custom Value, and enter the following code snippet for the Expression.
- Save the model.
- Reset and Run the model. Verify that the processor pulls red items (Type 1) if they are available.
item.Type == Model.parameters["ItemType"].value
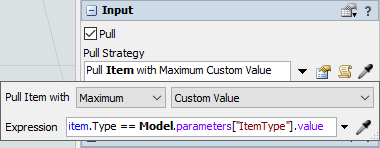
This will cause the processor to pull an item that matches the ItemType parameter if one is available. Otherwise, it will pull the oldest item.
Step 3 Configuring Reinforcement Learning
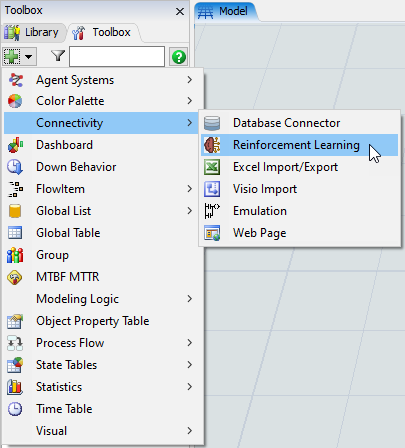
- In the Toolbox pane, add a Connectivity > Reinforcement Learning tool.
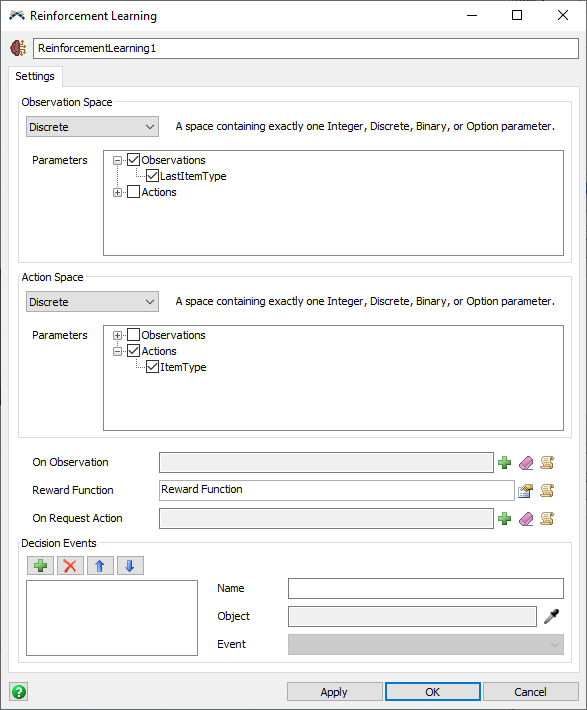
- In the Observation Space group, select Discrete from the dropdown menu.
- In the Parameters expand Observations and check LastItemType.
- In the Action Space group, select Discrete from the dropdown menu.
- In the Parameters expand Actions and check ItemType.
- Click on the Apply button to save your changes.
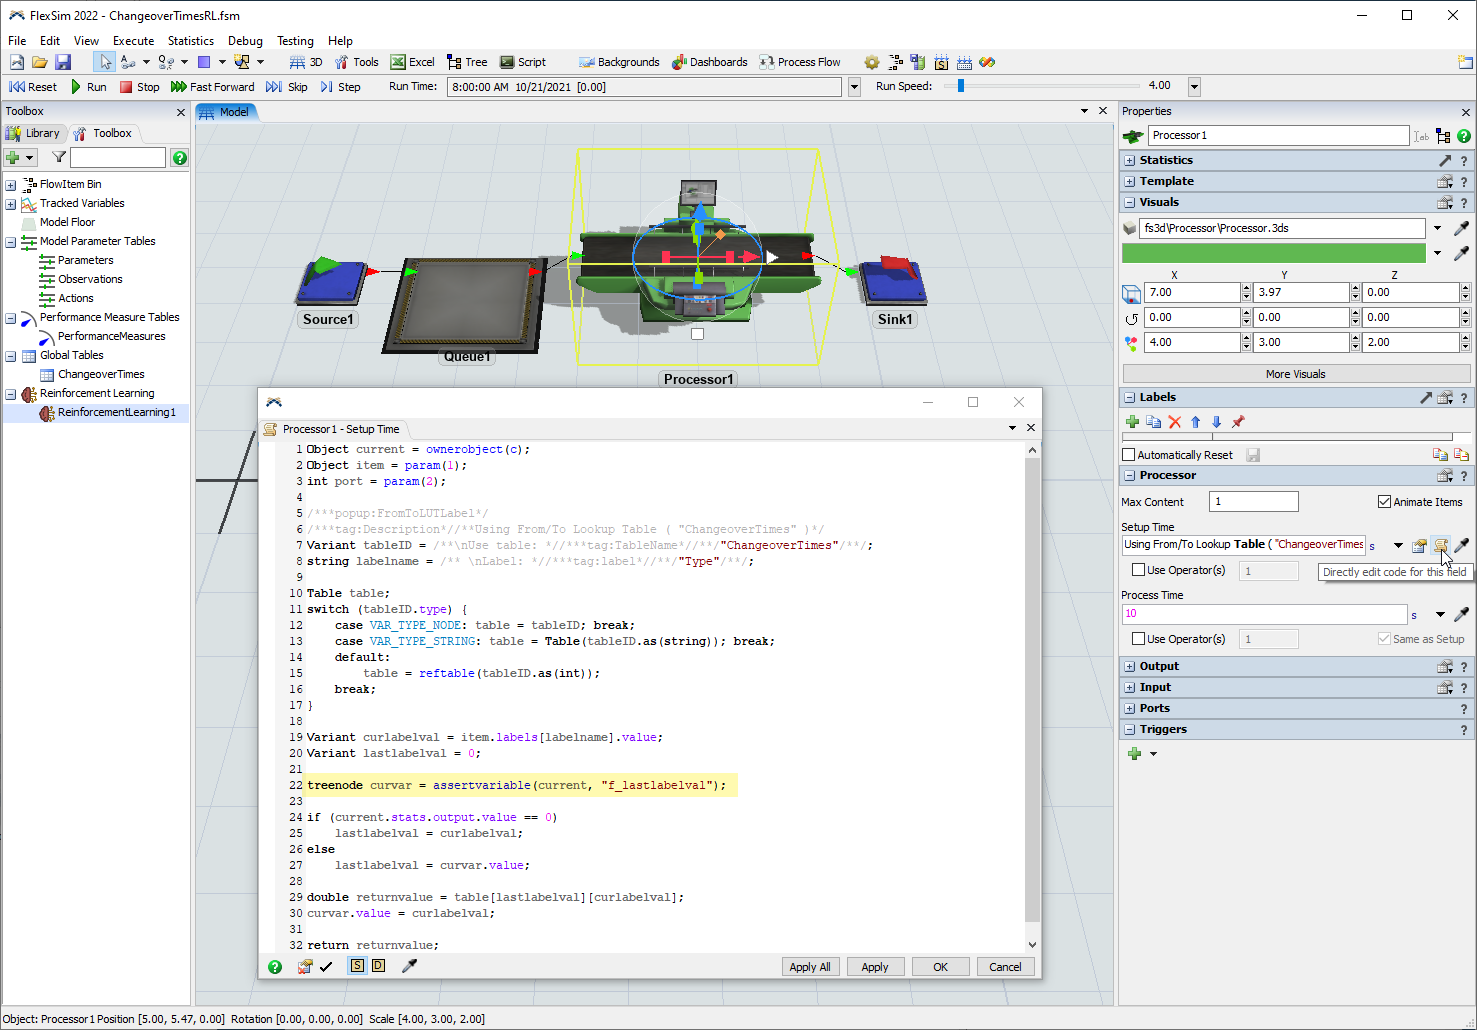
- If you click on the processor and press the Code button on its Setup Time picklist, you can see that the code sets a variable named
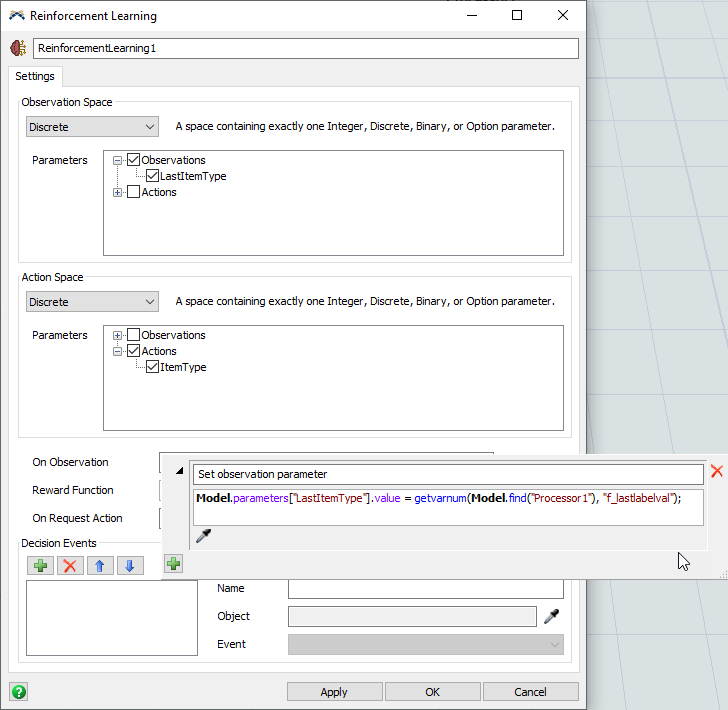
"f_lastlabelval". We will use this variable to set the LastItemType observation parameter from within the On Observation callback of the Reinforcement Learning tool. - In the Reinforcement Learning properties window, press the Add button by the On Observation trigger and select Code Snippet.
- Change the description text from Code Snippet to Set observation parameter.
- Type or paste the following code snippet into the field.
- Before we fill out the Reward Function, we want to configure the sink to accumulate a reward amount on a label as items leave the model.
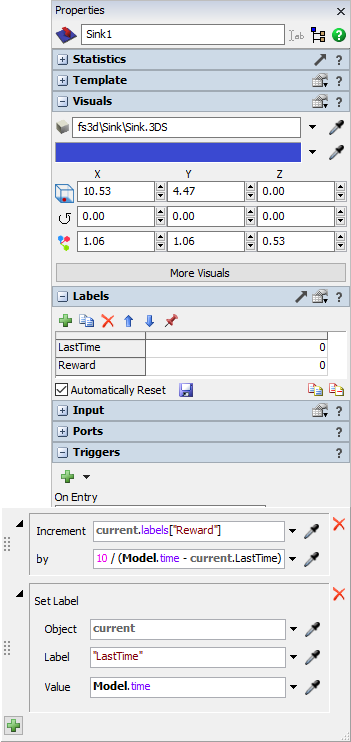
- Click on the sink in the 3D View. In the Labels pane, add a Number label and name it LastTime.
- Add another Number label and name it Reward.
- Check the Automatically Reset button, and press the save icon to save the label reset values as 0.
- In the Triggers panel, add an On Entry trigger.
- Add a Data > Increment Value option to the trigger.
- In the Increment dropdown, select or type
current.labels["Reward"] - In the by field, enter
10 / (Model.time - current.LastTime) - Add a Data > Set Label option to the trigger.
- Change the Object to current and the Label to "LastTime".
- For the Value, enter
Model.time - Back on the Reinforcement Learning properties window, edit the parameters for the Reward Function.
- Change the description text from Reward Function to Reward based on throughput.
- Type or paste the following code snippet into the field.
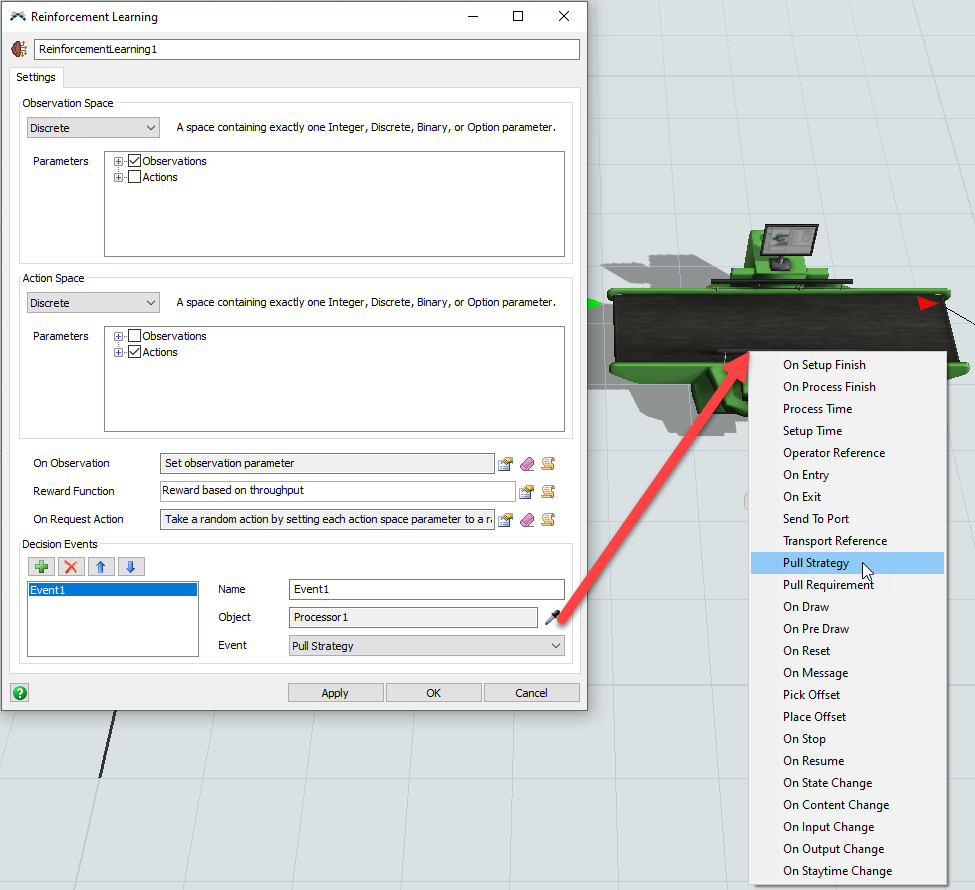
- In the On Request Action trigger, add the option to Take a Random Action.
- In the Decision Events group, add a new event reference and sample the processor's Pull Strategy event.
- Click on the OK button to apply your changes and close the window.
- Save the model.
- Reset and Run the model. Verify that the processor now pulls random items based on the ItemType parameter changing randomly before each pull. If the queue does not have the requested item type, the processor should pull the first item in the queue.
Model.parameters["LastItemType"].value = getvarnum(Model.find("Processor1"), "f_lastlabelval");
This will give a larger reward for items that processed faster, and a smaller reward if the item had a long changeover time.
double reward = Model.find("Sink1").Reward;
Model.find("Sink1").Reward = 0;
int done = (Model.time > 1000);
return [reward, done];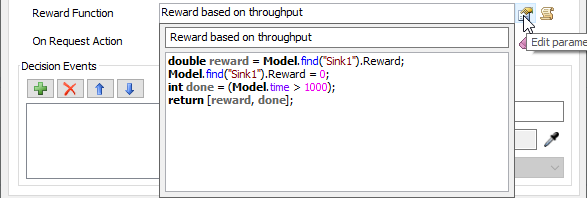
This will cause a reward to be given for each item that has left the model since the last observation. It also specifies that a training episode is done once the model has run for at least 1000 seconds.
The On Request Action trigger fires when the model is run normally, not in training mode. For now, we will have the model take random actions when run normally.
Testing the Environment Connection
We will now return to the Python scripts to begin training. You should ensure that you have reviewed Key Concepts About Reinforcement Learning and that you have downloaded the included python scripts and configured a development environment to run them.
The flexsim_env.py script contains the definition for a FlexSimEnv class that we can use to communicate from Python to FlexSim. It has functions for launching FlexSim with a model and communicating with the model using sockets.
In the flexsim_env.py file, a main() function is defined that can be used to test the connection from Python to FlexSim.
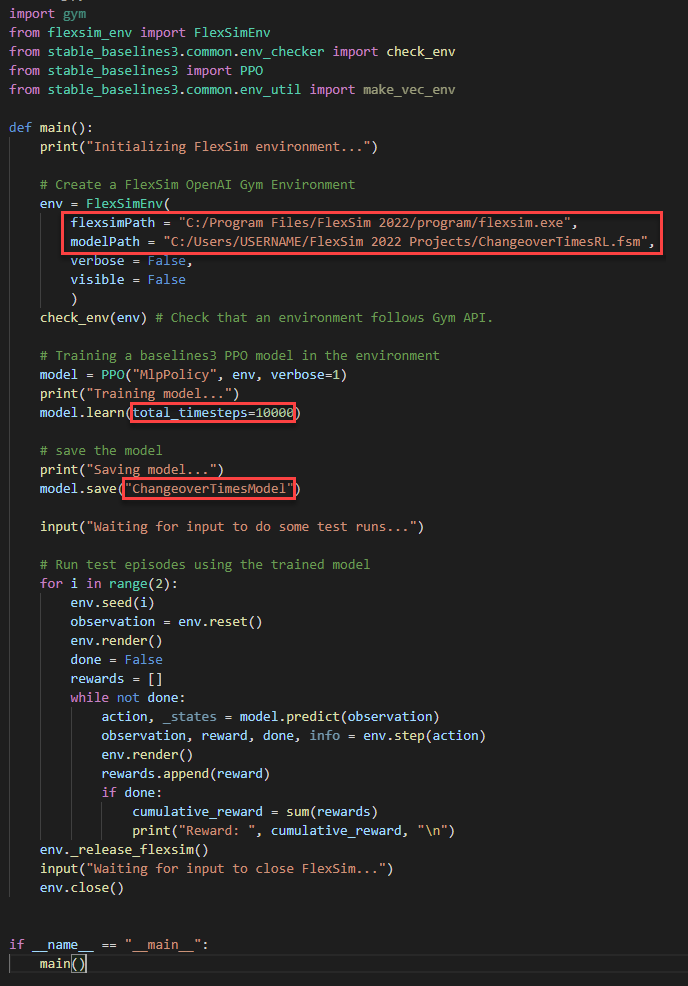
- Near the bottom of the flexsim_env.py script, modify the flexsimPath and modelPath to reference the location where FlexSim is installed and where the model is saved. For example:
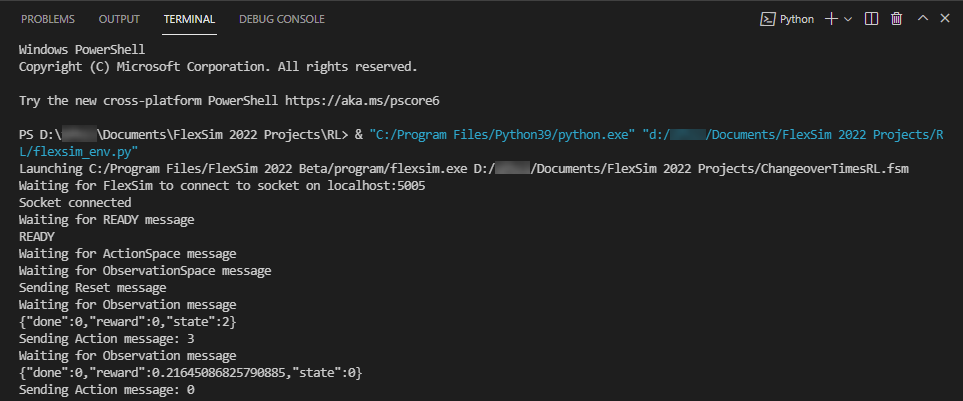
- Run the flexsim_env.py script by pressing the Run Python File button at the top.
- In the python terminal window, press any key to close FlexSim and end the python process.
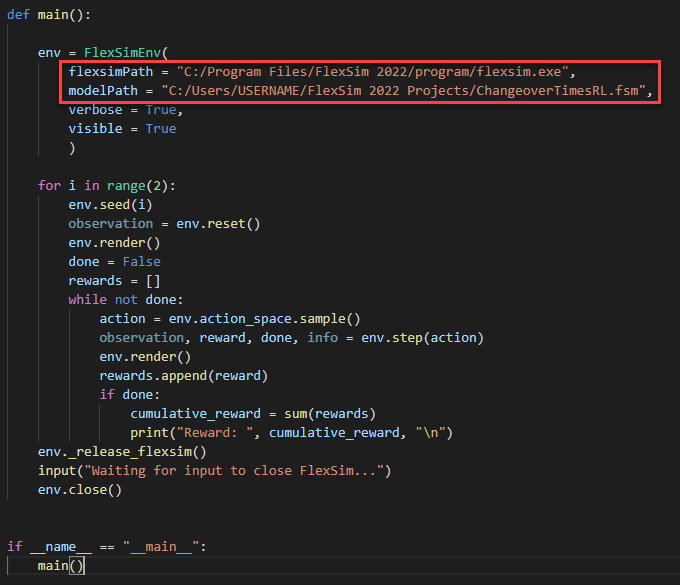
Be sure to use slashes '/' within the path. Do not use backslashes '\'. The backslash character is a special escape character within Python strings.
If everything is configured correctly, the script should launch a new instance of FlexSim with the model open. The python terminal window should print statements describing each step of what is happening.
If you receive any errors about missing package dependencies or Access Denied permission issues, then you will need to
adjust the configuration of your Python environment to resolve those issues. The _launch_flexsim(self) function calls the
python function subprocess.Popen(args), which may require Administrative permission to execute.
The environment has two additional parameters verbose and visible that control whether the script prints to the python output and whether FlexSim appears as a visible window.
The environment also has two parameters address and port that control the socket connection to FlexSim. By default, it uses 'localhost' on port 5005, but you can override those values when you create an instance of the FlexSimEnv class.
Training the Algorithm
If the flexsim_env.py script was able to successfully launch FlexSim and run test episodes of the model, then you are ready to train a reinforcement learning algorithm.
The flexsim_training.py script contains an example function that uses a FlexSimEnv to train a Stable Baselines3 PPO algorithm.
- In the flexsim_training.py script, modify the flexsimPath and modelPath to reference the location where FlexSim is installed and where the model is saved.
- Run the flexsim_training.py script by pressing the Run Python File button at the top.
- To fix missing packages errors, use the python terminal window to install the missing packages. For example, enter the command "pip install stable-baselines3" to install the stable-baselines3 package.
- Press the Run Python File button to execute flexsim_training.py again once the required packages are installed.
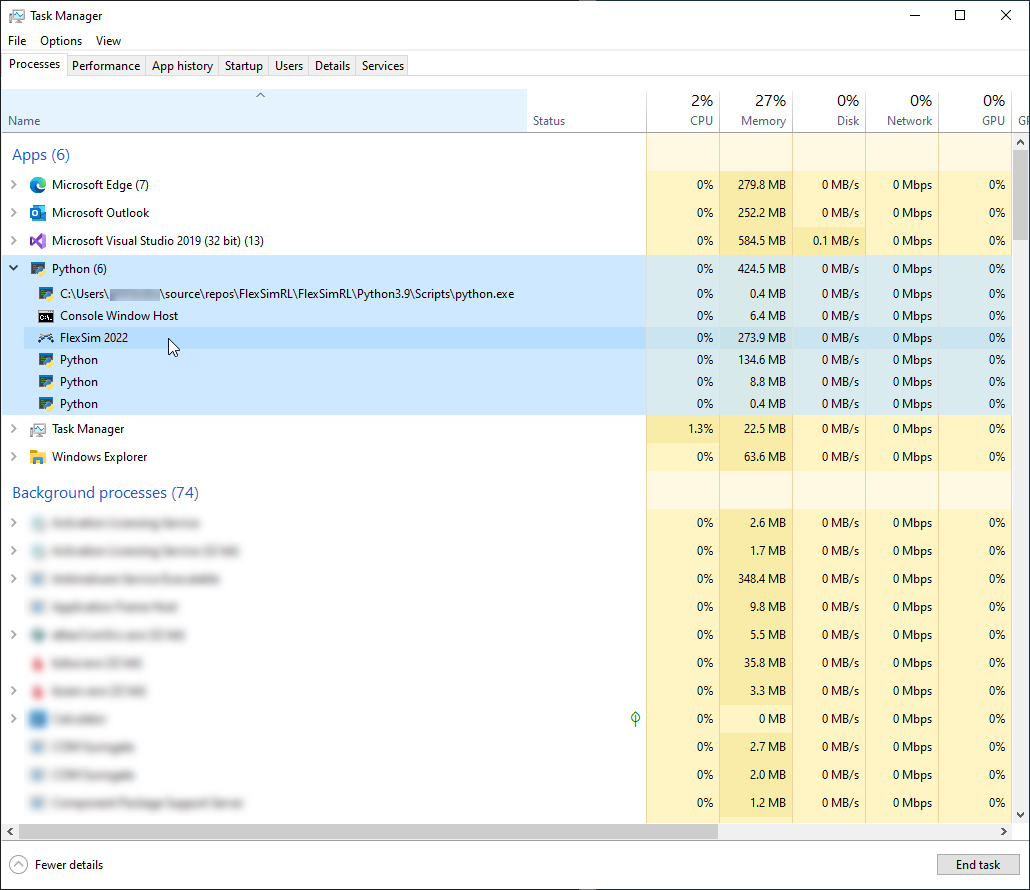
- In this script, because visible is set to False on the FlexSimEnv, you will not see a FlexSim window appear. Instead, you can can use the Task Manager to see that a FlexSim process is created as a background process. The process may appear under a python process.
- As the algorithm learns, Stable Baslines3 will print information to the python window about the training status.
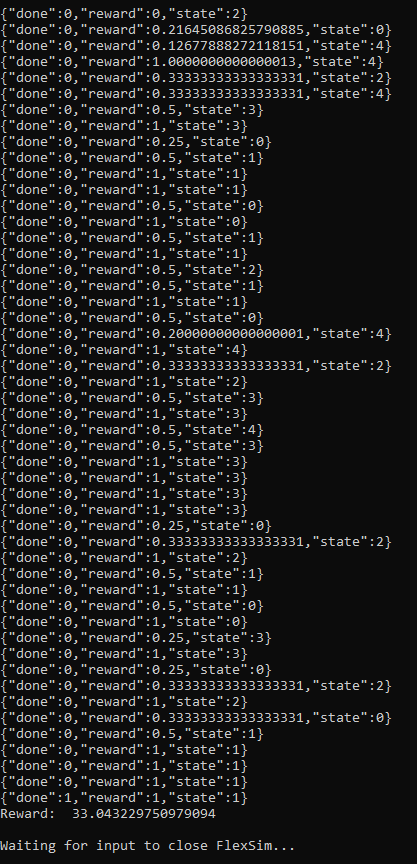
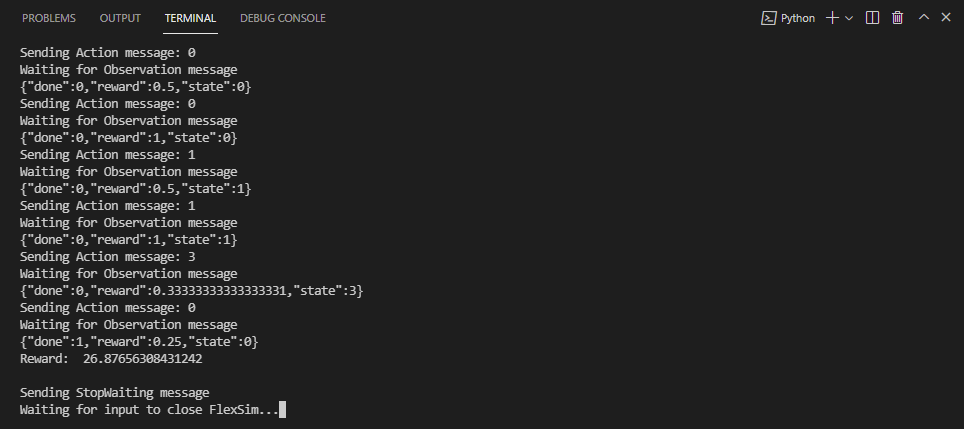
- After the model is saved, the script will wait for you to push any key and then run some test episodes using the trained model. In the output below, you can see that the agent is often rewarded 1 at a given step, which indicates no changeover time in our example model.
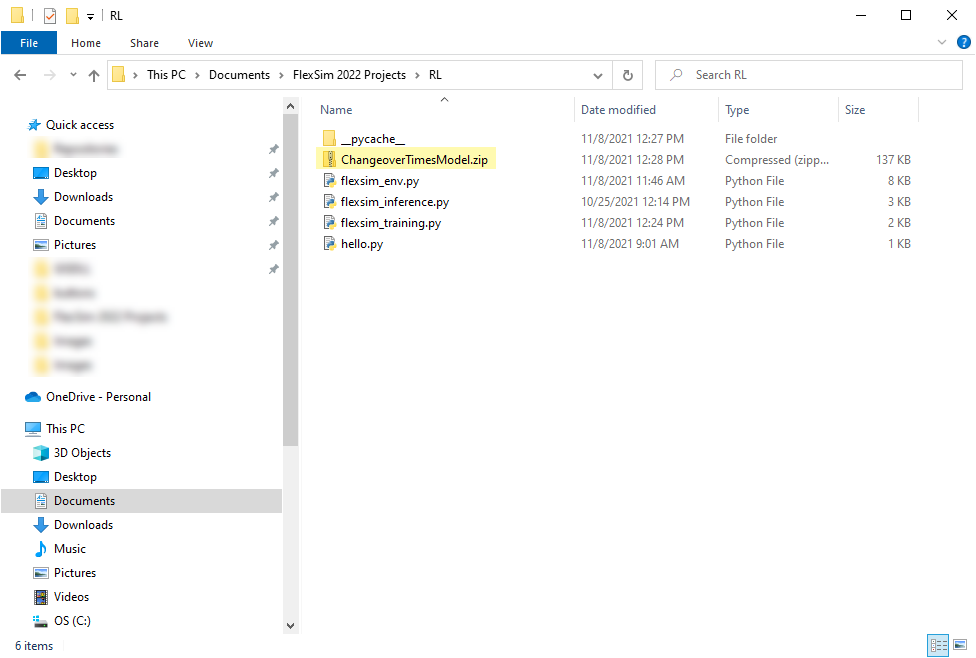
- If you open Windows Explorer to your python project directory, you will find a zip file containing the data for the trained AI model. To learn more about using that data, continue to Using a Trained Model.
Modify the name of the file where it will save the trained model to "ChangeoverTimesModel"
You should also note that you can change how long the algorithm trains by changing the total_timesteps passed into the model.learn() function.
You will likely get errors about missing packages, such as "No module named 'stable_baselines3'":
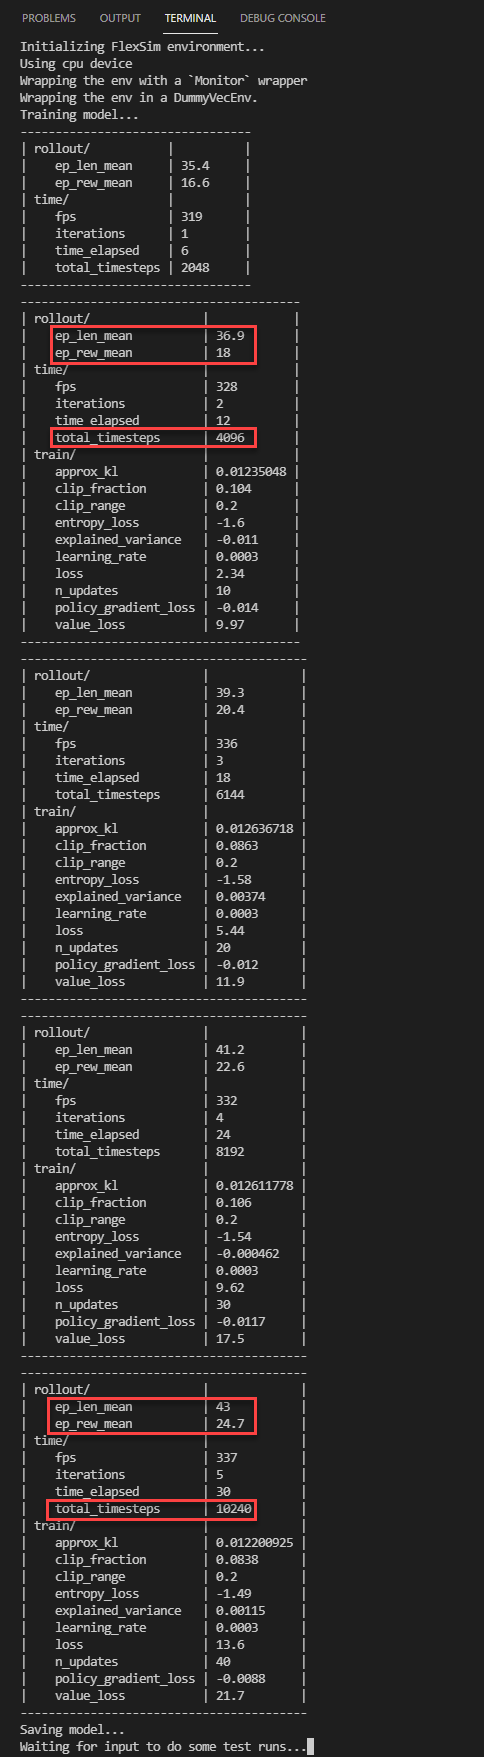
You can see in the status above that as it takes more timesteps, the average length of the episode (ep_len_mean) is increasing. In our simulation model, we are processing one box per decision and running for a fixed amount of time, so the episode length represents the total throughput of our simulation.
You can also see that the average reward per episode (ep_rew_mean) is increasing. For this example, that means that we are processing more items in the same amount of time, suggesting that the algorithm is learning to pull items in a way that minimizes the changeover times, increasing the efficiency of the system.
For this simple example, we are observing only the last item processed when determining what item to process next. We may be able to further improve our algorithm by observing more data about the system, such as information about the available items in the queue. Adjusting the reward function may also change how well the algorithm learns. You can expand on this simple example to learn more about reinforcement learning through experimentation.