Using Process Flow With 3D Task Logic
Overview
As was discussed in the topic Tools and Methods to Build Tasks, you will primarily use two main tools to assign tasks to task executers: the process flow shared assets or standard 3D logic. Each tool has its own advantages and disadvantages, which were discussed in that topic.
But what if you want to mix and match these two tools? For various reasons, you might determine that your simulation model would benefit from combining elements of both methods. While it is certainly possible to design task logic that uses both, it does require some careful setup and knowledge of certain concepts.
The following is a high-level overview of how you would set up this kind of system:
- Create a global task list - In the Toolbox, you'll create a task list that will store task sequences created by the process flow.
- Add triggers to task executers in the 3D model - You'll add the On Resource Available trigger to all the task executers. This trigger will fire whenever the task executer is free to work on tasks. You'll add instructions that will tell the task executer to pull tasks from the global list when that trigger fires.
- Create task sequences in the process flow - You'll create a complete set of tasks and put them inside a task sequence. Then you'll dispatch the task sequence to the global list you created.
- Set up standard 3D task logic - You won't need to make any changes to how you assign standard 3D tasks to task executers. You can use the normal procedures for creating these types of tasks.
Task Series vs. Task Sequences
If you're going to combine process flow task logic with standard 3D logic, you'll want to know the logical differences between a task series and a task sequence because a task executer will treat these tasks somewhat differently.
What is a Task Series?
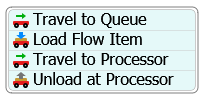
To review, a task is a single instruction or action that is performed by a task executer, such as a travel task or a loading task. A task series is a set of individual tasks that are assigned one-by-one to a task executer. The tasks in a task series aren't connected to each other, but the operator will usually perform each task in the order they were assigned.
For example, the following image shows a series of tasks that would be assigned to a task executer one-by-one as a token moves through a process flow:
What is a Task Sequence?
A task sequence is a set of tasks that have been grouped together into a single unit. If you are using standard 3D task logic, most tasks will be grouped into a task sequence and then assigned to a task executer.
You could think of a task sequence as a complete list of "to do" items that the operator will pull from a job board (the global list). The operator will complete all the tasks in the task sequence in the order they're listed. When the task sequence is complete, the operator will return to the job board and get a new "to do" list (task sequence) to work on.
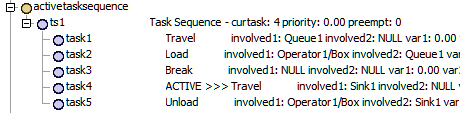
For example, the following image shows the tree view for a transport task sequence assigned to an operator by a fixed resource:
How Task Executers Handle Task Sequences
As was explained in How Task Executers Handle Tasks, task executers keep track of two things: 1) the task they are actively working on, and 2) a queue of tasks they have been assigned to work on. When task executers work on a task sequence, they will treat that sequence as a single task unit. When a task executer receives a task sequence:
- A unique task sequence is created on the task executer and this task becomes the active task. This task sequence will be identified by its name.
- Tasks that belong to that task sequence are appended to the task sequence.
- The task executer will complete the tasks in the task sequences in the order they were appended to the task sequence.
- If the task executer finishes a task sequence and nothing else is added to the task sequence, the task sequence will be deleted.
- After the task sequence is deleted, the task executer is free to work on other tasks or task sequences.
Depending on the preemption settings you use for the task executers, it might be possible to preempt task executers away from the task sequence even if they are in the middle of working on it. See Task Priorities and Preemption for more information.
Creating a Global Task List
As was mentioned earlier, you could think of a task sequence as a "to do" list that is posted on a job board. The global task list will act as the job board from which the task executers will pull the list of tasks they need to do.
To set up a global task list:
- In the left pane, click the Toolbox tab to switch to the Toolbox.
- Click the Add button
 to open a menu. Point to
Global List, then select Task Sequence
List.
to open a menu. Point to
Global List, then select Task Sequence
List. - In the list properties, change the name of the list to something distinct that you'll remember, such as Available Tasks.
- If needed, add or remove any custom fields to help track your list entries.
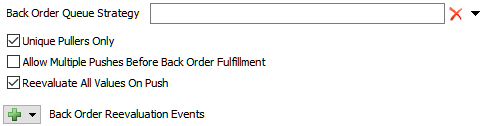
- Click the Back Orders tab and check the Reevaluate All Values on Push checkbox.
- Press the OK button to save the changes and close the window.
- Confirm that the list you just created now appears in the Toolbox.

See Key Concepts About Lists for more information about lists in general.
Adding On Resource Available Triggers
After creating the global task sequence list, you'll need to add an On Resource Available trigger on all of the task executers in the 3D model. Then you'll set the trigger to pull from this list whenever they're available to work on tasks. To add this trigger:
- In the 3D model, double-click the task executer to open its properties window.
- On the Triggers tab, click the
Add button to open
a menu. Select On Resource Available.
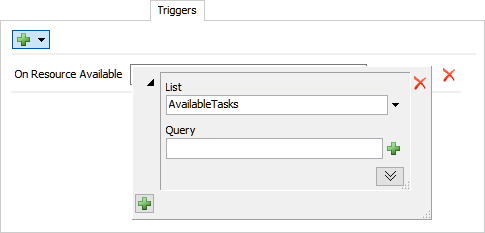
- Next to the On Resource Available box, click the
Add button
to open a menu. Point to Use List, and then select
Pull from Task Sequence List.
- In the picklist properties window, click the List menu and select the name of the global list the task executer should use.
- If needed, add a query to the Query box to instruct the task executer which task sequences should be pulled before others.
- Repeat the previous steps for all of the task executers in the 3D model.
See Key Concepts About Events for more information about triggers in general.
Creating a Task Sequence in Process Flow
You might have noticed that the task activities in the Process Flow library includes two additional activities: the Create Task Sequence and Dispatch Task Sequence activities.
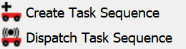
You can use these two activities to create and dispatch task sequences. You'll use the Create Task Sequence activity at the beginning of a set of process flow tasks to create a task sequence and assign the task sequence a name. Next, you'll add the task activities in the order they should be completed.
Adding a Dispatch Task Sequence is optional. If you want to dispatch the task sequence directly, you can use this activity. However, if you are going to dispatch the task sequence to a global list, it's better to use a Push to List activity.
To create a task sequence in process flow and push it to a global task sequence list:
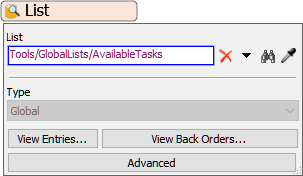
- Add a List shared asset to the process flow. In the List box, use the menu to link it to the global task sequence list you created earlier.
- Think through which event(s) in the simulation model will trigger the creation of token that will then create the task sequence. Perhaps you could use an Event-Triggered Source that listens for a specific event to occur, such as an item entering a queue that needs to be transported.
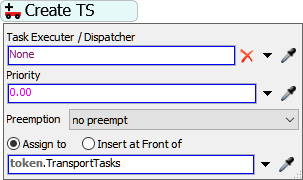
- Add a Create Task Sequence activity to the process
flow. In the activity's properties, next to the Task Executer /
Dispatcher box, click the Delete button
 to ensure there is no currently selected
task executer.
to ensure there is no currently selected
task executer. - If needed, you can assign values for the Priority and Preemption properties for the entire task sequence. In fact, a Create Task Sequence activity is the only way to assign priority or preemption to tasks in a process flow.
- In the box under the Assign to option, delete the part
of the code that says
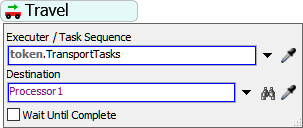
taskSequenceand replace that with the custom name you want to give your task sequence. For example, the final code could read something such astoken.MyTaskSequenceortoken.TransportTasks. - Add the rest of the task activities that will comprise the rest of the task sequence. In each task activity's properties, make sure that you change the Task Executer / Dispatcher box to assign it to the name of the custom task sequence you created earlier.
- In each task activity's properties, make sure that you clear the Wait Until Complete checkbox or else the token will get stuck on that activity during a simulation run.
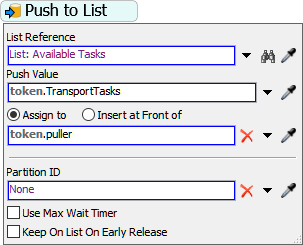
- At the end of the tasks you want to add to the task sequence, add a Push to List activity that will push the full task sequence to the global task sequence list. Link the activity to the list in the process flow (which should be tied to the global task sequence list).
- In the Push Value box, make sure that you assign the value to the name of the custom task sequence you created earlier.
Try completing Task Logic Tutorial 1.4 for a hands-on example of this system.