Task 1.2 - Create Custom Logic
Task Overview
In this tutorial task, you'll build more of the patient track for the health care clinic model to get some additional practice using the FlexSim Healthcare objects and activities.
In the first tutorial task, you learned how to use one of the activity sets to quickly set up the logic of your patient track. In this tutorial task, you'll learn how to build your own block of activities to create custom logic. Building a custom block of activities will help you better understand how the logic in FlexSim Healthcare models works.
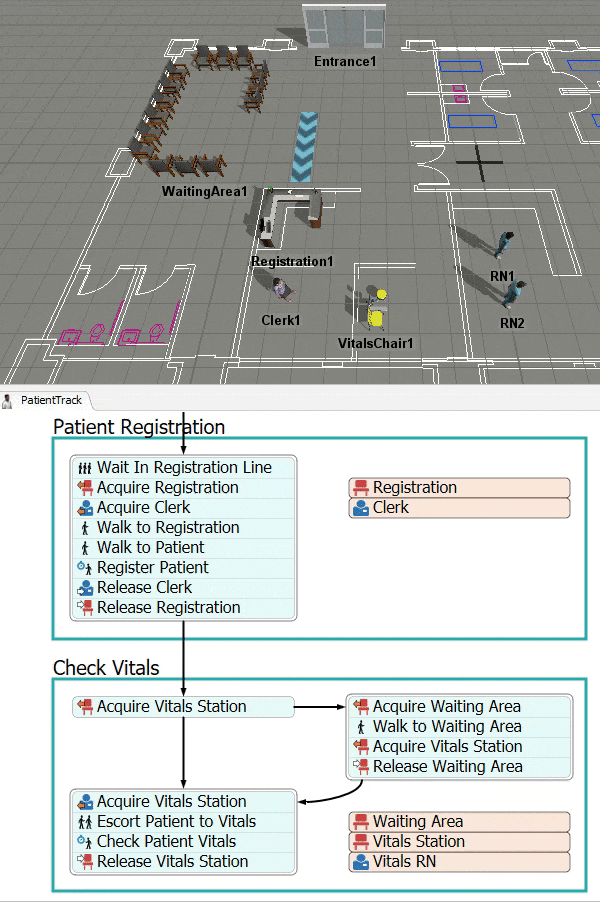
When you're finished, your simulation model should look similar to the following image:
Step 1 Add a Custom Set of Activities
Up to this point, you've learned how to use one of the activity sets to create the logic for your patient track. In this step, you'll learn how to add activities from scratch to create custom logic. Your goal will be to create a phase in which an RN checks the patient's vitals in the PatientTrack process flow. In this phase, you'll design the logic that will instruct a nurse to come take the patient to the patient vitals area.
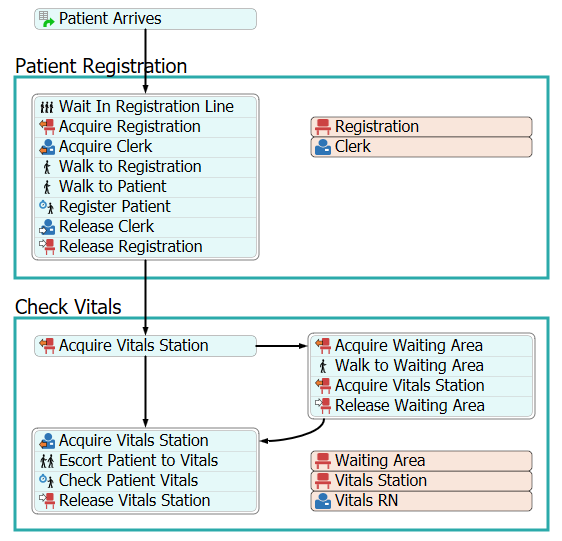
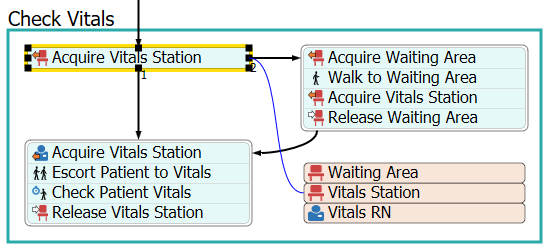
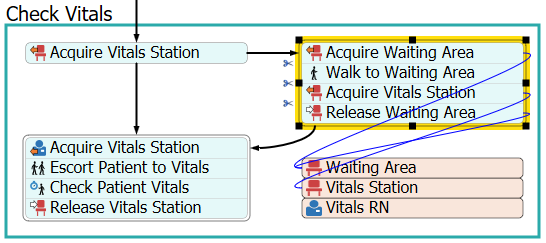
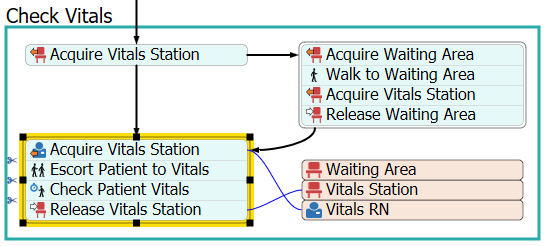
When you're finished, your process flow will look similar to the following image:
For now, you'll merely add and connect these activities to the process flow. You'll edit the properties to add logic in a later step.
To add and connect these activities:
- Make sure the PatientTrack patient flow is open and active.
- In the Process Flow Library, expand the Flowchart group and add a Process shape container to your process flow. Rename this container Check Vitals.
- In the Check Vitals container, add an Acquire Location activity (under HC Resources).
- Add the following activities to create a separate stacked block:
- An Acquire Staff activity (under HC Resources)
- An Escort Patient activity (under HC Sub Flows)
- A Process activity (under HC Basic)
- A Release Location activity (under HC Resources)
- Rename the new activities as follows:
- To the right of these activities, add the following activities to create a stacked
block:
- An Acquire Location activity (under HC Resources)
- A Walk activity (under HC Sub Flows)
- An Acquire Location activity (under HC Resources)
- A Release Location activity (under HC Resources)
- Rename the new activities as follows:
- Add the following shared assets to the shape:
- 2 Location Resource shared assets (under HC Resources)
- A Staff Resource shared asset (under HC Resources)
- Rename the shared assets as follows:
- Create a connector from the following activities:
- From the Release Registration activity to the first Acquire Vitals Station activity on the left
- From the first Acquire Vitals Station activity on the left to the Acquire Vitals RN activity
- From the first Acquire Vitals Station activity on the left to the Acquire Waiting Area activity
- From the Release Waiting Area activity to the Acquire Vitals RN activity
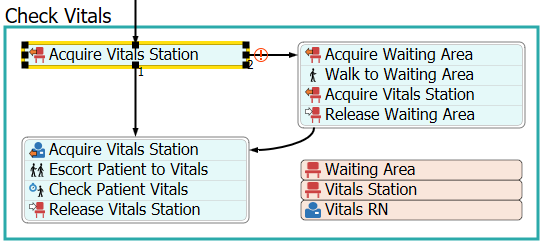
- Click the first Acquire Vitals Station activity on the left to select it. Confirm that connector 1 is going to the Acquire Vitals RN activity and that connector 2 is going to the Acquire Waiting Area activity. If not, delete the connectors and reconnect them in the appropriate order or re-rank the connections. See Changing the Rank Number or Name of Outgoing Connectors for more information.
| Activity | New Name |
|---|---|
| Acquire Location | Acquire Vitals Station |
| Acquire Staff | Acquire Vitals RN |
| Escort Person | Escort Patient to Vitals |
| Process | Check Patient Vitals |
| Release Location | Release Vitals Station |
| Activity | New Name |
|---|---|
| Acquire Location (first one) | Acquire Waiting Area |
| Walk | Walk to Waiting Area |
| Acquire Location (second one) | Acquire Vitals Station |
| Release Location | Release Waiting Area |
| Activity | New Name |
|---|---|
| Location Resource (first one) | Waiting Area |
| Location Resource (second one) | Vitals Station |
| Staff Resource | Vitals RNs |
Check that your process flow looks similar to the image at the beginning of this step.
Step 2 Edit the Custom Activity Logic
Since you built your own custom set of activities in the previous step, not all of the properties will be automatically set up the way they were when you used an activity set. Activity sets are a great way to cut down the time it takes to build the logic for a FlexSim Healthcare model. However, it's also a good idea to understand how to set up activity logic yourself so that you can create your own custom logic if needed. This step will teach you how to set up this kind of logic.
In this step, you'll create the logic for the patient vitals phase of the patient track. If the vitals station is available, a nurse will escort the patient to the station and check the patient's vitals. If the vitals station is not available, the patient will wait in the waiting area.
The following is an overview of how each activity in the Check Vitals phase of the process flow will function:
| Activity or Shared Asset | Explanation |
|---|---|
| Waiting Area | This shared asset will link to the WaitingAreas group that you created in an earlier step. |
| Vitals Chair | This shared asset will link to the VitalsStations group that you created in an earlier step. |
| Vitals RN | This shared asset will link to the RNs group that you created in an earlier step. |
| Acquire Vitals Station (first one on the left) | This activity will attempt to acquire the vitals station location. If another patient is using the vitals station, the token will move to the Acquire Waiting Area activity and the patient will find a chair in the waiting room. If the vitals station is acquired, the token will move to the Acquire Vitals RN activity instead. |
| Acquire Waiting Area | This activity will attempt to acquire one of the chairs in the WaitingArea1 multi-location. When the location is free, the patient token will move to the Walk to Waiting Area activity. |
| Walk to Waiting Area | Once a chair in the WaitingArea1 multi-location has been acquired, this activity will tell the patient to walk to the specific chair it acquired. |
| Acquire Vitals Station (second one on the right) | This activity is almost identical to the previous Acquire Vitals Station activity. It will attempt to acquire the vitals station location for the patient. If the location is not free, the token will wait at this activity until it becomes available. When the location is free, the token will move to the Release Waiting Area activity. |
| Release Wait Area | This activity will release the specific chair from the WaitingArea1 location so that it is free for other patients to acquire. |
| Acquire Vitals RN | This activity will acquire a member of the RNs group. If all members of the RNs group are busy working on other tasks, the token will wait at this activity until an RN is free. |
| Escort Patient to Vitals | The vitals nurse will then escort the patient to the vitals station. You'll need to link this activity to the acquired vitals station and the vitals nurse in order to tell the patient where to go and with whom. |
| Check Patient Vitals | This activity will represent the amount of time it takes the patient to complete the check vitals process. You'll set that time to 20 seconds for now. |
| Release Vitals Station | This activity will release the vitals station so that it is free for other patients to acquire. |
To edit the activity properties:
- In the PatientTrack process flow, click the
Waiting Area shared asset to select it. In Quick Properties
next to the Location box, click the
Sampler button
 to enter sampling mode.
 - In the 3D model, click the WaitingArea1 object to open a menu. Select WaitingAreas group from the menu to sample it.
- Click the Vitals Station shared asset to select it.
In Quick Properties next to the Location box, click the
Sampler button
to enter sampling mode.
- In the 3D model, click the VitalsChair1 object to open a menu. Select VitalsStations group from the menu to sample it.
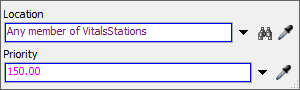
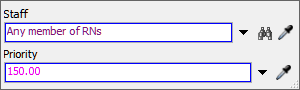
- Click the Vitals RN shared asset to select it. In Quick Properties, click the arrow next to the Staff box to open a menu. Point to Staff Groups, then select RNs.
- Click the first Acquire Vitals Station activity to
select it. Click the No Link icon
 next to this activity to enter
sampling mode.
next to this activity to enter
sampling mode. - Click the Vitals Station shared asset to sample it. A blue line will appear to indicate this activity is now linked to the shared asset.
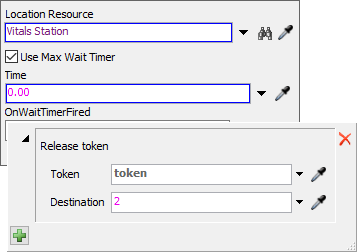
- Make sure the first Acquire Vitals Station activity is still selected. In Quick Properties, check the Max Wait Timer check box.
- Next to the OnWaitTimerFired box, click the
Edit Properties button
 to open a picklist window. In the
Destination box, delete the current number and type
to open a picklist window. In the
Destination box, delete the current number and type
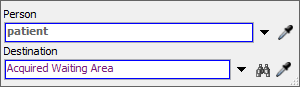
2. - Click the Acquire Waiting Area activity to select it.
Click the No Link icon
next to this activity to enter
sampling mode.
- Click the Waiting Area shared asset to sample it. A blue line will appear to indicate this activity is now linked to the shared asset.
- Click the Walk to Waiting Area activity to select it.
In Quick Properties next to the Destination box, click the
Sampler button
to enter sampling mode.
- Click the Waiting Area shared asset to sample it.
- Click the second Acquire Vitals Station activity to
select it. Click the No Link icon
next to this activity to enter
sampling mode.
- Click the Vitals Station shared asset to sample it. A blue line will appear to indicate this activity is now linked to the shared asset.
- Click the Release Waiting Area activity to select it.
Click the No Link icon
next to this activity to enter
sampling mode.
- Click the Waiting Area shared asset to sample it.
- Click the Acquire Vitals RN activity to select it.
Click the No Link icon
next to this activity to enter
sampling mode.
- Click the Vitals RN shared asset to sample it. A blue line will appear to indicate this activity is now linked to the shared asset.
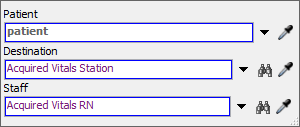
- Click the Escort Patient to Vitals Station activity to
select it. In Quick Properties next to the Destination box,
click the Sampler button
to enter sampling mode.
- Click the Vitals Station shared activity to select it.
- Next to the Staff box, click the
Sampler button
to enter sampling mode.
- Click the Vitals RN shared activity to select it.
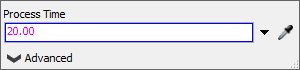
- Click the Check Patient Vitals activity to select it.
In the Process Time box, delete the current text and type
20.00. - Click the second Release Vitals Check activity to
select it. Click the No Link icon
next to this activity to enter
sampling mode.
- Click the Vitals Station shared asset to sample it. A blue line will appear to indicate this activity is now linked to the shared asset.
Consider saving your simulation model at this point.
Step 3 Test Your Model
As was mentioned in the previous tutorial task, it's a good habit to test your model periodically. In general, the best time to test a simulation model is after you've built out a small portion of the model to ensure that everything is working as you expected it to work.
Both of the two phases of the patient track involve having patients wait in line or go to the waiting area if certain resources aren't available. In order to test whether those pieces of logic are working correctly, you'll need to add more than one patient to the model at a time. In this step, you'll adjust the PatientArrivals process flow so that it introduces two patients at a time rather than only one.
- Make sure the PatientArrivals process flow is open and active.
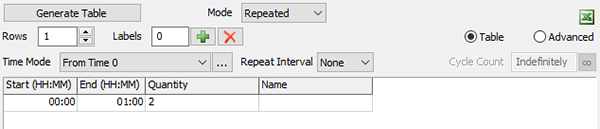
- Click the Patient Arrival Schedule activity to select it. In Quick Properties, click the Edit Arrivals button to open a new window.
- In the first row under the Quantity column, delete the
current number and change it to
2. - Close the window.
Now reset and run the simulation model:
As you watch the model run, notice that the first and second patient each enter and walk to the waiting line. While the first patient registers, the second patient waits in line. While the first patient is escorted by a nurse to the vitals station, the second patient enters the waiting room.
Notice also that the nurse and patients walk through the floor plan walls, taking the shortest distance between two points. You'll learn how to fix this problem in a future tutorial.
Conclusion
Up to this point, you've created a simulation model of a health care clinic in which a patient completes the registration and goes to a patient vitals station. As you saw in the last step of the tutorial, the patients and staff members sometimes walk through walls and objects. In the next tutorial task, you'll learn how to fix this problem using A* navigation. Continue on to Tutorial Task 1.3 - Add A* Navigation.