Task 2.2 - Create Coordinated Loading Tasks
Task Overview
In this tutorial task, you'll learn how to create coordinated loading tasks. Coordinated tasks are when two or more operators are needed to complete a given task.
To review, up to this point, you've created a simulation model of a system in which two operators transport standard-sized boxes from one queue to two processors. But imagine you needed to create a simulation model for a business system in which:
- The boxes that needed to be transported had varying weights
- When the weight of a box exceeds 40, workplace regulations require two operators to transport it
You'll model that kind of system in this tutorial. Normally, the two operators will transport standard size boxes on their own. But occasionally, a large box will require them to work together to transport the box, which means you'll need to design coordinated task logic to handle these special tasks.
You'll begin by editing the process flow logic so that it occasionally creates a box that has a weight exceeding 40. When a box is larger than 40, you'll design logic that will change the box's visuals so that it appears larger than the standard boxes and is colored red. These changes will help make the heavy boxes visually distinct from the standard boxes. Then, you'll design logic that will place the heavy boxes inside the LargeQueue in the 3D model.
After that, you'll add two tracks to your process flow to handle the coordinated tasks. One track will control the main operator who will handle loading and transporting the heavy boxes. The second track will control the assisting operator who will assist with the transportation tasks. You'll use the Process Flow Coordination activities to ensure that the two operators work on these tasks at the same time. See Coordinated Tasks and Process Flow Coordination for a deeper explanation of the processes and activities involved in building coordinated tasks.
When you're finished, your simulation model will operate similar to the following image:
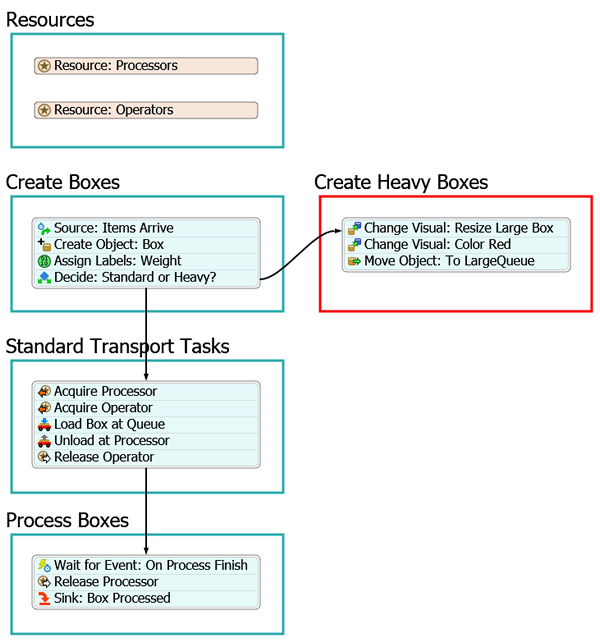
Step 1 Add Activities to Vary the Weight of Boxes
In this step, you'll modify the process flow by adding new activities that will create heavy boxes and place them in the LargeQueue. When you're finished, the process flow will look like this:
For now, you'll merely add and connect these activities to the process flow. You'll edit the properties to add the logic in the next step.
To add and connect these activities:
- With the process flow open and active, add the following activities to the end of
the stacked block in the Create Boxes shape:
- An Assign Labels activity (under Basic)
- A Decide activity (under Basic)
- Rename these activities as follows:
- Add another Process shape (under Flowchart) to the process flow.
- In Quick Properties, rename this process shape as Create Heavy Boxes.
- Click the Color box to change the shape's color to red.
- Inside the Create Heavy Boxes shape, add the following
activities to create a stacked block:
- 2 Change Visual (under Visual)
- A Move Object (under Objects)
- Rename these activities as follows:
- Create a second connector going from the Decide: Standard or Heavy? activity to the Change Visual: Resize Large Box.
| Activity | New Name |
|---|---|
| Assign Labels | Assign Labels: Weight |
| Decide | Decide: Standard or Heavy? |
| Activity | New Name |
|---|---|
| Change Visual (first one) | Change Visual: Resize Large Box |
| Change Visual (second one) | Change Visual: Color Red |
| Move Object | Move Object: To LargeQueue |
Consider saving your simulation model.
Step 2 Add the Heavy Boxes Logic
In this step, you'll modify the process flow by adding activities that will create heavy boxes and place them in the LargeQueue. You'll resize these boxes so that they are larger and colored red. You'll also change the arrival rate for the boxes to slow it down a little bit.
The following is an overview of how the new and modified activities will function:
| Activity | Explanation |
|---|---|
| Source: Items Arrive | You'll modify this activity so that the boxes will arrive every 10 seconds. |
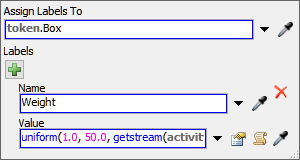
| Assign Labels: Weight | You'll add a label called Weight to the token that randomly assigns a weight to the box between 1 and 50. You'll use the uniform statistical distribution to assign this value. This distribution will mean that most of the time, a standard box (those with a weight below 40) will get created. But occasionally a large box (with a weight above 40) will get created. |
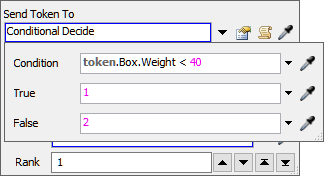
| Decide: Standard or Heavy? | This activity will check the value that was assigned to the Weight. If the value of this label is higher than 40, the token will be sent to the activities in the Create Heavy Boxes shape. If the value is lower than 40, it will continue on to the activities in the Standard Transport Tasks shape. |
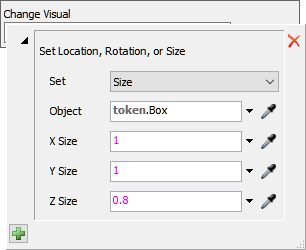
| Change Visual: Resize Large Box | This activity will receive the tokens that are associated with boxes that are classified as heavy because their Weight label is larger than 40. It will resize these boxes so that they appear larger in the 3D model. The standard box size is 0.61 by 0.61 by 0.3. You'll set the large boxes to be 1 by 1 by 0.8. |
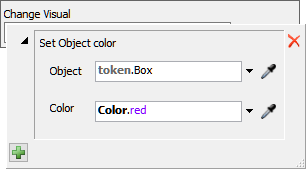
| Change Visual: Color Red | This activity will change the heavy boxes so that they are colored red in the 3D model. |
| Move Object: To LargeQueue | This activity will place the heavy boxes inside the LargeQueue in the 3D model. |
To create this logic:
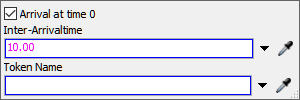
- Click the Source: Items Arrive activity to select it. In Quick Properties, check the Arrival at time 0 checkbox.
- In the Inter-Arrivaltime box, type
10.00. - Click the Assign Labels: Weight activity to select it. In Quick Properties, click the arrow next to the Assign Labels To box to open a menu. Point to Token Label, then select Box.
- Click the Add button
 to add a new label.
 - In the Name box, type
Weight. - Click the arrow next to the Value box to open a menu. Point to Statistical Distribution, then select Uniform to open the distribution chooser.
- In the Minimum box, type
1.00. - In the Maximum box, type
50.00. - Click the Decide: Standard or Heavy? activity to select it. In Quick Properties, click the arrow next to the Send Token To box to open a menu. Select Conditional Decide.
- In the Condition box, type
token.Box.Weight <
			40
. - Click the Change Visual: Resize Large Box activity to
select it. In Quick Properties next to the Change Visual
box, click the Add button
to open a menu. Select
Set Rotation, Size, or Location.
- Click the Set menu and select Size.
- In the Object box, type
token.Box. - In the Z box, type
0.8. - Click the Change Visual: Color Red activity to select
it. In Quick Properties next to the Change Visual box,
click the Add button
to open a menu. Select
Set Object Color.
- In the Object box, type
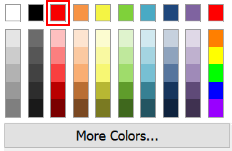
token.Box. - Click the arrow next to the Color box to open a menu. Select Red.
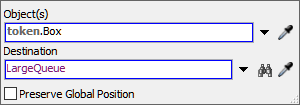
- Click the Move Object: To LargeQueue activity to select it. In Quick Properties, click the arrow next to the Object(s) box to open a menu. Point to Token Label, then select Box.
- Next to the Destination box, click the
Sampler button
 to enter sampling mode.
 - In the 3D model, click the LargeQueue to open a menu. Select LargeQueue.
Try running the simulation model:
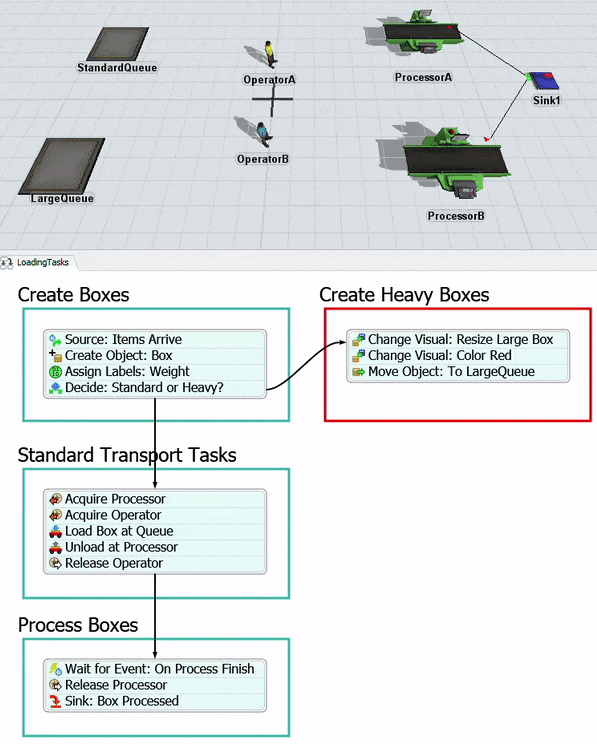
As you watch, you'll eventually see a few large, red boxes that will appear in the LargeQueue. For now, the large boxes will just stay in the queue because you haven't created logic to move them out of the queue yet. You'll do that in the rest of the steps of this tutorial.
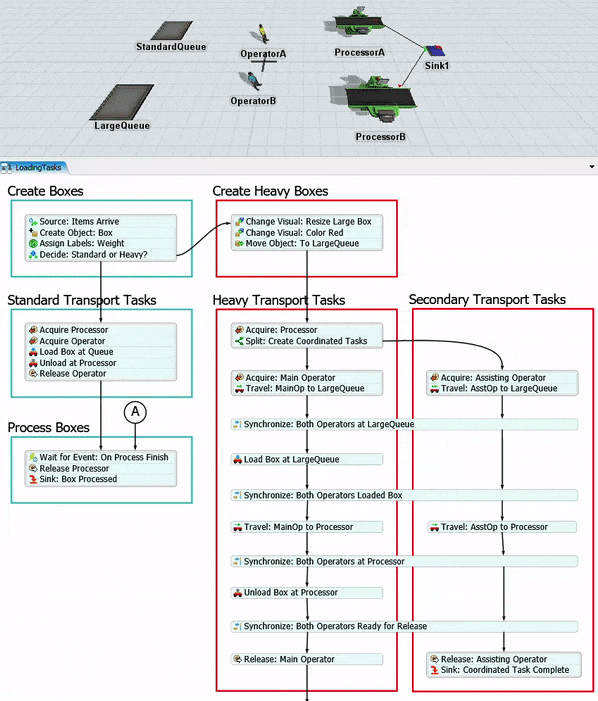
Step 3 Add Coordinated Task Activities
In this step, you'll add activities to your process flow that will control the logic of the 3D model. When you're finished with this step, your process flow will look similar to the following image:
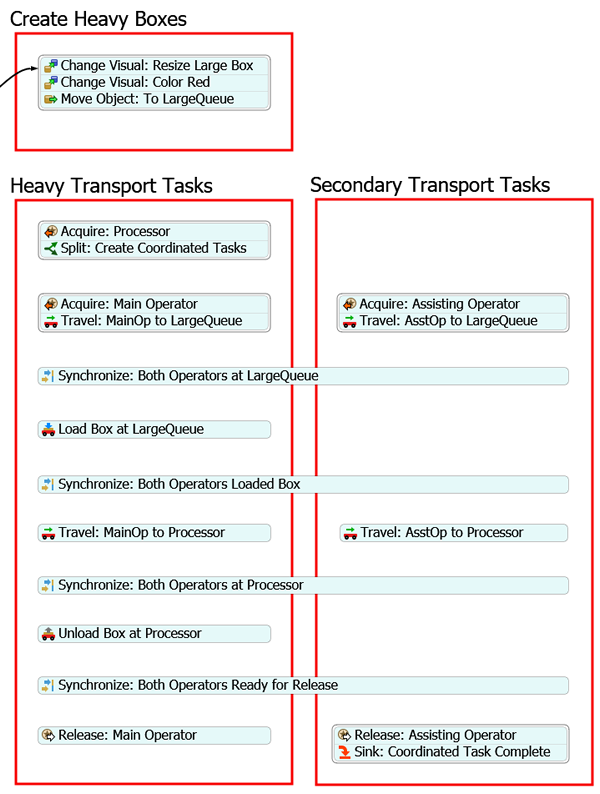
For now, you'll merely add these activities to the process flow. You'll edit the properties to add the functionality in a later step.
To add these activities:
- Add two Process shapes (under Flowchart) to the process flow.
- Rename the two shapes Heavy Transport Tasks and Secondary Transport Tasks.
- In Quick Properties for both shapes, change the Color box to change each shape's color to red.
- In the Heavy Transport Tasks shape, create a stacked
block with the following activities:
- An Acquire Resource (under Shared Assets)
- A Split (under Coordination)
- Rename these activities as follows:
- In the Heavy Transport Tasks shape, create a stacked
block with the following activities:
- An Acquire Resource (under Shared Assets)
- A Travel (under Task Sequences)
- Rename these activities as follows:
- Add the following activities to the Heavy Transport
Tasks shape in this order, but leave them floating and unconnected:
- A Synchronize (under Coordination)
- A Load (under Task Sequences)
- A Synchronize (under Coordination)
- A Travel (under Task Sequences)
- A Synchronize (under Coordination)
- An Unload (under Task Sequences)
- A Synchronize (under Coordination)
- A Release Resource (under Shared Assets)
- Resize the four Synchronize activities so that they span across both the Heavy Transport Tasks and the Secondary Transport Tasks shapes.
- Rename these activities as follows:
- Click the stacked block that contains the Acquire: Main Operator activity to select. Press Ctrl+C to copy the stacked block. Press Ctrl+V to paste the stacked block. Position it inside the Secondary Transport Tasks so that it is parallel with the original stacked block.
- Rename the copied activities as follows:
- Add a Travel activity (under Task Sequences) to the Secondary Transport Tasks shape. Position it so that it is parallel with the Travel: MainOp to Processor activity in the Heavy Transport Tasks shape.
- Rename this activity as Travel: AsstOp to Processor.
- At the bottom of the Secondary Transport Tasks shape,
create a stacked block with the following activities:
- A Release Resource (under Shared Assets)
- A Sink (under Basic)
- Rename these activities as follows:
| Activity | New Name |
|---|---|
| Acquire | Acquire: Processor |
| Split | Split: Create Coordinated Tasks |
| Activity | New Name |
|---|---|
| Acquire | Acquire: Main Operator |
| Travel | Travel: MainOp to LargeQueue |
| Activity | New Name |
|---|---|
| Synchronize (first one) | Synchronize: Both Operators at LargeQueue |
| Load | Load Box at LargeQueue |
| Synchronize (second one) | Synchronize: Both Operators Loaded Box |
| Travel | Travel: MainOp to Processor |
| Synchronize (third one) | Synchronize: Both Operators at Processor |
| Unload | Unload Box at Processor |
| Synchronize (fourth one) | Synchronize: Both Operators Ready for Release |
| Release | Release: Main Operator |
| Activity | New Name |
|---|---|
| Acquire: Main Operator (copied) | Acquire: Assisting Operator |
| Travel: MainOp to LargeQueue (copied) | Travel: AsstOp to LargeQueue |
| Activity | New Name |
|---|---|
| Release | Release: Assisting Operator |
| Sink | Sink: Coordinated Task Complete |
Check to make sure your process flow looks similar to the image at the beginning of this step.
Step 4 Connect the Activities
You'll notice that in the previous step you added some coordination activities (the Split and Synchronize activities). The logic of these activities depends on setting up the connectors between your activities correctly. (See Process Flow Coordination for more information.) For that reason, you'll work on connecting all the activities correctly in this step. The important thing to pay attention to is making sure you connect the activities in the right order so that the connector rankings are correct. Do your best to ensure that you follow these steps in this exact order.
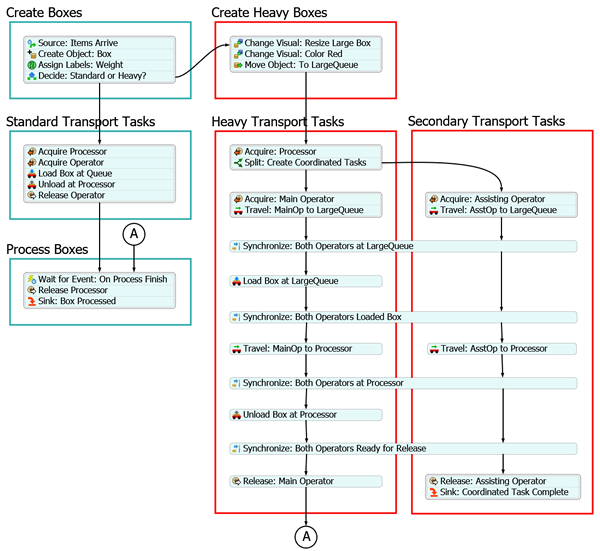
When you're finished, your process flow should look similar to the following image:
To connect these activities:
- Create a connector going out from the Move Object: To LargeQueue activity to the Acquire: Processor activity.
- Create a connector going out from the Split: Create Coordinated Tasks activity to the Acquire: Main Operator activity.
- Create a second connector going out from the Split: Create Coordinated Tasks activity to the Acquire: Assisting Operator activity.
- Create connectors between the activities in the Heavy Transport
Tasks shape:
- From the Travel: MainOp to LargeQueue activity to the Synchronize: Both Operators at LargeQueue activity
- From the Synchronize: Both Operators at LargeQueue activity to the Load Box at LargeQueue
- From the Load Box at LargeQueue to the Synchronize: Both Operators Loaded Box activity.
- From the Synchronize: Both Operators Loaded Box activity to the Travel: MainOp to Processor activity
- From the Travel: MainOp to Processor activity to the Synchronize: Both Operators at Processor activity
- From the Synchronize: Both Operators at Processor activity to the Unload Box at Processor activity
- From the Unload Box at Processor activity to the Synchronize: Both Operators Ready for Release activity
- From the Synchronize: Both Operators Ready for Release activity to the Release: Main Operator activity
- Create connectors between the activities in the Secondary
Transport Tasks shape:
- From the Travel: AsstOp to LargeQueue activity to the Synchronize: Both Operators at LargeQueue activity
- From the Synchronize: Both Operators at LargeQueue activity to the Synchronize: Both Operators Loaded Box activity
- From the Synchronize: Both Operators Loaded Box activity to the Travel: AsstOp to Processor activity
- From the Travel: AsstOp to Processor activity to the Synchronize: Both Operators at Processor activity
- From the Synchronize: Both Operators at Processor activity to the Synchronize: Both Operators Ready for Release activity
- From the Synchronize: Both Operators Ready for Release activity to the Release: Assisting Operator activity
- Create a connector going out from the Release: Main Operator to the Wait for Event: On Process Finish stacked block (in the Process Boxes shape).
- Click the newly created connector to select it. In Quick Properties in the Line Style group, open the Type menu and select Split.
Consider saving your simulation model.
Step 5 Edit the Heavy Transport Task Logic
In this step, you'll create the logic that will control the tasks for the operator on the Heavy Transport Tasks track. The following is an overview of how the activities will function:
| Activity | Explanation |
|---|---|
| Acquire: Processor | This activity will attempt to acquire one of the processors for the box. If the processor is not available to receive the flow item, the token will wait at this activity until the processor becomes available. If the processor is available, the token will acquire that resource and release the token to the next downstream object. When the resource is acquired, you'll assign the token a label named Processor that will contain a reference to the specific processor that was acquired. |
| Split: Create Coordinated Tasks | The Split activity will split the incoming token into two identical tokens and release them through each outgoing connector. You'll use these two tokens to synchronize the two operators so that they can coordinate their tasks. One token will control the main operator and the other will control the assisting operator. You'll create the second token as an independent token with a copy of the original token's labels. |
| Acquire: Main Operator | This activity will attempt to acquire an operator to work on the transportation tasks. If the operator is not available to work on the task, the token will wait at this activity until the operator becomes available. If the operator is available to work on the task, the token will acquire that resource and release the token to the next downstream object. When the resource is acquired, you'll assign the token a label named MainOperator that will contain a reference to the specific operator that was acquired and you'll use this to assign the rest of the tasks to this operator. |
| Travel: MainOp to LargeQueue | This activity will tell the main operator to travel to the LargeQueue in the 3D model. It will use the MainOperator label to assign the task to the same operator that was acquired in the previous activity. |
| Synchronize: Both Operators at LargeQueue | This activity will ensure that the main operator will wait until the assisting operator has also traveled to the queue and is ready to help load the large box. The token controlling the main operator will wait until the token controlling the assisting operator reaches this activity. You'll use the default settings for this activity. |
| Load Box at LargeQueue | This activity will tell the main operator to load the box at LargeQueue. It will use the MainOperator label to assign the task to the same operator that was acquired in the previous activity and it will use the Box label to tell the operator which item should be transported. |
| Synchronize: Both Operators Loaded Box | This activity will ensure that the assisting operator will wait until the main operator has loaded the large box. The token controlling the assisting operator will wait until the token controlling the main operator reaches this activity. You'll use the default settings for this activity. |
| Travel: MainOp to Processor | This activity will tell the main operator to travel to the processor that was acquired earlier. It will use the MainOperator label to assign the task to the same operator that was acquired in the previous activity and it will use the Processor label to tell the main operator which processor it should travel to. |
| Synchronize: Both Operators at Processor | This activity will ensure that both the main operator and the assisting operator will both arrive at the processor before unloading the box. The token controlling the assisting operator will wait until the token controlling the main operator reaches this activity. You'll use the default settings for this activity. |
| Unload Box at Processor | This activity tells the main operator to unload the box at the processor. It will use the MainOperator label to assign the task to the same operator that was acquired in the previous activity and it will use the Box label to tell the operator which item should be transported. You'll use the Processor label to tell the operator which processor should receive the flow item. |
| Synchronize: Both Operators Ready for Release | This activity will ensure that the assisting operator will wait until the main operator has unloaded the large box. The token controlling the assisting operator will wait until the token controlling the main operator reaches this activity. You'll use the default settings for this activity. |
| Release: Main Operator | This activity releases the main operator so that it can work on other tasks. It will use the MainOperator label to release the operator. |
To create this logic:
- Click the Acquire: Processor activity to select it.
Click the Exclamation Point button
 next to this activity to enter sampling mode.
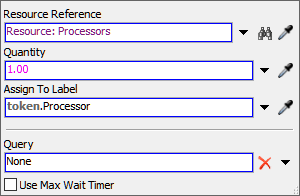
 - Click the Resource: Processors shared asset to sample it.
- In Quick Properties, click the arrow next to the Assign To Label box to open a menu. Point to Token Label, then select Processor.
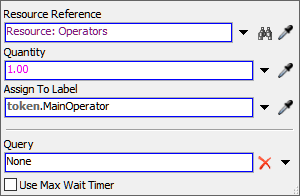
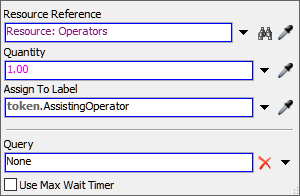
- Click the Acquire: Main Operator activity to select it.
Click the Exclamation Point button
next to this activity to enter sampling mode.
- Click the Resource: Operators shared asset to sample it.
- In Quick Properties in the Assign To Label box, type
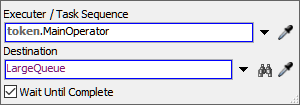
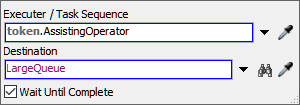
token.MainOperator. - Click the Travel: MainOp to LargeQueue activity to select it. In Quick Properties, click the arrow next to the Executer / Task Sequence box to open a menu. Point to Token Label and select MainOperator.
- Next to the Destination box, click the
Sampler button
to enter sampling mode.
- In the 3D model, click the LargeQueue to open a menu. Select LargeQueue.
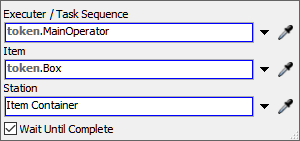
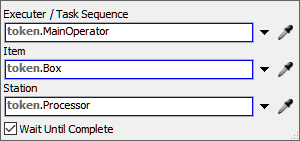
- Click the Load Box at LargeQueue activity to select it. In Quick Properties, click the arrow next to the Executer / Task Sequence box to open a menu. Point to Token Label and select MainOperator.
- Click the arrow next to the Item box to open a menu. Point to Token Label and select Box.
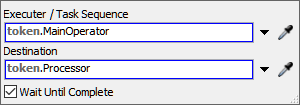
- Click the Travel: MainOp to Processor activity to select it. In Quick Properties, click the arrow next to the Executer / Task Sequence box to open a menu. Point to Token Label and select MainOperator.
- Click the arrow next to the Destination box to open a menu. Point to Token Label and select Processor.
- Click the Unload Box at Processor activity to select it. In Quick Properties, click the arrow next to the Executer / Task Sequence box to open a menu. Point to Token Label and select MainOperator.
- Click the arrow next to the Item box to open a menu. Point to Token Label and select Box.
- Click the arrow next to the Station box to open a menu. Point to Token Label and select Processor.
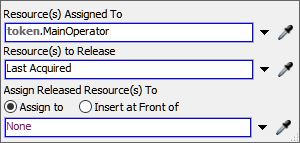
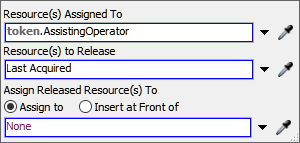
- Click the Release: Main Operator activity to select it. In Quick Properties, click the arrow next to the Resource(s) Assigned To box to open a menu. Point to Token Label and select MainOperator.
Consider saving your simulation model.
Step 6 Edit the Secondary Transport Task Logic
In this step, you'll create the logic that will control the tasks for the operator on the Secondary Transport Tasks track. The following is an overview of how the activities will function:
| Activity | Explanation |
|---|---|
| Acquire: Assisting Operator | This activity will attempt to acquire an operator to work on the transportation tasks. If the operator is not available to work on the task, the token will wait at this activity until the operator becomes available. If the operator is available to work on the task, the token will acquire that resource and release the token to the next downstream object. When the resource is acquired, you'll assign the token a label named AssistingOperator that will contain a reference to the specific operator that was acquired and you'll use this to assign the rest of the tasks to this operator. |
| Travel: AsstOp to LargeQueue | This activity will tell the assisting operator to travel to the LargeQueue in the 3D model. |
| Synchronize: Both Operators at LargeQueue | This activity will ensure that the main operator will wait until the assisting operator has also traveled to the queue and is ready to help load the large box. The token controlling the main operator will wait until the token controlling the assisting operator reaches this activity. You'll use the default settings for this activity. |
| Synchronize: Both Operators Loaded Box | This activity will ensure that the assisting operator will wait until the main operator has loaded the large box. The token controlling the assisting operator will wait until the token controlling the main operator reaches this activity. You'll use the default settings for this activity. |
| Travel: AsstOp to Processor | This activity will tell the assisting operator to travel to the processor that was acquired earlier. It will use the Processor label to tell the main operator which processor it should travel to. |
| Synchronize: Both Operators Ready for Release | This activity will ensure that the assisting operator will wait until the main operator has unloaded the large box. The token controlling the assisting operator will wait until the token controlling the main operator reaches this activity. You'll use the default settings for this activity. |
| Release: Assisting Operator | This activity releases the assisting operator so that it can work on other tasks. |
| Sink: Coordinated Task Complete | This activity removes the token that was linked to the flow item from the process flow. |
To create this logic:
- Click the Acquire: Assisting Operator activity to
select it. Click the Exclamation Point button
next to this activity to enter
sampling mode.
- Click the Resource: Operators shared asset to sample it.
- In Quick Properties in the Assign To Label box, type
token.AssistingOperator. - Click the Travel: AsstOp to LargeQueue activity to select it. In Quick Properties, click the arrow next to the Executer / Task Sequence box to open a menu. Point to Token Label and select AssistingOperator.
- Next to the Destination box, click the
Sampler button
to enter sampling mode.
- In the 3D model, click the LargeQueue to open a menu. Select LargeQueue.
- Click the Travel: AsstOp to Processor activity to select it. In Quick Properties, click the arrow next to the Executer / Task Sequence box to open a menu. Point to Token Label and select AssistingOperator.
- Click the arrow next to the Destination box to open a menu. Point to Token Label and select Processor.
- Click the Release: Assisting Operator activity to select it. In Quick Properties, click the arrow next to the Resource(s) Assigned To box to open a menu. Point to Token Label and select AssistingOperator.

Consider saving your simulation model.
Step 7 Run and Test the Simulation Model
Run the simulation model:
As you watch, you'll see that when a large box appears in the LargeQueue, eventually one of the operators will go to load it. Once the other operator comes to load the box as well, the two operators then transport the box to one of the processors. The Split and Synchronize activities make it possible for the two operators to perform their tasks at the same time.
The only disadvantage of coordinated tasks is that the two operators follow the exact same travel path when they're working on the coordinated task and so their 3D visualizations appear to be merged together, creating an odd visual effect. One way to possibly fix this would be to apply some Change Visual activities that would apply a small offset to the assisting operator. However, that's a little difficult to get right and you might find it's easier just to live with the strange visualization.
Conclusion
This concludes the coordinated tasks tutorial. By now, you should have gotten a sense of how to build coordinated tasks by building parallel tracks and using the Coordination process flow activities to synchronize the tasks between the two operators.