Task 1.1 - Sorting Systems
Task Overview
In this task, you'll build a simulation model that uses three different methods to sort flow items:
Conditional Sorting
This simple conveyor sorting system will divert flow items based on a simple true or false condition. In this system 30% of the flow items will meet the condition and will be diverted to an alternate conveyor line.
Destination-Based Sorting
Next, you'll modify the first conveyor system so that flow items will be diverted to a particular conveyor line where the line's conveyor port ranking matches the flow item's type.
Fixed Resource Sorting
Lastly, you'll add a way to sort flow items to different downstream fixed resources based on the flow item's type.
Step 1 Create a Conditional Sorting System
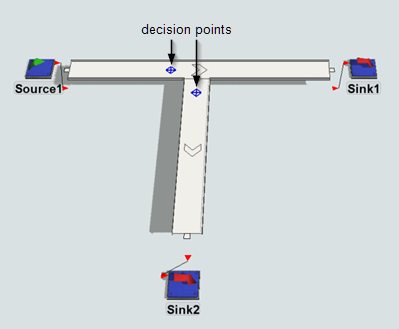
In this step, you'll create a sorting conveyor system that diverts flow items to two different conveyors based on specific conditions. To create this system, you'll add a decision point to the main line conveyor and connect it to a decision point on the diverting conveyor. Then you will set the decision point's On Arrival trigger to send 30% of items to the decision point on the diverting line.
To create this kind of sortation system:
- With the Library open, drag a Source into your 3D model.
- Create a Straight Conveyor extending horizontally from the Source.
- Open the Toolbox in the right pane. Double-click Conveyor System to open a properties window.
- In the General tab, clear the Draw Render Mode box. Click OK to save the changes and close the window.
- Switch back to the Library in the right pane. Create a second Straight Conveyor that is perpendicular to the first. Drag the second conveyor until it snaps to connect with the first conveyor, forming a T shape.
- Drag a Sink from the Library and position it at the end of the first conveyor. Repeat this step for the second conveyor.
- Create port connections (A-connects) from the Source to the first conveyor and from the conveyors to their respective Sinks.
- Drag a Decision Point from the Library and place it on the first conveyor at the first junction on the conveyor where items could be diverted to different conveyor lines.
- Drag another Decision Point from the Library and place it at the beginning of the second conveyor line. This is the conveyor line to which you will divert 30% of the products.
- Make an input/output port connection ('A' connect) from the sending Decision Point on the first conveyor to the receiving Decision Point on the second conveyor.
- Double-click the sending Decision Point to open its Properties dialog box.
- On the Decision Point Type tab, in the
Triggers group, click the Add
button
 to open a menu. Select
On Arrival.
to open a menu. Select
On Arrival. - Click the Add button
next to the
On Arrival trigger and select Send
Item from the menu.
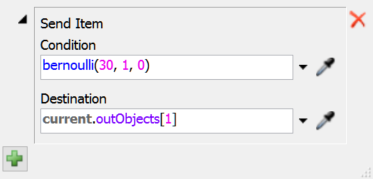
- In the Send Items dialog box, delete what is in the
Condition box and replace it with the following expression:
bernoulli(30, 1, 0). - Leave the default settings in the Destination box for now. Click OK to apply the changes.
- Double-click the Source to open its properties window.
On the Source tab in the
Inter-Arrivaltime box, type
2.
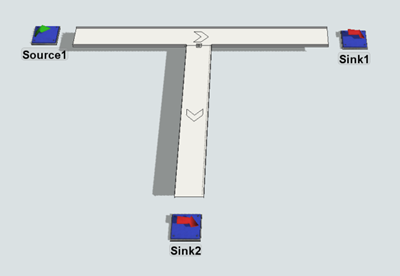
Run the simulation to test it. As the simulation runs, approximately 30% of the flow items should get diverted to the second conveyor:
You can create different conditions that need to be satisfied in order for the items to
get sent to the destination, such as a condition that checks the value of a label on a flow
item. For example, the condition could be an expression such as item.Weight >
10. This expression would check a label named Weight on the flow item. If
the value of the label is greater than 10, the item will be sent to the specified
destination.
Step 2 Change it to a Destination-Based Sorting System
In the previous step, you created a sorting system that was focused on whether a particular condition is met or not. In this step, you will modify the system's logic to send flow items to a conveyor that matches a value of the flow item's ProductType label.
To create this logic, you will add some additional conveyors and connect the decision point on the main line conveyor to multiple decision points on diverting conveyors. Then you will set the source to randomly assign a value between 1 and 5 to a label called ProductType and assign each number a unique color.
Then you will add the Send Item Behavior on the On Arrival trigger to the decision point on the main line. The Destination field on the Send Item Behavior will determine which lanes the items will be diverted to based on their item product type.
To create this kind of sortation system:
- Disconnect the two Sinks from the conveyor (press and hold the Q key as a shortcut).
- Click the second conveyor in your model. Copy (Ctrl+C) the conveyor and paste it (Ctrl+V) to make 4 copies of the conveyor.
- Snap the 4 copies to the first conveyor, spacing them equally. Feel free to resize the first conveyor to make it longer if needed. You can also use the Join Conveyor tool in the Library to connect the last conveyor if needed.
- Drag 3 more Sinks from the Library into the model and position each one at the end of a conveyor. Add port connections (A-connects) between each conveyor and each Sink.
- Drag 4 more Decision Points from the Library and position each one at the beginning of each conveyor except the last one. Add port connections (A-connects) from the first decision point to each of the new decision points.
- Double-click the Source to open its properties window.
On the Triggers tab, click the
Add button
to open a menu. Select On Creation.
- Click the Add button next to the On Creation trigger to open a menu. Point to Data, then select Set Label.
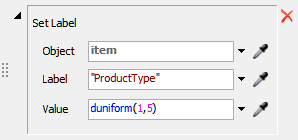
- In the Set Label picklist options in the
Label box type
"ProductType"to assign a label named ProductType to flow items as they are created. - In the Value box, type the statistical distribution
duniform(1,5)to randomly assign the flow items a product type of 1 through 5. - Now you'll add a second picklist option to the On Creation trigger. With the Set Label options still open, click the Add button at the bottom of this box to open a menu. Point to Visual, then Set Object Color.
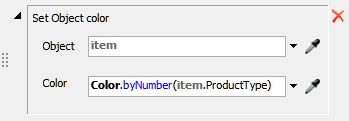
- In the Set Object Color picklist options, in the
Color box, type
Color.byNumber(item.ProductType)to assign different item types a color based on the numeric value in the ProductType label. - Double-click the first Decision Point to open its
properties window. On the Decision Point Type tab, next to
the OnArrival trigger, click the
Add button
to open a menu. Select Send Item.
- In the Send Item picklist options, click the arrow next
to the Condition box to open a menu and select
Always. The box will now display
true, which means that any item arriving at the decision point will always be sent. - Click the arrow next to the Destination box type the
expression
current.outObjects[item.ProductType], which means that it will send the item to a port based on the number listed in the ProductType label. - Click OK to apply the settings and close the Properties dialog box.
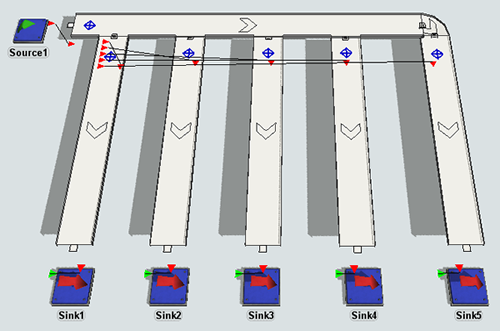
Run the simulation to test it. As the simulation runs, you'll notice that items are diverted down different conveyor lines based on their color (ProductType):
Step 3 Add a Way to Sort to Fixed Resources
In this step, you will add an additional sorting method that sorts flow items to downstream fixed resources based on their product type. You'll start by changing the source's properties so that it will create 6 different product types of items (instead of just 5). Then, you'll add two queues to the last conveyor line and connect a decision point that will send flow items to one of them.
When sending items to multiple downstream fixed resources, you connect the decision point on the conveyor to exit transfers (rather than to other decision points). Items sent to an exit transfer will go to the object connected to that exit transfer.
To create this sortation system:
- Double-click the Source to open its properties window.
On the Triggers tab, next to the On
Creation box, click the Edit Properties button
 to open the picklist properties.
 - Click the arrow next to the Set Label picklist to
expand it. In the Value box, change the expression to
duniform(1,6)so that it will create an additional item Type. Click OK to apply the changes. - Delete the Sink on the last conveyor.
- Drag two Queues from the Library and place them side by side at the end of the last conveyor.
- Create a port connection (A-connect) from the last conveyor to the first Queue. You should now see an exit transfer on the first conveyor with a port connection to the first queue.
- This time, when you create a second port connection (A-connect) from the last conveyor to the second Queue, make sure that you create the port connection in a position that is far away from the first exit transfer. You want to create two different exit transfers for each queue. Feel free to reposition the exit transfers if needed, but make sure that the second exit transfer is further down the conveyor line than the first one.
- Create a port connection (A-connect) from this conveyor's Decision Point to the exit transfer connected to the first queue.
- Double-click the Decision Point on the last conveyor to
open its properties window. On the Decision Point Type tab
in the Triggers group, click the
Add button
to open a menu. Select On Arrival.
- Click the Add button
next to the
On Arrival trigger and select Send
Item from the menu.
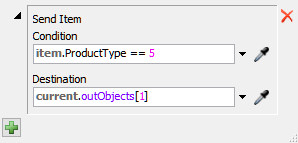
- In the Condition box, write the expression
item.ProductType == 5to send items with a ProductType of 5 to the first output port. - The Send Item function on Decision Points requires strict connections. Therefore, to prevent routing errors, drag one more Decision Point and place it on the last conveyor so that there are now two decision points.
- Create a port connection (A-connect) from the first Decision Point on the main conveyor to the new Decision Point you just added.
![]()
Run the simulation to test it. As the simulation runs, you'll notice that items with an ProductType of 5 or 6 are diverted two one of the queues based on their color (ProductType):
Conclusion
In the next tutorial task, you will learn how you can modify this system to merge conveyor lanes. Continue on to Tutorial Task 1.2 - Merging, Area Restriction, and Slug Building.