Global Preferences
Overview and Key Concepts
The global preferences dialog window specifies default user preferences for FlexSim. These preferences are saved across several models and remembered when FlexSim is closed and reopened. The dialog window is split into seven tabs.
These settings are accessed from the File menu.
The Fonts and Colors Tab
The Fonts and Colors tab specifies syntax highlighting and other settings used in FlexSim's implementation of the Scintilla code editor. You can also specify settings and colors for the template editor, as well as for unformatted text (which is used in multi-line unformatted text controls like the user description portion of the Properties window).
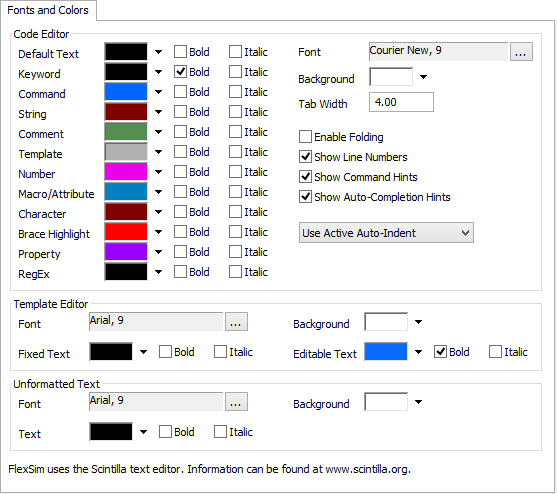
For more information on the Scintilla code editor, go to www.scintilla.org.
The Scintilla text editor is under copyright 1998-2003 by Neil Hodgson <neilh@scintilla.org>. All Rights Reserved.
The Environment Tab
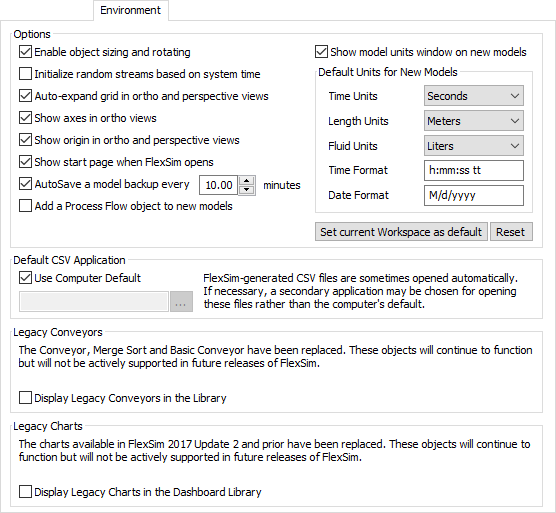
In this tab page you can specify various settings such as whether you want code to be C++ or FlexScript by default, various grid settings in the ortho and perspective view, excel DDE settings, etc.
AutoSave will automatically save a backup model of your currently open model. This backup model will be named [modelname]_autosave.fsm and will be saved in the same directory as your model. AutoSave will only save your model if it is reset and not running. You can disable AutoSave for a specific model in the Model Settings window.
For a list of valid time and date format options, see Model Settings.
The Libraries Tab
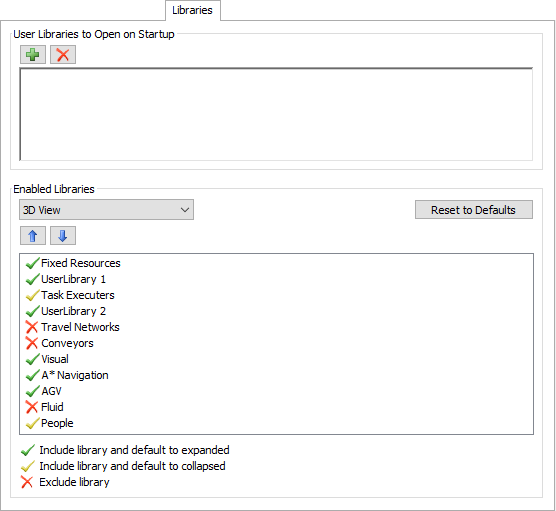
This tab page lets you control libraries that are loaded and displayed in the Drag-Drop Library. The paths specified in the User Libraries to Open on Startup are relative to your libraries folder of the install directory (for example, C:/Program Files/FlexSim/libraries). Enabled Libraries allow you to specify which libraries are visible and which order they appear in. Once a User Library is loaded, it will be displayed in this list.
The Dynamic Content Tab
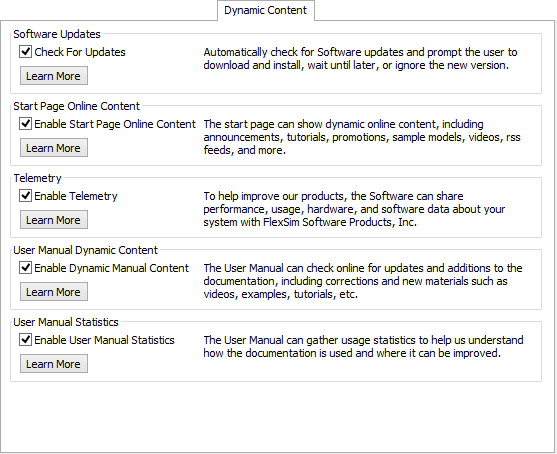
In this tab page you can specify various settings that send or pull content from the FlexSim server in order to give you a more dynamic experience or to help FlexSim better understand how to improve the software.
The Customize Toolbar Tab
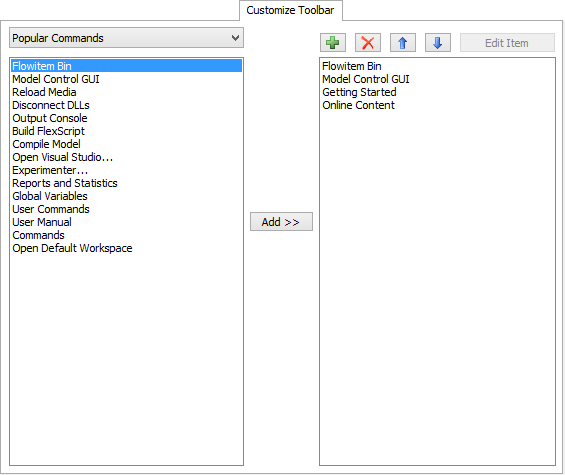
In this tab page you can customize which menu commands are accessible easily through the customizable section of the top toolbar.
The Graphics Tab
This tab is used for customizing 3D graphics settings so that FlexSim will run the best on your hardware.
Several of these options provide suggestions or hints to the graphics card as to the quality you would like. If the graphics card does not support the feature requested, such as Quad Buffered Stereo 3D or a 32 Bit Depth Buffer, it will fall back to using the next best option that it supports.
If no graphics acceleration is available with your system configuration, FlexSim will automatically fall back to using a generic software OpenGL implementation and ignore the settings defined here.
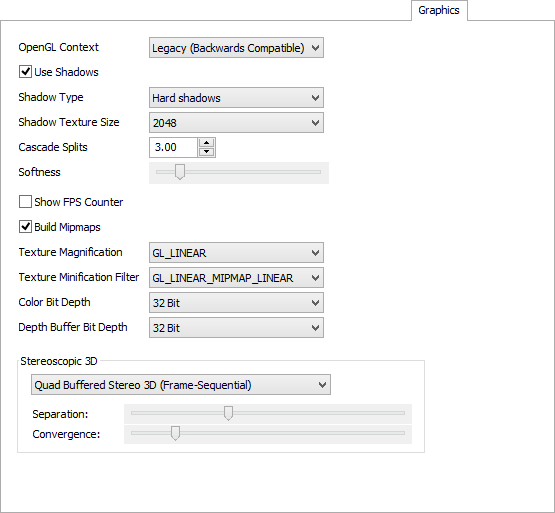
OpenGL Context
This option controls which type of OpenGL rendering context FlexSim will request from the graphics driver on your computer.
- Recommended - A hardware-accelerated OpenGL rendering context that supports almost all features of OpenGL, including deprecated features. This setting will request the best OpenGL Compatibility Profile that the graphics driver supports.
- Core Profile (3.3) - A hardware-accelerated OpenGL rendering context that supports only OpenGL 3.3 features. Deprecated features have been removed. Some graphics driver implementations and system configurations (such as VMware virtual machines) only perform hardware graphics acceleration with an OpenGL Core Profile.
- Generic (No GPU Acceleration) - A generic software renderer by Microsoft that supports OpenGL 1.1 on any hardware. Graphics processing will be done on the CPU and not the graphics card (GPU). This type of rendering context is slow, and certain graphics features, such as bone animations and shadows, will not work with this context. This option was previously known as Compatibility Mode.
Use Shadows
This option controls whether shadows will be rendered in the 3D environment.
Shadow Type
This specifies whether shadows should be rendered with hard or soft edges.
Shadow Texture Size
This specifies the resolution of the shadow map. A higher resolution will improve shadow quality, but will require more graphics processing.
Cascade Splits
This specifies the number of cascaded shadow maps to use. More cascade splits will improve shadow quality, but will require more graphics processing.
Softness
This affects how much shadows are blurred around the edges when using soft shadows.
Show FPS Counter
If checked, FlexSim will display a counter showing how quickly the 3D view is rendering in frames per second.
Build Mipmaps
If checked, FlexSim will generate multiple resized "thumbnails" of each texture it loads. This allows for faster and better texture rendering when zoomed out, but requires approximately double the graphics card memory to store the texture.
Texture Magnification
Select how the graphics card should resolve the color of each pixel when you are zoomed in close to a texture.
- GL_LINEAR - This will do a linear interpolation of the color values of multiple texture elements surrounding the pixel. While this looks much better when zoomed in, the linear interpolation calculation can be slower than the GL_NEAREST option.
- GL_NEAREST - This will just take the color value of the texture element closest to the pixel. While faster, this doesn't look as good when zoomed in.
Texture Minification
Select how the graphics card should resolve the color of each pixel when you are zoomed out from a texture.
- GL_LINEAR - This will do a linear interpolation of the color values of multiple texture elements near the pixel. This allows for a more smooth look when zooming out, but the linear interpolation calculation can be slower than the GL_NEAREST option.
- GL_NEAREST - This will just take the color value of the texture element closest to the pixel. While faster, can cause weird "flicker" artifacts when zooming out.
- The other options are more or less similar to the above options, but allow more flexibility in defining which mipmap "thumbnail" to use as well.
Color Bit Depth
Choose the format in which you want the graphics to store color data.
Depth Buffer Bit Depth
Choose the format in which you want the graphics to store depth buffer data. Depth buffer values span from a 3D view's near plane to its far plane, so the depth buffer bit depth defines the granularity by which the graphics card can distinguish which objects are in front of or behind other objects.
Stereoscopic 3D
This option controls how stereoscopic 3D should be rendered.
- No Stereoscopic 3D - Do not attempt to do any stereoscopic 3D rendering.
- Quad Buffered Stereo 3D (Frame-Sequential) - Certain
system configurations can use this mode to sync the 3D display with active-shutter
glasses using four OpenGL render buffers to display every other frame to each eye. This
mode requires specialized hardware and software designed for 3D, such as Nvidia 3D
Vision.
Once your computer is properly configured with a 3D display, this mode will automatically render 3D views in stereoscopic 3D. If you are using an Nvidia Geforce graphics card, the view must be full-screen (F11) to trigger the effect. On Nvidia Quadro or AMD FirePro graphics cards, the effect will work with all 3D views.
This mode only works with certain configurations of hardware and software. The graphics card, 3D display monitor, cable/port (DVI-D, DisplayPort, HDMI 1.4a), graphics driver, and operating system must all be compatible for this mode to work correctly. If any of those pieces are not compatible, then FlexSim will automatically fall back to rendering without stereoscopic 3D.
- Side-by-Side - This option will render each eye to one side of the screen. This can be used to record 3D screenshots or video to be later played with a stereoscopic 3D picture viewer or video player. It can also be used in full-screen mode with certain 3D TVs or monitors that support side-by-side stereo 3D input.
- Top-Bottom - This option works similarly to side-by-side, but one eye will be rendered at the top of the screen and the other will be rendered at the bottom.
Separation
This controls the difference in horizontal position between the right and left images, changing the depth of the stereo effect.
Convergence
This controls the focal point of the stereo effect. Increasing the convergence makes near objects appear to pop out of the screen.
Compiler
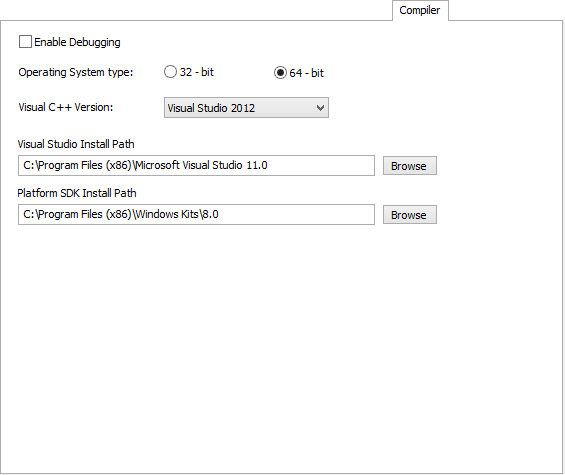
This tab is used for configuring Visual Studio to compile or debug C++ code.