Task 4.4 - Custom AGV Settings
Task Overview
In this tutorial task, you'll learn how to create custom loading and unloading times for different types of flow items. You'll begin the tutorial task by changing the arrival schedule so that the upper floors regularly produce dirty laundry and waste that needs to be transported to the loading dock area. In the last step, you'll learn how to use a global table to create custom loading and unloading times for each type of flow item.
When you are finished, your simulation model will look similar to the following image:
Step 1 Create Additional Delivery Schedules
In this step, you'll add additional activities to the DeliverySchedule process flow you created in an earlier tutorial task. Eventually, these new activities will create the logic that will regularly create dirty laundry and waste in the queues on each of the upper floors.
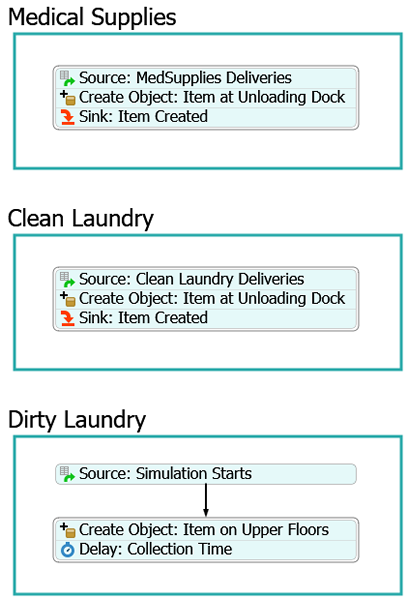
When you're finished, your process flow should look similar to the following image:
For now, you'll merely add and connect these activities to the process flow. You'll edit the properties to add the functionality in a later step.
To add and connect these activities:
- On the main toolbar, click the Process Flow button to open a menu. Select DeliverySchedule to open this process flow.
- From the Library under the Flowchart group, add a Process shape.
- Rename the new process shape Dirty Laundry.
- Inside the Dirty Laundry shape, add a Schedule Source (under Token Creation).
- Create a stacked block with the following activities:
- A Create Object activity (under Objects)
- A Delay activity (under Basic)
- For clarity, rename the new activities as follows:
- Create a connection from the Source: Simulation Starts activity to the Delay: Varying Collection Times activity.
- Create a connection from the Create Object: Item on Upper Floors activity looping back to the Delay: Varying Collection Times activity.
| Activity | New Name |
|---|---|
| Source | Source: Simulation Starts |
| Create Object | Create Object: Item on Upper Floors |
| Delay | Delay: Collection Time |
Check that your process flow looks similar to the image shown in the beginning of this step.
Step 2 Edit the Delivery Schedule Logic
In this step, you'll create the logic for the new activities you added in the previous step. The following is an overview of how each activity and shared asset will function:
| Activity | Explanation |
|---|---|
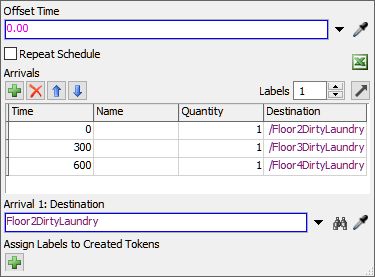
| Source: Simulation Starts | This activity will create 3 tokens that will loop continuously throughout the rest of the activities in the Dirty Laundry shape. You'll assign a unique value for a label named Destination on each token. One token will create tokens for the Floor2DirtyLaundry queue, another for the Floor3DirtyLaundry queue, etc. You'll also offset the timing of some of these tokens so that they don't all move to the next activity at the same time. |
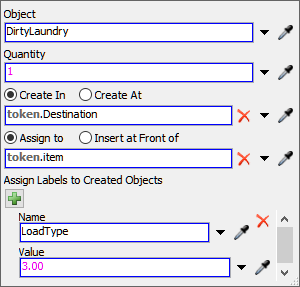
| Create Object: Item on Upper Floors | You'll edit this activity so that it will create the new DirtyLaundry flow item and place it inside the one of the queues on the upper floor. The token will use its Destination label to know which queue it should use. You'll also add a label named LoadType to the new flow items that will indicate which type of flow item it is. You'll use a value of 3 for DirtyLaundry flow items. |
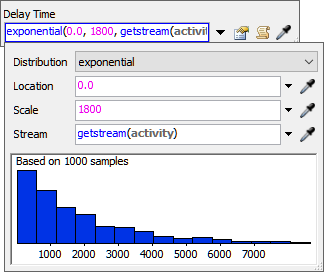
| Delay: Collection Time | The token will be delayed a varying amount of time, representing the amount of time it takes a staff member to collect the dirty laundry. You'll use an exponential distribution with a scale of 1800 seconds (equivalent to 15 minutes). After the token finishes the delay, it will loop back to the Create Object activity. |
After you've made these edits, you'll create a copy of these activities that will simulate Waste collection. You'll make a few edits to the activities:
| Activity | Explanation |
|---|---|
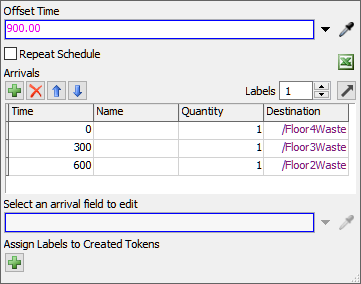
| Source: Simulation Starts (Waste) | This schedule source will be identical to the Dirty Laundry schedule source. The only difference is you will add a small offset time of 900 seconds to this activity. You'll also assign Destination labels that will create tokens for the Floor4Waste queue, the Floor3Waste queue, etc. |
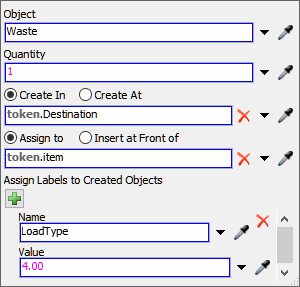
| Create Object: Item on Upper Floors | You'll edit this activity so that it will create the new Waste flow item and place it inside the UnloadingDock queue. You'll also edit the LoadType label to use a value of 4 for Waste flow items. |
To create this logic:
- Click the Source: Simulation Starts activity to select
it. In Quick Properties, click the Add button
 to add a new row.
 - Repeat the previous step until there are 3 rows.
- Increase the Labels box to
1. - In the table, rename the new label column Destination.
- Click the first cell under the Destination column to
select it. Type
Floor2DirtyLaundryin this cell. - Under the Destination column for the second row, type
Floor3DirtyLaundry. - Under the Destination column for the third row, type
Floor4DirtyLaundry. - Under the Time column for the second row, type
300. - Under the Time column for the second row, type
600. - Click the Create Object: Item on Upper Floors activity to select it. In Quick Properties click the arrow next to the Object box to open a menu. Point to FlowItems and select DirtyLaundry.
- Make sure the Create In option is selected. Click the arrow next to the box below this option to open a menu. Select Token Label, then select Destination.
- Under the Assign Labels to Created Objects, click the
Add button
to add a label.
- In the Name box, delete the current text and type
LoadType. - In the Value box, delete the current text and type
3.00. - Click the Delay: Varying Collection Times activity to
select it. In Quick Properties next to the Delay box, click
the Edit Properties button
 to open the statistical
distribution properties.
to open the statistical
distribution properties. - Change the Scale to
1800. - Click the Dirty Laundry shape to select it. Press Ctrl+C to copy the shape. Click a blank area in the process flow and press Ctrl+V to paste a copy of the shape into the process flow.
- Rename the copied shape Waste.
- In the Waste shape, click the
Source: Simulation Starts activity to select it. In the
Offset Time box, type
900.00. - In the Arrivals table, under the
Destination column for the second row, type
Floor4Waste. - Under the Destination column for the second row, type
Floor3Waste. - Under the Destination column for the third row, type
Floor2Waste. - Click the Create Object: Item on Upper Floors activity to select it. In Quick Properties, click the arrow next to the Object box to open a menu. Point to FlowItems and select Waste.
- Under the Assign Labels to Created Objects for the
LoadType label, change the Value box, delete the
current text and type
4.00.
Consider saving your simulation model at this point.
Step 3 Change the Drop Off Logic
In this step, you'll add a second queue to the loading dock area. One queue will collect dirty laundry for shipment to a cleaning facility and one queue will collect waste for removal. You'll change the drop off logic so that the two queues in the loading dock area pull the dirty laundry and waste flow items from the ItemsReadyForDelivery global list. Because items in the upper floors will now need transport to the loading dock, you'll also add Next Look For Work connections from the main AGV network to each of the upper floors.
To change the drop off logic:
- From the library, add a Queue to the 3D model near the drop off area.
- Rename the new queue WasteRemoval.
- Press and hold the A key to enter connection mode. Click the MainDropOffPoint control point. Then, click the WasteRemoval queue to open a menu. Select Location. A blue line will appear connecting the control point and the queue.
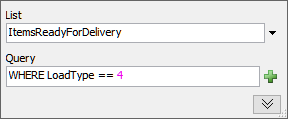
- Double-click the WasteRemoval queue to open its properties window. In the Flow tab in the Input group, check the Pull Strategy check box.
- Click the arrow next to the Pull Strategy box to open a menu. Point to Use List and select Pull from Item List to open a picklist window.
- Click the arrow next to the List box to open a menu and select ItemsReadyForDelivery.
- Next to the Query box, click the
Add button
to open a menu. Point to WHERE (filter) and select
LoadType.
- In the Query box, change the last part of the list
query to
== 4. - Click the OK button to save the changes and close the window.
- Double-click the LoadingDock queue to open its properties window.
- In the Flow tab next to the Pull
Strategy box, click the Edit Properties button
to open a picklist window.
- Next to the Query box, click the
Add button
to open a menu. Point to WHERE (filter) and select
LoadType.
- In the Query box, change the last part of the list
query to
== 3. - Click the OK button to save the changes and close the window.
Reset and run the simulation model:
As the model runs, dirty laundry and waste will gradually appear in the queues on the upper floors and the AGVs will transport those items to the appropriate queues in the loading dock area.
Step 4 Customize Loading and Unloading Times
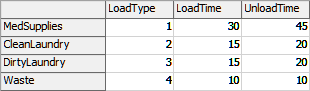
In this step you'll create a global table that will control the loading and unloading times for the AGVs depending on what type of load they are transporting. When you're finished, your global table will look similar to the following image:
After setting up the global table, you'll then update the AGVs in the 3D model to use this global table to determine the loading and unloading times of the four different flow items. This step will demonstrate two different methods for referencing a global table. For the Load Time property, you'll learn how to reference a global table using a picklist. For the Unload Time property, you'll use a different method in which you'll reference a global table using FlexScript. Explore both methods to determine which one you prefer.
To customize the load times:
- In the Toolbox, click the Add button
to open a menu. Select
Global Table to create a new table.
- In Quick Properties, change the name of the table to ItemLoadTypes.
- In the Rows box, increase the number to
4. - In the Columns box, increase the number to
3. - Change the name of the row headers as follows:
- Change the name of the column headers as follows:
- Fill in the cell values as follows:
- Click the Model tab to return to the 3D model view.
- If needed, drag all of the AGVs away from the AGVEntryPoint control point to different areas in the model so that you can access each one.
- Double-click AGV1 to open its properties window.
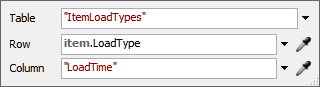
- In the TaskExecuter tab, click the arrow next to the Load Time box to open a menu. Select By Global Table Lookup to open a picklist window.
- Click the arrow next to the Table box to open a menu. Select ItemLoadTypes.
- In the Row box, type
item.LoadType. - In the Column box, type
"LoadTime". - In the Unload Time box, type the following expression:
Table("ItemLoadTypes")[item.LoadType]["UnloadTime"] - Click the OK button to save the changes and close the window.
- Repeat the previous steps to change the Load Time and Unload Time properties for the rest of the AGVs. Use whichever global table lookup method you prefer.
| Row Number | Row Name |
|---|---|
| Row 1 | MedSupplies |
| Row 2 | CleanLaundry |
| Row 3 | DirtyLaundry |
| Row 4 | Waste |
| Column Number | Column Name |
|---|---|
| Col 1 | LoadType |
| Col 2 | LoadTime |
| Col3 | UnloadTime |
| LoadType | LoadTime | UnloadTime | |
|---|---|---|---|
| MedSupplies | 1 | 30 | 45 |
| CleanLaundry | 2 | 15 | 20 |
| DirtyLaundry | 3 | 15 | 20 |
| Waste | 4 | 10 | 10 |

Reset and run the simulation model:
As the simulation model runs, you'll notice that the AGVs will spend different amounts of time loading and unloading flow items based on which type of flow items it is.
Conclusion
Now that you've completed the AGV tutorial, you hopefully have a good sense of all the different features and settings that are available when building an AGV model. As you can see, you've been able to build a fairly complex AGV simulation model using almost no code at all. The AGV features and process flow templates make it easy to build AGV systems and scale well to large simulation projects as needed.
For even more information about modeling AGV systems in FlexSim, consider reading the chapter about Working With Task Executers, which contains a section about AGVs. This concludes the AGV tutorial.