Task 1.4 - Add a Custom Location Object
Task Overview
In this tutorial task, you'll learn how to add a custom location object by creating a meeting place where two staff members can consult with each other. You'll also add a patient examination phase and staff consultation phase to the PatientTrack process flow that will put the new custom object to use. In this phase, the MD that examined the patient will discuss the patient's treatment with an RN.
At the end of the tutorial task, you'll also three additional phases to the end of the patient track.
When you're finished, your model will function similar to the following image:
Step 1 Add a Custom Location Object
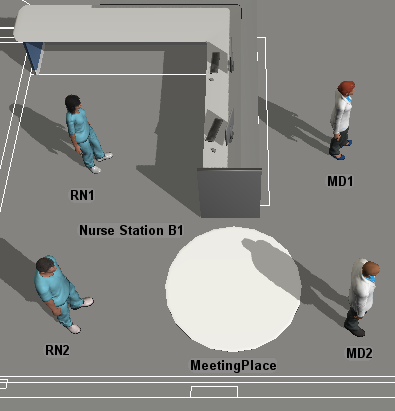
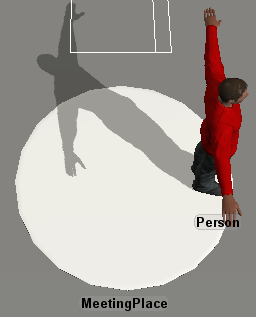
In this step, you'll create a custom location object: a meeting place where two staff members can consult with each other. Visually, it will look like a circle on the floor:
To add this custom location object:
- Make sure the 3D model is currently the active window and that you are in the FlexSim Healthcare environment. In the left pane, click the Library tab to open the Library.
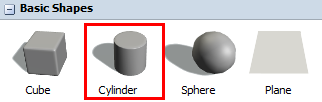
- In the Library under the Healthcare group, click the Prop object to open a menu of location objects. Drag a Cylinder object (under Basic Shapes) into the model. (Use the image in the introduction for this step as a guide for placing objects in the model.)
- Double-click Cylinder1 to open its properties window.
- In the box at the top of the window, rename the cylinder MeetingPlace.
- In the General tab, change the
Size
 properties as follows:
- X-Size: 2.00
- Y-Size: 2.00
- Z-Size: 0.01

In the next step, you'll learn how to add enter instructions for the custom object you just added to the model.
Step 2 Create Enter Instructions
When you're working with custom location objects, you need to assign the object's enter and/or exit instructions. These instructions tell the object which animations it should apply when it is interacting patients and staff. You can assign different instructions to different types of FlexSim Healthcare objects if needed.
For the meeting place object, you'll create two sets of instructions: one for the first staff member that enters the object and one for the second staff member. You'll create enter instructions that will tell each staff member where to stand and will animate them talking to each other. This animation will loop continuously until the staff members leave the object. The meeting place object won't need any exit instructions, so you won't add any at this time.
To create the enter instructions for this custom location object:
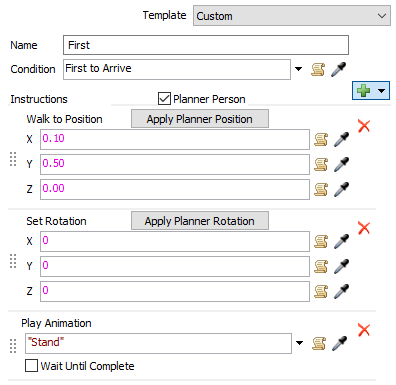
- Ensure that the MeetingPlace properties window is still open. In the Enter Instructions tab, confirm that the Template menu is set to Custom.
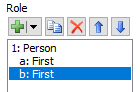
- In the Role list on the left, click the
Add button
 to
add a new role to the list.
to
add a new role to the list. - In the Name box, delete the text and type
Staff. - Click the arrow next to the Condition box to open a menu and select Is an Operator.
- Click the Apply button to save these changes.
- Back by the Role list on the left, click the arrow next
to the Add button
to open a menu. Select
Add Sub Role.
- In the Name box, delete the text and type
First. - Click the arrow next to the Condition box to open a menu and select First to Arrive.
- Click the Apply button to save these changes.
- Next to the Instructions box, click the
Add button to
open a menu. Select Walk to Location to add this
instruction.
- Repeat the previous step to add two more instructions:
- A Set Rotation instruction
- A Play Animation instruction
- Click the arrow next to the Play Animation instruction box to open a menu. Point to Person Animations, then select Stand.
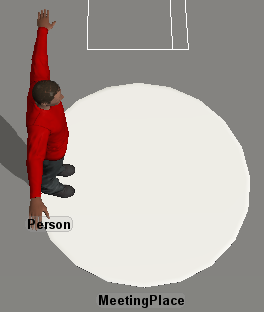
- At the top of all the instructions, check the Planner Person checkbox. You'll see a person appear on the MeetingPlace shape in the 3D model.
- Reposition the Planner Person so that it is on one side of the MeetingPlace shape.
- Click the Apply Planner Position button next to the Walk to Position instructions to change the offsets.
- In the Role list, confirm that the
First role still selected. Then click the
Duplicate button
 to make a copy of this role.
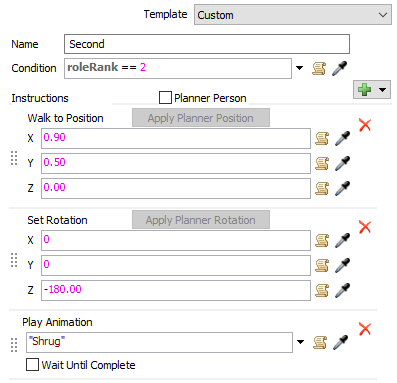
 - In the Name box, delete the text and type
Second. - In the Condition box, type
roleRank == 2. - Click the Apply button to save these changes.
- Click the arrow next to the Play Animation instruction box to open a menu. Point to Person Animations, then select Shrug.
- Reposition the Planner Person so that it is on the opposite side of the MeetingPlace shape.
- Click the Apply Planner Position button next to the Walk to Position instructions to change the offsets.
- In the Set Rotation instructions, change the
Z to
-180.00. - Clear the Planner Person checkbox.
- Press the OK button to save the changes and close the properties window.
You'll test your custom object by building a process flow activity that includes it in the next two steps.
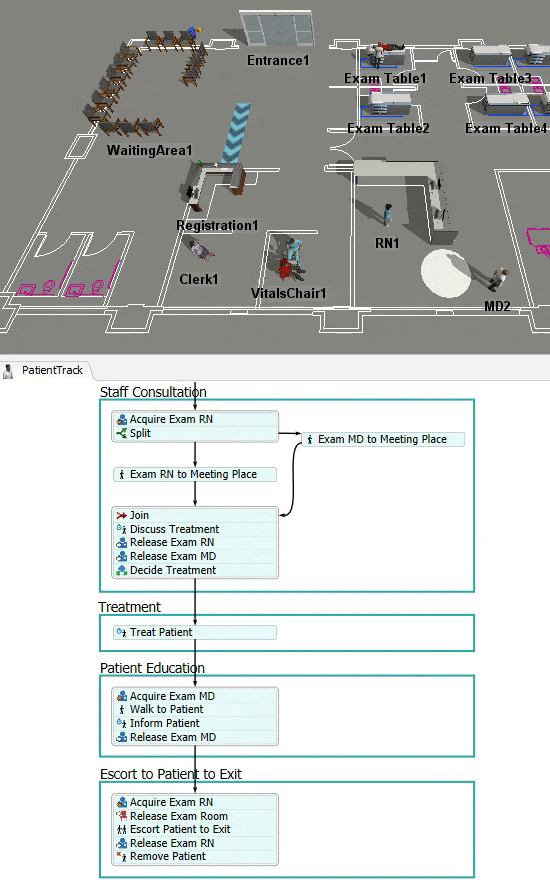
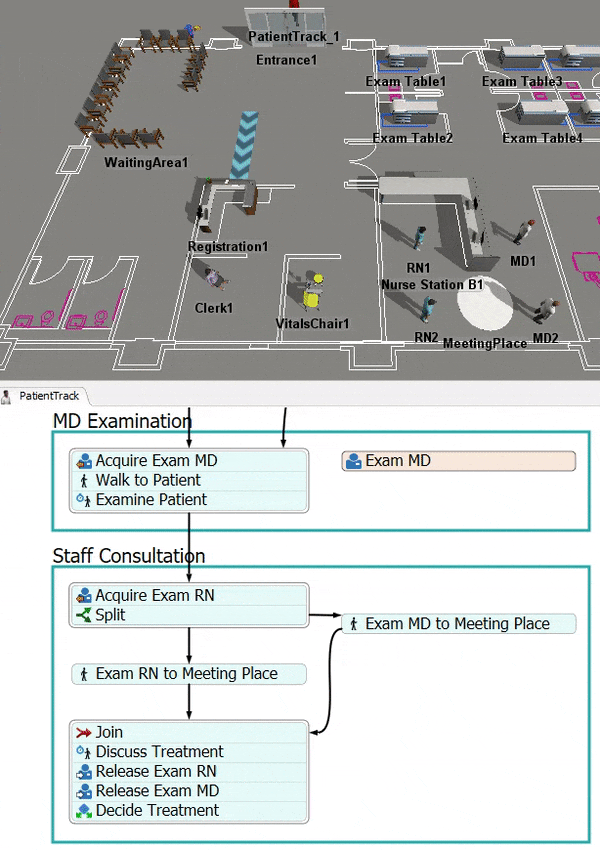
Step 3 Add Exam and Staff Consultation Phases
In this step, you'll add two phases to the patient track. The first phase will be an examination phase in which a doctor will examine the patient. The next phase will use the new custom location object you created in the previous step. In this phase, the MD that performed the patient examination will consult with an RN about the patient's treatment.
When you're finished, your process flow should look similar to the following image:
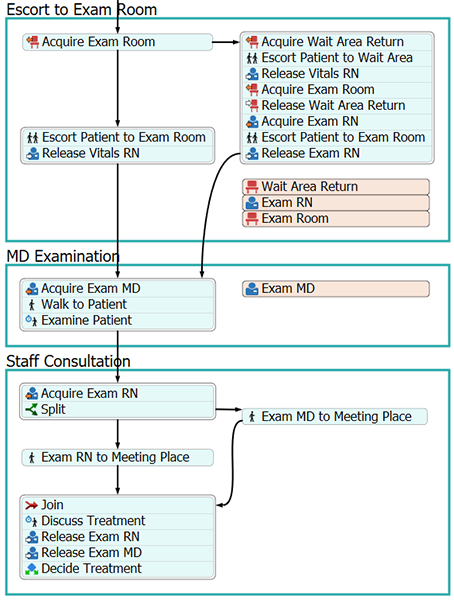
For now, you'll merely add and connect these activities to the process flow. You'll edit the properties to add logic in a later step.
To add and connect these activities:
- Make sure the PatientTrack process flow is open and active. In the Library
under the HC Activity Sets group, add the following
activity sets to your process flow:
- A Process with Staff activity set
- A Two Staff Meet activity set
- Rename the two new shape containers as follows:
- Press and hold the Ctrl key. In the MD Examination shape, click the Release Staff activity and move it from the stacked block to another space in the process flow. Delete the Release Staff activity.
- Repeat the previous steps to delete the following activities and shared assets from
the Staff Consultation container:
- The Acquire Staff2 activity
- The Staff1 shared asset
- The Staff2 shared asset
- From the Library under the Basic group, add a Decide activity to the end of the last activity block in the Staff Consultation phase.
- Rename the activities and shared assets in the MD Examination container as follows:
- Rename the activities in the Staff Consultation container as follows:
- Create connectors from the following activities:
- From the Release Vitals RN activity (in the Escort to Exam Room shape) to the Acquire Exam MD activity (in the MD Examination shape)
- From the Release Exam RN activity (in the Escort to Exam Room shape) to the Acquire Exam MD activity (in the MD Examination shape)
- From the Examine Patient activity to the Acquire Exam RN activity (in the Staff Consultation shape)
| Activity or Shared Asset | New Name |
|---|---|
| Process with Staff | MD Examination |
| Two Staff Meet | Staff Consultation |
| Activity or Shared Asset | New Name |
|---|---|
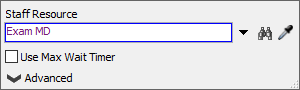
| Staff | Exam MD |
| Acquire Staff | Acquire Exam MD |
| Walk | Walk to Patient |
| Process | Examine Patient |
| Activity | New Name |
|---|---|
| Acquire Staff1 | Acquire Exam RN |
| Staff2 to Office | Exam MD to Meeting Place |
| Staff1 to Office | Exam RN to Meeting Place |
| Process | Discuss Treatment |
| Release RN | Release Exam RN |
| Release MD | Release Exam MD |
| Decide | Decide Treatment |
Check that your process flow looks similar to the image at the beginning of this step.
Step 4 Edit the Exam and Consultation Activities
In this step, you'll edit the properties for the new activities you added in the previous step. Because you are using activity sets, most of the activities are set up to work correctly already. However, you will need to make a few changes, especially since you deleted a few of the shared assets from the activity sets.
The following is an overview of how the activities and shared assets in the MD Examination phase will function:
| Activity or Shared Asset | Explanation |
|---|---|
| Exam MD | This shared asset will link to the MDs group in the 3D model. |
| Acquire Exam MD | This activity will acquire a member of the MDs group. If all members of the MDs group are busy working on other tasks, the token will wait at this activity until an MD is free. |
| Walk to Patient | Once an MD has been acquired, this activity will tell the MD to walk to the current patient's location. |
| Examine Patient | This activity will represent the amount of time it takes the MD to examine the patient. You'll set that time to 20 seconds for now. |
The following is an overview of how the activities in the Staff Consultation phase will function:
| Activity | Explanation |
|---|---|
| Acquire Exam RN | This activity will acquire a member of the RNs group. If all members of the RNs group are busy working on other tasks, the token will wait at this activity until an RN is free. |
| Split | This activity will split the current patient's token into two tokens in order to give coordinated travel tasks to the MD and the RN. The MD and RN will perform the next two travel tasks at the same time. |
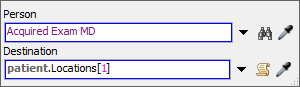
| Exam MD to Meeting Place | This activity will tell the acquired Exam MD to walk to the MeetingPlace object in the 3D model. |
| Exam RN to Meeting Place | This activity will tell the acquired Exam RN to walk to the MeetingPlace object in the 3D model. |
| Join | Once the coordinated travel tasks are complete, the two tokens can be joined together into one token again. |
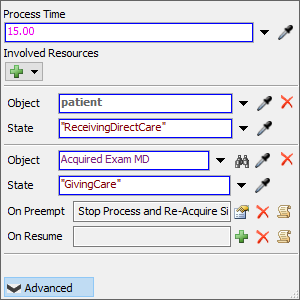
| Discuss Treatment | This activity will represent the amount of time it takes the MD to discuss the patient's treatment with the RN. You'll set that time to 10 seconds for now. |
| Release Exam RN | This activity will release the Exam RN that was acquired earlier in the process flow. Afterwards, the RN will then be free to work on other tasks or to be acquired by other patients. |
| Release Exam MD | This activity will release the Exam MD that was acquired earlier in the process flow. Afterwards, the MD will then be free to work on other tasks or to be acquired by other patients. |
| Decide Treatment | For now, this activity is just a placeholder activity. In the future, you'll use it to determine which treatment the patient will receive. For now, you'll just use the default settings, which means you won't change it in this step. |
To build this logic:
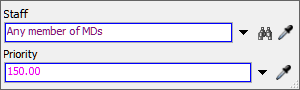
- In the MD Examination shape, click the Exam MD shared asset to select it. In Quick Properties, click the arrow next to the Staff box to open a menu. Point to Staff Groups, then select MDs.
- Click the Examine Patient activity to select it. In the
Process Time box, delete the current text and type
20.00. - In the Staff Consultation shape, click the
Acquire Exam RN activity to select it. Click the
No Link button
 next to the activity to enter
sampling mode.
next to the activity to enter
sampling mode. - Click the Exam RN shared asset in the Escort to Exam Room shape to sample it. A blue line will appear to show that the activity is linked.
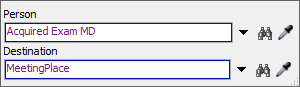
- Click the Exam MD to Meeting Place activity to select
it. In Quick Properties next to the Person box, click the
Sampler button
 to enter sampling mode.
 - Click the Exam MD shared asset in the MD Examination shape to sample it.
- In Quick Properties next to the Destination box, click
the Sampler button
to enter sampling mode.
- In the 3D model, click the MeetingPlace object to open a menu. Select Meeting Place to sample it.
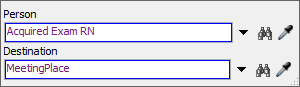
- Click the Exam RN to Meeting Place activity to select
it. In Quick Properties next to the Person box, click the
Sampler button
to enter sampling mode.
- Click the Exam RN shared asset in the Escort to Exam Room shape to sample it.
- In Quick Properties next to the Destination box, click
the Sampler button
to enter sampling mode.
- In the 3D model, click the MeetingPlace object to open a menu. Select Meeting Place to sample it.
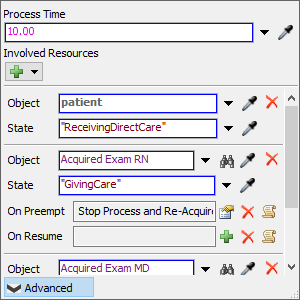
- Click the Discuss Treatment activity to select it. In
the Process Time box, delete the current text and type
10.00. - In the second Object box, click the
Sampler button
to enter sampling mode.
- Click the Exam RN shared asset in the Escort to Exam Room shape to sample it.
- In the third Object box, click the
Sampler button
to enter sampling mode.
- Click the Exam MD shared asset in the MD Examination shape to sample it.
- Click the Release Exam RN activity to select it. In
Quick Properties next to the Staff Resource box, click the
Sampler button
to enter sampling mode.
- Click the Exam RNs in the Escort to Exam Room shape to sample it.
- Click the Release Exam MD activity to select it. In
Quick Properties next to the Staff Resource box, click the
Sampler button
to enter sampling mode.
- Click the Exam MDs in the MD Examination shape to sample it.


Reset and run the model:
After the patient arrives in the exam room, an MD should go examine the patient for 20 seconds. Afterwards, the MD and RN should now go to the meeting place and consult about the patient's treatment for 10 seconds.
Step 5 Add Additional Phases and Activities
In this step, you'll create three additional phases in your PatientTrack process flow: Treatment, Patient Education, and Departure. You'll use the Process with Staff activity set again and you'll use the Escort Patient to Exit activity set for the first time.
When you're finished, your process flow should look similar to the following image:
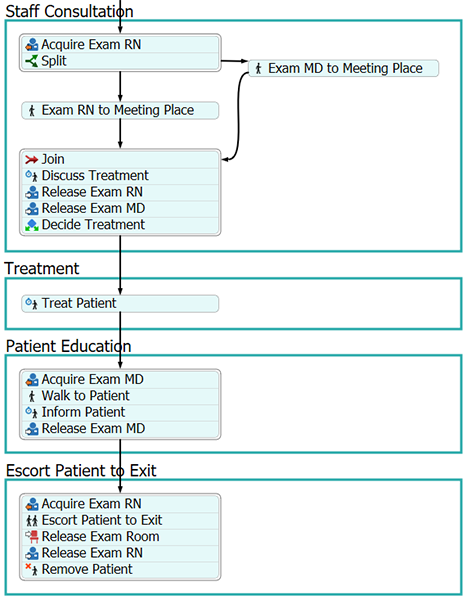
For now, you'll merely add and connect these activities in these new phases. You'll edit the properties to add logic in a later step.
To add these activities:
- Make sure the PatientTrack process flow is open and active. From the Library under the Flowchart group, add a Process shape container to the process flow.
- In the Library under the HC Activity Sets group,
add the following activity sets to your process flow:
- A Process with Staff activity set
- An Escort to Exit activity set
- Rename the new shapes as follows:
- From the Library under the HC Basic group, add a Process activity to the Treatment shape.
- Rename this activity as Treat Patient.
- Delete the two Staff shared assets from the Patient Education and Escort Patient to Exit shapes.
- From the Library under the HC Resources group, add a Release Location activity, inserting it after the Acquire Staff activity in the Escort Patient to Exit shape.
- Rename the activities in the Patient Education shape as follows:
- Rename the activities in the Escort Patient to Exit shape as follows:
- Create connectors from the following activities:
- From the Decide Treatment activity to the Treat Patient activity
- From the Treat Patient activity to the Acquire Exam MD activity
- From the Release Exam MD activity to the Acquire Exam RN activity
| Shape | New Name |
|---|---|
| Process | Treatment |
| Process with Staff | Patient Education |
| Escort to Exit | Escort Patient to Exit |
| Activity or Shared Asset | New Name |
|---|---|
| Acquire Staff | Acquire Exam MD |
| Walk | Walk to Patient |
| Process | Inform Patient |
| Release Staff | Release Exam MD |
| Activity or Shared Asset | New Name |
|---|---|
| Acquire Staff | Acquire Exam RN |
| Release Location | Release Exam Room |
| Escort Patient | Escort Patient to Exit |
| Release Staff | Release Exam RN |
Check that your process flow looks similar to the image at the beginning of this step.
Step 6 Edit the Activity Properties
In this step, you'll add the logic for the three new phases that you added in the previous step. You'll create the logic for the patient to receive treatment, followed by a brief meeting with the doctor that performed the original examination before the patient is discharged. Lastly, a nurse will escort the patient to the exit and the patient will then leave the simulation.
The following is an overview of how the activities will function:
| Activity | Explanation |
|---|---|
| Treat Patient | This activity will act as a stand-in for the amount of time that it takes the patient to receive treatment. This is a placeholder activity for right now. You'll eventually replace this activity with more complex activities in a later tutorial task. For now, you'll set the delay time to 5 seconds. |
| Acquire Exam MD | This activity will acquire the same MD the patient acquired in an earlier step. If that specific MD is busy, the token will wait until that specific MD is available before moving to the next downstream activity. |
| Walk to Patient | Once an MD has been acquired, this activity will tell the MD to walk to the current patient's location. |
| Inform Patient | This activity will represent the amount of time it takes the MD to examine the patient. You'll set that time to 15 seconds for now. |
| Release Exam MD | This activity will release the Exam MD that was acquired earlier in the process flow. The MD will then be free to work on other tasks or to be acquired by other patients. |
| Acquire Exam RN | This activity will acquire the same RN the patient acquired in an earlier step. If that specific RN is busy, the token will wait until that specific RN is available before moving to the next downstream activity. |
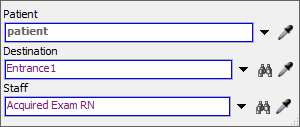
| Escort Patient to Exit | This activity will tell the previously acquired Exam RN to escort the patient to the exit. |
| Release Exam Room | This activity will release the specific exam room the patient had acquired earlier in the process flow so that it is free for other patients to acquire. |
| Release Exam RN | This activity will release the Exam RN that was acquired earlier in the process flow. The RN will then be free to work on other tasks or to be acquired by other patients. |
| Remove Patient | This activity will remove the patient from the simulation model. |
To build this logic:
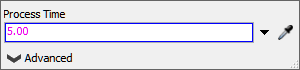
- Click the Treat Patient activity to select it. In Quick
Properties in the Process Time box, delete the current text
and type
5.00. - In the Patient Education shape, click the
Acquire Exam MD activity to select it. In Quick Properties
next to the Staff Resource box, click the
Sampler button
to enter sampling mode.
- Click the Exam MD shared asset in the MD Examination shape to sample it.
- Click the Walk to Patient activity to select it. In
Quick Properties next to Person box, click the
Sampler button
to enter sampling mode.
- Click the Exam MD shared asset in the MD Examination shape to sample it.
- Click the Inform Patient activity to select it. In
Quick Properties in the Process Time box, delete the text
and type
15.00. - Click the Advanced button to expand the activity.
- Next to second Object box, click the
Sampler button
to enter sampling mode.
- Click the Exam MD shared asset in the MD Examination shape to sample it.
- Click the Release Exam MD activity to select it. Click
the No Link button
next to the activity to enter
sampling mode.
- Click the Exam MD shared asset in the MD Examination shape to sample it. A blue line will appear to show that the activity is linked.
- In the Escort to Exit shape, click the
Acquire Exam RN activity to select it. Click the
No Link button
next to the activity to enter
sampling mode.
- Click the Exam RN shared asset in the Escort to Exam Room shape to sample it. A blue line will appear to show that the activity is linked.
- Click the Escort Patient to Exit activity to select it.
In Quick Properties next to the Destination box, click the
Sampler button
to enter sampling mode.
- In the 3D model, click Entrance1 to sample it.
- In Quick Properties next to the Staff box, click the
Sampler button
to enter sampling mode.
- Click the Exam RN shared asset in the Escort to Exam Room shape to sample it.
- Click the Release Exam Room activity to select it.
Click the No Link button
next to the activity to enter
sampling mode.
- Click the Exam Rooms shared asset in the Escort to Exam Room shape to sample it. A blue line will appear to show that the activity is linked.
- Click the Release Exam RN activity to select it. Click
the No Link button
next to the activity to enter
sampling mode.
- Click the Exam RN shared asset in the Escort to Exam Room shape to sample it. A blue line will appear to show that the activity is linked.
Reset and run the simulation model:
As you watch, the MD will briefly meet with the patient and then the patient will depart the health care clinic.
Conclusion
At this point, the basic structure of your patient track is now in place. In the next tutorial task, you'll make the simulation model more complex by adding conditional treatment phases to the patient track. You'll also learn how to use equipment and transport objects in your model. Continue on to Tutorial Task 1.5 - Add Transport and Equipment Objects.