Simulating Trains
Overview and Concepts
In addition to the ability to simulate high fidelity automated guided vehicle systems, FlexSim's AGV module also includes a capability to attach trailers to AGVs. When attached, trailers will travel behind (or in front of) their driver AGVs, and their motion will be articulated on the path of travel.
Using this trailer attachment behavior, you to can represent the articulated motion necessary for modeling train yards, train travel networks, etc. While, in the context of train simulation, the term AGV is somewhat of a misnomer, nevertheless, the AGV system provides all the behavior you need to build sophicated train simulation models.
The animation below shows a very simple example of an AGV that attaches to a trailer, moves the trailer to a different location on the network, and then detaches from that trailer.
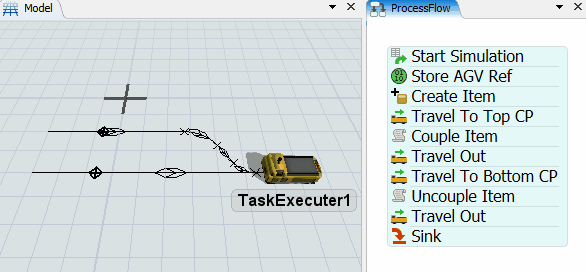
This topic will introduce the essential elements of the AGV system that you'll need to know to start building train simulation models.
Drivers and Trailers
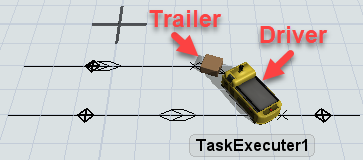
In the AGV module, all objects that can travel on paths are separated into drivers and trailers. The driver AGV is the object that owns all of the information about where the AGV is on the path, how much of the path it takes up, and how many trailers are attached to it. A "trailer" is an object that is attached to the AGV driver, either behind or ahead of it. Each trailer will track the motion of the AGV that it is attached to. In other words, the AGV driver drives the motion of all of its trailers.
AGV drivers are usually themselves task executers. In other words, you can treat an AGV driver like any task executer by giving it task sequences, etc. However, AGV drivers can subsequently become trailers to other AGV drivers. When an AGV becomes an attached trailer to another AGV driver, in can no longer execute task sequences. Instead, task sequences should be given to its driver.
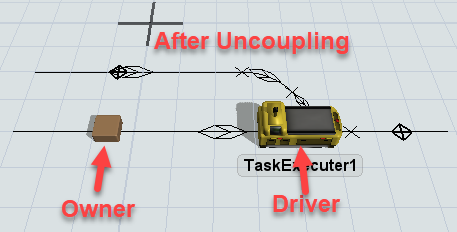
Non-task executer trailers can also be promoted to drivers, although perhaps the term owner is more appropriate here. This happens when one or more trailers is uncoupled from their driver AGV, and the uncoupled trailer is not a task executer. When a driver is not a task executer, it cannot be given task sequences. Instead, it only owns the information about where it is on the path system, and what trailers are attached to it. In order to make a non-task executer driver/owner move, you have to attach it to another AGV driver that is a task executer, then give that driver task sequences.
Whenever an AGV driver is given a task sequence telling it to travel to a control point, by default it will travel so that the AGV driver's center arrives at the control point. Trailers ahead of the AGV will be pushed past the control point, and trailers behind it will stop short of the control point.
Attaching, Detaching, Coupling, Uncoupling
There are four different methods for controlling the makeup of an AGV train, namely attaching, detaching, coupling and uncoupling. A full reference for these methods is provided in the AGV API reference. This topic will merely give a synopsis of these different methods.
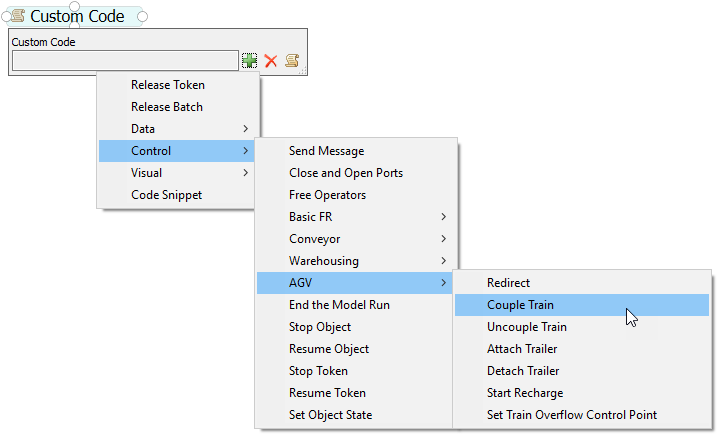
You can easily add each of these functionalities in process flow, as follows:
- Add a Custom Code activity to your process flow.
- In the Custom Code activity's quick properties, press the
 Add button.
In the drop-down, navigate to the menu Control > AGV.
Add button.
In the drop-down, navigate to the menu Control > AGV. - Select the desired functionality.
Attaching a Trailer
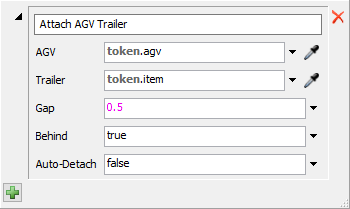
Attaching a trailer will attach an individual trailer to an AGV driver. It is used primarily to attach an off-network object (a flow item or other object that the AGV network was previously unaware of). You specify mainly whether to attach the object ahead of or behind the driver AGV, and the desired gap between it and the next-closest trailer/driver.
See AGV.attachTrailer() for more information
Detaching a Trailer
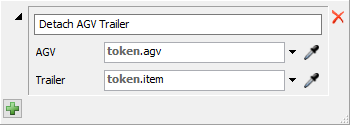
Detaching a trailer will detach an individual trailer from an AGV driver. Once detached, the object is an "off-network" object. In other words, the AGV network will no longer track where that object is on the network.
Detach a trailer (as opposed to uncoupling a train) if you are about to destroy an object.
See AGV.detachTrailer() for more information
Coupling a Train
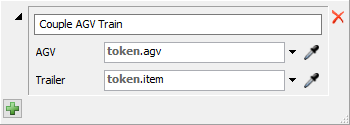
Coupling a train is similar to attaching a trailer, with a few key differences. Coupling a train is meant to be much simpler for you as a user, with a lot of the more difficult work being handled behind the scenes. It takes a single parameter, namely a trailer to couple to.
If the trailer is an "off-network" object (it is not another driver AGV or AGV trailer), then the functionality will forward to attaching a trailer, but will automatically calculate the gap and behind/ahead aspect, based on the position of the object relative to the AGV's current train.
If the trailer is another AGV driver or trailer, then coupleTrain() will figure out where on the network that train is, and attach the entire train (the AGV driver and all of its trailers) to this AGV driver's set of trailers. The ahead/behind and gap variables will again be determined based on where the trailer is on the path compared to where the current AGV is on the path.
See AGV.coupleTrain() for more information
Uncoupling a Train
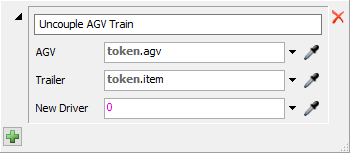
Uncoupling a train is similar to detaching a trailer, with a few key differences. This functionality primarily takes a trailer. That trailer becomes the "split point" at which the AGV train should be uncoupled. Starting at that trailer and proceeding away from the AGV driver object, a new AGV train of trailers will be created. This train will become its own AGV driver. Note that, unlike detaching a trailer, here the AGV network will still keep track of where the new train is on the network. The trailer will become its own driver AGV. If this driver is a task executer, then you can give the new driver task sequences to move on the network.
If you want the new "driver" AGV to be a different object than the trailer that is the detach point, then pass this object in as the optional New Driver parameter.
See AGV.uncoupleTrain() for more information
Overflowing
As noted in the AGV Driver section, when an AGV is sent to a control point destination, if it has trailers ahead of it, it will push those trailers past the destination. In some cases you need to define how the pushed trailers should continue when they run off the end of their current path. You can define this using the AGV.overflowCP property. Before you send the train to its destination, set this property to a control point that is past the destination control point, and the pushed trailers will be routed toward that control point when they are pushed past the destination control point.
Custom Destinations
By default, an AGV will travel so that its center arrives at the target destination control point. However, you can customize this as needed. You can send the AGV to some offset along the destination path, and/or you can send one of the AGV's trailers to the destination, as well as many other possible configurations.
See Customizing AGV Travel Tasks for more information