The Experimenter
Overview and Key Concepts
The Experimenter is a tool that automates running a model with different inputs and collecting the results. To use the Experimenter, you'll configure one or more Jobs. A Job defines a strategy for generating Scenarios (a set of model inputs) and for determining how many Replications of each Scenario to run. When a Job runs, it runs the model once for each Replication of each Scenario, and records the results in a Results Database File. You can then view and explore the results in the Performance Measures Window.
There are several types of Jobs:
| Job | Description |
|---|---|
| Experiment | Specify a set of Scenarios, and how many Replications to run of each Scenario. |
| Optimization | Specify an Objective, and it will automatically generate Scenarios attempting to optimize that Objective |
| Range Based | Specify a set of parameters, and a range of values for each parameter and it will automatically generate Scenarios for each permutation of parameter values. |
You can have multiple Jobs of any type, although only one Job is required to use the Experimenter.
For more information, see the Key Concepts About Experiments topic, as well as the Running Jobs topic.
Once you have run at least one Job, you can view the data in the Results Database File using the Performance Measures Results Window.
The File Area
The File Area is above each of the tabs in the Experimenter window. You can view and edit the path for the Results Database File, as well as delete the file. The File Area has the following properties:

Results Database File
This field displays the path to the Results Database File. If the file specified does not exist, it will be created when the next Job runs. If the Use Default Path box is cleared, you can use this field to specify a custom path for the Results Database File.
Use Default Path
Clear this box to specify a custom path for the Results Database File. If this box is checked, the path will match the model's file path and name.
Delete Results File
Click this button to delete the Results Database File, if it exists. Deleting the file is a common task, and should be done if the model has changed since the last Job was run, to prevent mixing results from different models.
View Results
If you have run one or more Jobs, click this button to open the Performance Measure Results Window and view the results. The Performance Measure Results Window shows all results in the Results Database File, regardless of which Job produced those results.
The Jobs Tab
The Jobs Tab allows you to add, remove, reorder, and edit the Jobs in the Experimenter. The left side of the tab allows you to view and edit the list of Jobs. The right side of the view allows you to edit the selected Job.
The left side of the Jobs tab has the following properties:
Jobs
| Icon | Description |
|---|---|
 |
Add a Job. You can configure the Job once it has been added. |
 |
Duplicate a Job. |
 |
Remove the selected Job. |

 |
Move the selected Job up or down in the list. |
Experimenter Job Properties
If you select an Experiment Job, the right side of the Jobs tab has the following properties:
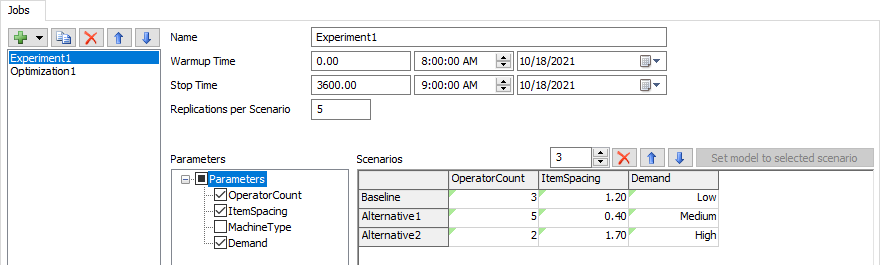
Name
Use the Name field to update the name fo the current Job.
Warmup Time
Use the Warmup Time field to set the Warmup Time for each Scenario.
Stop Time
Use the Stop Time field to set the Stop Time for each Scenario.
Replications Per Scenario
Use this field to set the number of Replications to run for each Scenario.
Parameters
Use the Parameters tree to select which Parameters you want to see in the Scenarios table. All other Parameters are left at their current values for all Scenarios. Check a box in the tree to add a Parameter as a column to the Scenarios table.
Scenario Count
You can use the Scenario Count field, above the Scenarios Table, to specify the number of Scenarios defined by this Job. Adding or removing a Scenarios adds or removes rows in the Scenarios Table.
Remove/Up/Down
The Remove/Up/Down buttons
remove or reorder the selected Scenarios in the
Scenarios table.
Set model to selected scenario
This button becomes available when you have selected a single row in the table. When you click this button, the parameters in the model are set to the values in that column.
Scenario Table
Use the table to set the values for each Parameter in each Scenario.
Optimization Job Properties
If you select an Optimization Job, the right side of the Jobs tab has the following properties:
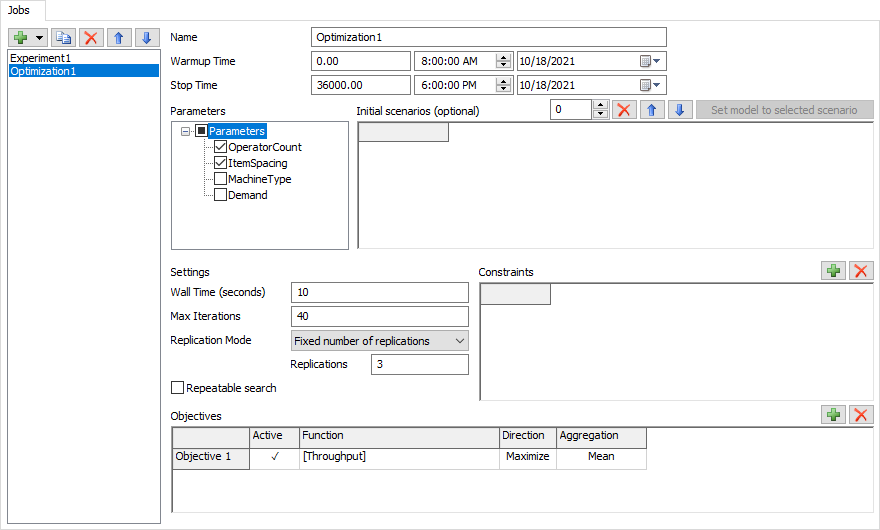
Name
Use the Name field to update the name fo the current Job.
Warmup Time
Use the Warmup Time field to set the Warmup Time for each Scenario.
Stop Time
Use the Stop Time field to set the Stop Time for each Scenario.
Parameters
Use the Parameters tree to select which Parameters the Optimizer can change. All other Parameter are left at their current values during the Optimization.
Initial Scenarios
Similar to an Experiment Job, you can define Scenarios for the Job to run. These Scenarios are optional. You can define these Scenarios to give the Optimizer a starting point for its search. If you don't define them, the Optimizer will use its own algorithm for starting the search.
Defining these Scenarios is identical to defining Scenarios in an Experiment Job. For more information, see the Experiment Job section.
Wall Time
This property specifies the approximate number of seconds that the Optimization Job will run for. To automatically stop the Optimization after 10 minutes, use the value 600. To allow the Optimization Job to run until some other stop condition occurs, use the value 0.
Max Iterations
This property specifies the maximum number of Scenarios to try before ending the search. To allow the Optimization Job to run util some other stop condition occurs, use the value0.
Replication Mode
This property determines how the Optimization Job will run replications. There are three options for this mode:
- Fixed number of replications - indicates that the job will run the same number of Replications for every Scenario it generates. When you use this mode, you'll specify how many Replications to run of each Scenario.
- Objective Confidence Met - indicates that the job should run Replications for every Scenario until a certain confidence level is achieved for all Objectives. If one Scenario is more sensitive to random variation, then that Scenario will require more replications. When you use this mode, you'll specify a confidence level to reach.
- Best Outside Confidence - similar to Objective Confidence Met, except that the Job will stop running Replications of a Scenario as soon as it becomes clear that it is statistically different from the best Scenario.
Repeatable Search
Check this box to make the search repeatable. A repeatable search generates the same sequence of Scenarios. This can make the Optimization take longer. If this box is cleared, the sequence of Scenarios will depend on how long each Replication takes to run.
Constraints
You can use this table to specify any Constraints. A Constraint is an expression that must be true; the Optimization Job will try to avoid generating Scenarios that violate the constraints.
Expressions can include any Parameter or Performance Measure name. Valid examples might include:
[PerformanceMeasure1] <= 1000[PerformanceMeasure2] >= 50[Param1] + [Param2] <= 10You can use the row header to set the name of the Constraint.
Objectives
You can use this table to define one or more Objectives for your Job. An Objective has four components:
- An Active flag - Only Active objectives will be used in the Optimization.
- A Function - The function is an expression that computes a value. Often, the function is just a Performance Measure value. The function's purpose is to produce a score for the model. Any Parameter or Performance Measure can be used.
- A Direction - The direction indicates some meaning for the function. If the direction is Maximize, the Optimization will seek Scenarios that produce high function values. If the direction is Minimize, the Optimization will seek Scenarios that produce low function values.
- An Aggregation - The Aggregation determines how the function values from each Replication are combined to compute the Scenario's function value.
You need at least one active Objective to run an Optimization Job.
Range-Based Job Properties
If an Range-Based Job is selected, the following properties are available:
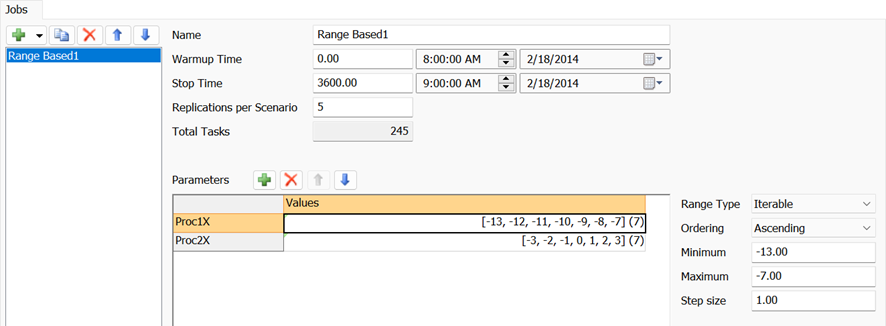
Name
Use the Name field to update the name fo the current Job.
Warmup Time
Use the Warmup Time field to set the Warmup Time for each Scenario.
Stop Time
Use the Stop Time field to set the Stop Time for each Scenario.
Replications Per Scenario
Use this field to set the number of Replications to run for each Scenario.
Total Tasks
This field displays the total number of tasks specified by the job. This value is the product of the number of possible values for each parameter (the number of scenarios) and the number of replications.
Parameters
The Parameters table displays the Model Parameters involved in the job,
and the set of possible values for each parameter.
You can use the Add button
to add additional parameters to the job. You can use the
Up and
Down
buttons to reorder the selected parameters. You can also use the
Remove button to
remove parameters from the job.
The following properties are only visible if you select a parameter in the Parameters table.
Range Type
Use this property to choose how you'll specify the set of values for each parameter.
Ordering
Use this property to choose how the set of values will be ordered.
Minimum
Specify the minimum value of the set of values. Only available for Continuous, Integer, Discrete, Option, and Pass-Through parameters, and when the Range Type is Iterable.
Maximum
Specify the maximum value of the set of values. Only available for Continuous, Integer, Discrete, Option, and Pass-Through parameters, and when the Range Type is Iterable.
Step Size
Specify the step size of the set of values. Only available for Continuous, Integer, Discrete, Option, and Pass-Through parameters, and when the Range Type is Iterable.
Values Table
If the selected parameter is an Expression parameter, or if the Range Type is set to Specific Values, the Values Table is available. Use this interface to specify each value in the set.
The Run Tab
The Run tab is where you run one or more Jobs. It has the following properties:
Job
Select a Job. This is the Job that will run when you press the Run button. The type of Job you select also determines the properties shown below this property.
Run
Runs the selected Job.
Run Many
Opens a popup where you can select multiple jobs to run. When you run multiple jobs, they are run squentially, in the order shown in the popup.
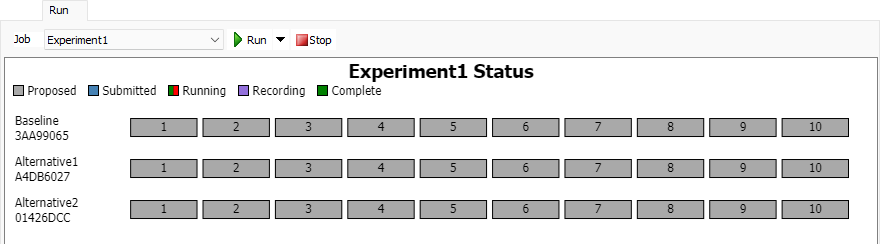
Job Status
The Job Status chart shows the status of the selected Job. If the selected Job is running, the chart will update as the Job runs.
Optimization Job Properties
If an Optimization Job is selected, the following properties are available:
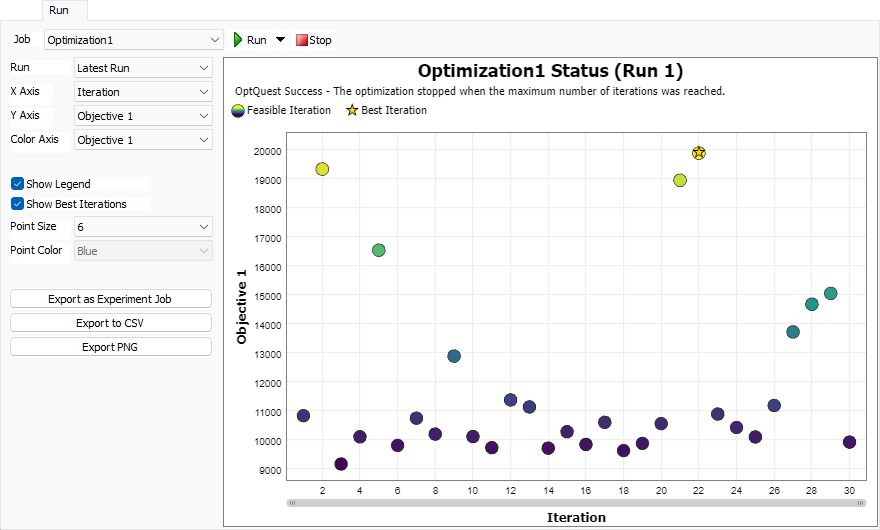
Job Status
The Job Status chart for an Optimization shows one point per iteration as a scatter plot. An iteration represents a Scenario, as well as some additional information about that Scenario, including:
- The iteration number
- All objective values
- The iteration rank (rank 1 is the best Scenario)
- Which (if any) constraints were broken
Run
Selects which run to display in the Job Status chart.
X Axis
Selects a value to use as the horizontal X axis.
Y Axis
Selects a value to use as the vertical Y axis.
Color Axis
Selects a value for the color axis. The color of each point on the chart comes from a gradient of colors. The highest value has a yellow color, while the lowest value has a dark purple color.
Show Legend
Check this box to show the legend on the Job Status chart.
Show Best Iterations
Check this box to mark the best iterations with a gold star. If you have a single objective, only one iteration will be marked. If you have multiple objectives, each iteration on the trade-off curve will be marked.
Point Size
Sets the size of the points for each Scenario on the Job Status chart.
Point Color
If you choose None for the color axis, you can use this property to specify a color for the iteration.
Export as Experiment Job
You can select Scenarios by clicking on a point in the chart. If you have selected Scenarios, you can create an Experiment Job that defines those Scenarios.
Export to CSV
Saves a CSV file containing the data used to generate the Job Status chart.
Export PNG
Saves an image file showing the current Job Status chart.
Range-Based Job Properties
Run
Choose which run to display on the Job Status chart.
The Advanced Tab
The Advanced tab allows you to configure some additional settings that apply to all Jobs. It has the following properties:
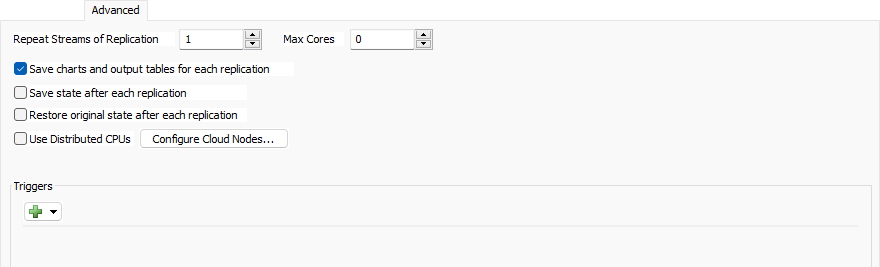
Repeat Streams of Replication
Specify a replication to set the manual model runs (not experimenter replications) to use the same random number streams. You must be repeating random streams for this to take effect.
Max Cores
Specify the maximum number of cores for the experimenter to use. The value 0 indicates that all available cores should be used. This property is ignored if using distributed CPUs.
Save charts and output tables for each replication
If checked then at the end of each replication, the Experimenter will save the data for each dashboard statistic, Statistics Collector, and Calculated Table in the model so they can later be viewed as part of the results.
Save state after each replication
If checked, each replication's full simulation state will be saved in the Results Database File at the end of the model run. You can later extract the state file from the database and view the final state of every replication.
Restore original state after each replication
If checked, FlexSim will completely reload the model between execution of each model. You might check this box if your model doesn't properly reset to the same exact state every time you reset, and you don't want that "spill-over" state affecting subsequent replication results. However, because it is completely reloading the tree, it may increase the time it takes to run each replication.
Use Distributed CPUs
Check this box to use CPUs available on the network or internet, rather than the local machine's CPUs. If checked, the Experimenter will attempt to use the machines specified in your Global Preferences. See Running Jobs on the Cloud for more information.
Configure Cloud Nodes...
Click this button to open your Global Preferences window, where you can edit the list of cloud nodes available to the Experimenter.
Triggers
The Experimenter fires triggers at various times during each Job. The following trigger describes each trigger:
| Name | Timing |
|---|---|
| On Start of Job | Fired just after the user clicks the Run button. |
| On Start of Replication | Fired in the child process right before the model starts running. |
| On End of Warmup | Fired in the child process at the warmup time. |
| On End of Replication | Fired in the child process when the run finishes. Fired
in the main process when results have been returned from the
child process. If param(3) exists, the trigger
is being fired on the parent process. Otherwise, it is being
fired on the child process.
|
| On End of Job | Fired when the Job finishes. |