Using the Properties Pane
Introduction to the Properties Pane
The Properties pane allows you to edit the properties for any object that is currently selected in the model or in a given tool. You can also use the Properties pane to view important information (such as statistics) about objects when they are selected during a simulation run.

The Properties pane is context sensitive. The pane shows properties corresponding to the active tab you are working in (3D, Tree, Table, etc.) as well which object or node you have clicked on in that tab. For example, if the User Manual is the active tab, the right pane displays the table of contents for the User Manual.
Getting to Properties
Generally the Properties pane is docked on the right side of FlexSim's standard user interface. To edit an object's properties, just click on it, and you will see its properties in the pane on the right.
Alternatively, you can double-click on an object to view its properties. This will open a properties pane next to the cursor, where you can edit the object's properties.
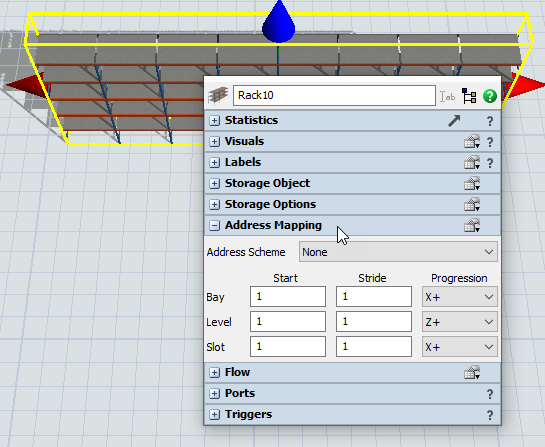
Editing a Property
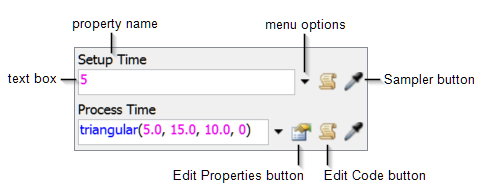
A typical property in FlexSim will usually have similar components. The following image labels these components for two different properties on a processor:
The following sections explain each component of the property.
Property Name
The name of the property tells you the purpose of the property. For example, in the preceding image, these two properties are named Setup Time and Process Time. These names describe their function. The setup time will affect how much time the 3D object needs (if any) before it can process another flow item. The process time controls how long the 3D object will process an item.
Text Box
The text box displays the property's current setting or value. If you know which values are valid for this property, you can type it in directly in the text box.
Different properties will have a variety of possible settings or values. Some properties will allow you to use a fixed number. Some might allow you to use a statistical distribution to randomly calculate a number. Some might allow you to reference another 3D object in the model or an activity/shared asset in a process flow. Some might allow you to reference a value in a label or a global table.
Notice that in the preceding image, the text boxes for the setup time and process time
display very different values. The setup time is set to 5, which means it will
take 5 simulation seconds to set up the 3D object before it processes a flow item. By
contrast, the process time is set to triangular(5.0, 15.0, 10.0, 0). This means
the process time is using the triangular statistical distribution to randomly assign a
process time between 5 and 15 simulation seconds. See
Using
the Distribution Chooser for more information about random statistical
distributions.
Menu Options
Next to each property, you'll usually find a black arrow
 . When you click this arrow, it opens a
menu of the available options for this property. These menu options provide you with one of
the best tools to learn about that property's available settings. When you select an option,
the text box will either:
. When you click this arrow, it opens a
menu of the available options for this property. These menu options provide you with one of
the best tools to learn about that property's available settings. When you select an option,
the text box will either:
- Automatically fill itself in with the correct syntax based on your selection, OR
- Another dialog box will open to guide you through selecting more options.
In this way, the menu options can help teach you what options are available for a property, give you additional dialog boxes to guide you through the process, and it can help you learn the correct syntax for a property if you want to type it by hand later.
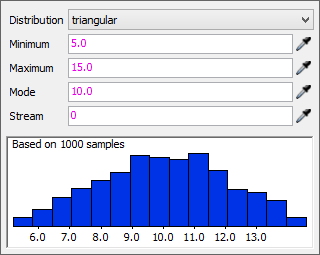
For example, if you wanted to use a random statistical distribution for the process time (as shown in the preceding image), you would select Statistical Distribution from the menu and then select the type of distribution you wanted. Based on your selection, a distribution chooser dialog box would appear to guide you through selecting the restrictions for your distribution:
Sampler Button
Many properties have a Sampler button  next to them. The sampler is a convenient shortcut tool that allows you to sample a variety
of 3D objects, process flow activities/shared assets, global tables, etc.
next to them. The sampler is a convenient shortcut tool that allows you to sample a variety
of 3D objects, process flow activities/shared assets, global tables, etc.
For example, if you were editing the Use Transport property on a processor, you could use the sampler to select which operator should transport flow items from the processor.
Edit Properties Button
The Edit Properties button  only
appears if you have used the menu to make a selection that had a dialog box. The Edit
Properties button will re-open the dialog box so that you can make changes.
only
appears if you have used the menu to make a selection that had a dialog box. The Edit
Properties button will re-open the dialog box so that you can make changes.
For example, if you used the menu to select a statistical distribution, you used the distribution chooser dialog box to set the initial restrictions for the distribution. If you wanted to make changes to the restrictions, you could click the Edit Properties button to open the distribution chooser and make the necessary changes.
Edit Code Button
If you are comfortable with FlexScript, you could click the Edit Code button
 to open a code editor and write custom code for
this property. The Edit Code button is also useful if you are trying to learn FlexScript and
you would like to see the coding logic that is used for a particular property.
to open a code editor and write custom code for
this property. The Edit Code button is also useful if you are trying to learn FlexScript and
you would like to see the coding logic that is used for a particular property.
For example, if you were to click the Edit Code button and view the FlexScript for the process time property used in the previous example, the code for the triangular statistical distribution would look like this:
		Object current = ownerobject(c);
		Object item = param(1);
		/***popup:StatisticalDistribution*/
		return
		/***tag:distribution*//**/triangular/**//**/(/**/
		/***tag:par1*//**/5.0/**/
		/***tag:par2*//**/, 15.0/**/
		/***tag:par3*//**/, 10.0/**/
		/***tag:par4*//**/, 0/**/
		/***tag:par5*//**//**/
		/**/)/**/
		;
Editing Multiple Objects
You can also edit the properties of multiple objects using the Properties pane. If you have clicked on an object that is selected (there is a red box around the object), and you change one of that object's properties, that property on all other selected objects of the same type will also be changed to the value you define. When this happens, a small hint text will appear telling you how many objects have changed.
While the Properties pane allows simple changing of multiple objects' properties, you can use Property Tables to have more sophisticated visibility and control of your objects' properties.