Using the AGV Process Flow Template
Overview and Concepts
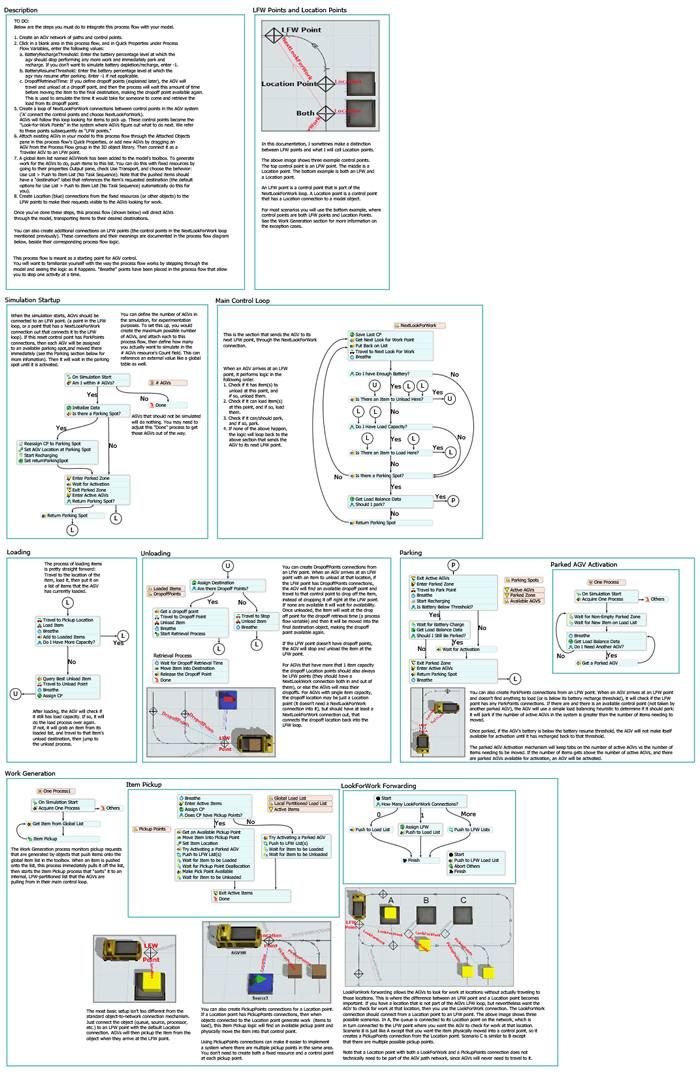
To make AGV simulations simpler, FlexSim has a pre-built AGV process flow template you can use with your AGV simulation project. This process flow template has pre-built sophisticated logic that makes it relatively easy to simulate many if not most AGV systems.
This topic will make reference to many concepts associated with building task sequence logic. As such, we advise first reviewing Key Concepts About Task Sequence Logic before proceeding with this topic.
Setting Up the AGV Process Flow Template
You can set up and use an AGV network using only standard logic if needed. However, more complex AGV simulation projects will likely benefit from using the AGV process flow template.
To set up an AGV process flow template:
- On the toolbar, click the Process Flow button to open a menu. Point to Add a Task Executer Process Flow and select AGV to create a new process flow template.
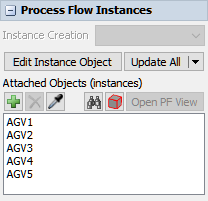
- In the newly created process flow, click a blank area to ensure nothing is selected.
In Quick Properties under the Process Flow Instances group,
find the Attached Objects (instances) box. Click the
Sampler button
 by this box to enter sampling mode.
 - In the 3D model, sample an AGV. It should now show up in the Attached Objects box.
- Repeat the previous steps to add additional AGVs as needed.
After setting up the process flow, there are several additional steps you can must do. These are documented within the AGV process flow template itself, so you can follow steps there.
Much of the AGV process flow template is self-documented, next to the logic that it is explaining. The purpose is for you to become familiar with how the process flow is actually working, activity-by-activity, so that you can understand, and change, the process flow as needed.
How the AGV Process Flow Template Drives AGV Behavior
AGVs are essentially task executers that have been connected to the AGV path network. As such, all travel tasks will be executed via the AGV travel network. In relation to the task logic topic mentioned previously, when you connect a task executer to an AGV network, you are defining the Transportation or Travel aspect of its behavior.
Connecting a Task Executer to an AGV Network
| Transportation or Travel | How do task executers move around? Via an AGV network. |
|---|
Alternately, when you attach the AGV process flow template to an AGV, you are defining both the AGV's Task Sequence Generation and Job Dispatching behavior.
Connecting a Task Executer to the AGV Process Flow Template
| Task Sequence Generation | How are task sequences defined? AGV process flow generates task sequences. |
|---|
| Job Dispatching | Who or what will perform what jobs? AGV process flow handles dispatching. |
|---|
Note that, when using the AGV process flow template, the Item Flows and Routing aspect of task executer logic is mostly still up to you. You can define it through connecting fixed resources, using another process flow, etc.
| Item Flows and Routing | Where do the items need to go? Mostly still up to you. |
|---|
Task Sequence Generation
| Task Sequence Generation | How are task sequences defined? AGV process flow generates task sequences. |
|---|
The AGV process flow template handles all task sequence generation for the attached AGV.
Parking and Activation
When the simulation starts, the AGVs will automatically be sent to a parking location if there is one connected to their reset control point. Then they will wait to be "activated." Activation happens when a new job (i.e. an item that needs to be transported) arrives.
Look-for-Work Looping
Once activated, an AGV will be sent around a loop of "Look for Work" points. This is a set of control points that are connected together in a loop with the "NextLookForWork" control point connection. Each of the work points is a place where the AGV will go to see if there is any item that needs to be picked up at that location. If there is no item to be picked up, then the AGV will continue to the next look-for-work point, and so on.
Job Dispatching
| Job Dispatching | Who or what will perform what jobs? AGV process flow handles dispatching. |
|---|
When using the AGV process flow template, job dispatching logic is handled by a combination of control points, the AGV process flow template, and a global list named AGVWork. (This global list is automatically created whenever you use the AGV process flow template.) When a fixed resource needs to request an AGV transport for a flow item, it will push the item to the AGVWork global list. Here, the item being pushed onto the list represents the "job." The process flow template will immediately pull the job from the list, figure out where the item is, and push it to a separate internal list that is partitioned by the Look-for-Work locations. Thus when AGVs arrive at these locations, they pull from that location's partition to see what work is there.
The key thing to keep in mind is that job dispatching is mostly determined by the location of the AGV in the 3D simulation model. When an AGV passes over a control point, it will check to see if there are any available tasks to work on, such as items to load. If there are tasks to work on, the AGV will begin working on the task and it will travel to the appropriate control point to load or unload flow items.
| Dispatching Decisions | |
|---|---|
| Resource Selection | The AGV process flow template does not do immediate resource selection. In other words, when a new job arrives (i.e. an item is pushed onto the AGVWork list), that job will not immediately be assigned to a resource. Instead it will wait for an AGV to come to its location. Thus resource selection is determined by the first AGV to arrive at the pickup location. This means, in general, that the job will be picked up by the closest AGV to that job. This delayed resource selection can be beneficial because there may be an AGV that drops an item off near to the job location, but AFTER the job arrives. If the logic had immediately performed resource selection, the AGV would have been busy at the time, and it would have dispatched the job to a less-optimal AGV. |
| Job Selection | Job selection is performed when an AGV arrives at a Look-for-Work location. There it looks to see if there is any work to do at that location. This is performed by pulling from the partion of an internal list that is associated with that location. You can define prioritization, filtering, etc. by customizing the pull query for the Is There an Item to Load Here? activity of the AGV process flow. If there aren't any available items to load at one of the pickup points, the AGV would simply move on to the next Look-for-Work location. |
If there weren't any available items to load at one of the pickup points, the AGV would simply move on to the next area without entering the pickup area.
Item Flows and Routing
| Item Flows and Routing | Where do the items need to go? Mostly still up to you. |
|---|
Item flows and routing are still primarily handled by you. You can use fixed resources as you would use them normally, or you can define routing through your own process flow. In other words, the same methods that you would use to connect 3D object flows in a standard simulation model would apply when using the AGV process flow template. See Connecting 3D Object Flows for more information.
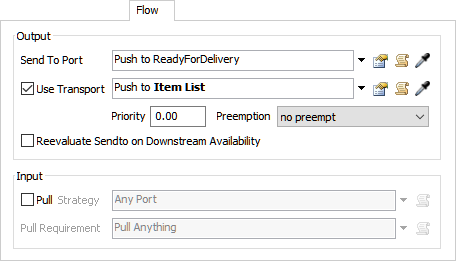
The single difference with standard routing is that, once you have decided where you want a flow item to go, you need to push the item to the AGVWork list. Additionally, you should set a label named "destination" on the item that references the target destination. This can be done by using the Push to Item List (No Task Sequence) option in the Use Transport field.
Connecting Fixed Resources to the AGV Network
When using the AGV process flow template, you connect fixed resources to the network the same way as when using the AGV network normally. The only difference is that, once connected, you should make the connected control point part of the Next-Look-for-Work loop.
Control Point Connections
The AGV process flow template interprets control point connections in very specific ways, as follows:
| Type | Description | Appearance |
|---|---|---|
| Location | Location control points are for connecting fixed resources to an AGV network. Once a fixed resource is connected to a location control point, it can send and receive flow items through the control point. |  |
| Pickup Points | Pickup points can be connected to location points to create a specific point where AGVs can load flow items. The location control point will route flow items to those points when it receives them from an upstream fixed resource. See Creating Pickup Points for more information. |
 |
| Dropoff Points | Dropoff points can be connected to location points to create a specific point where AGVs can unload flow items. The location control point will route AGVs to drop off items at one of those points and then send it to a downstream fixed resource. See Creating Dropoff Points for more information. |
 |
| Park Points | Park points can be connected to a control point that has been set as the entry point for an AGV. When the simulation model starts, an AGV will be sent to this park point and the AGV will enter the network at this point. Additionally, park points can be attached to points in the Next-Look-for-Work loop. AGVs can also charge their batteries at park points when their batteries are running low. The AGV process flow template uses a load balancing heuristic to determine if an AGV should park. When it arrives at a point with park points, it will compare the number of active AGVs with the number of active jobs. If there are more active AGVs, the AGV will park and wait to be activated again. This heuristic may be oversimplistic in some situations, especially if AGVs can load more than one item at a time or if you want to distribute your parked AGVs better. Nevertheless, since the entire process flow is editable, you can adjust this heuristic if needed. See Creating Park Points for more information. |
 |
| Next Look for Work | You'll need to have a series of Next Look for Work connections in your AGV network if you want to create a system in which AGVs loop around the system looking for work. These connections tell AGVs where their next destination should be if they are looking for work. When an AGV reaches the upstream control point, it will check for work at that control point. If there is no available work, it will travel to the downstream control point. See Creating Next Look for Work Loops for more information. |
 |
| Look for Work | Although not needed in simple scenarios, these connections can be useful in more sophisticated cases. They allow you to "hook" a location into the Next-Look-for-Work loop, without making the AGV actually travel to that location. In other words, a LookForWork connection forwards jobs from the location where the item is, to the location where the AGV will travel to as part of its Next-Look-for-Work loop. If you don't want the AGV to have to travel all the way to an item's location in order to find that job, then you can add a LookForWork connection from the item location's control point to a control point in the AGV's Next-Look-For-Work loop. This will cause the AGV to recognize that job when it reaches that point in its loop, without having to travel all the way to the item's location. When analyzed in terms of dispatching logic, the LookForWork connection allows you to balance the default dispatching logic of delayed resource selection with a more proactive, early resource selection logic. On one end of the spectrum (the default), you only use NextLookForWork connections, meaning AGVs must travel to every possible pickup location in order to select a job. This default prioritizes distance, selecting the AGVs that are always closest to the pickup location, at the cost of sending AGVs in long polling loops to find work. On the other end of the spectrum, you can have a very small Next-Look-for-Work loop, with only a few checkpoints. Nearly all pickup locations then forward their jobs to those few checkpoints, so that at each checkpoint, AGVs can pick from a large set of active jobs. AGVs will be assigned earlier to these jobs, at the cost of potentially having a closer AGV become available later. |
 |
Creating Pickup Points
You can set up the fixed resource to place flow items in one or more pickup points, instead of remaining in the fixed resource until pickup.
To create one or more pickup points:
- Create AGV paths to the pickup points area. If you want, the pickup points area can be on a loop separated from the main AGV network loop or it can be a small offshoot from the main AGV network loop.
- Add control points on the AGV paths where the AGVs should pickup the flow items.
- Press and hold the A key to enter connection mode. When you are in connection mode,
your mouse pointer will change to a plus sign with a chain link symbol next to it:

- Click the control point that is connected to the fixed resource. You will notice as you move your mouse that a yellow line will appear between the object you clicked and your cursor.
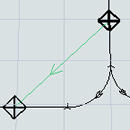
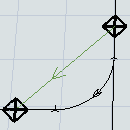
- Hover over the control point that will become the pickup point so that it is highlighted. Click the control point to open a menu. Select PickupPoints. A green line will appear to show that the location control point is now connected to the pickup control point.
- Repeat the previous steps as needed to create additional pickup control points.
When a simulation runs, the fixed resource will transfer the item to the pickup point where it will wait for transport by an AGV.

If you've created a separate looping path for the pickup points, the AGV will only travel there if it passes over the location control point and finds available work. If the pickup points are empty, it will not travel on the separate pickup point path and will instead continue to the Next Look For Work point.
Creating Dropoff Points
In the same way that you can create pickup points for AGV transfers, you can also create dropoff points for fixed resources.
To create dropoff points:
- Create AGV paths to the dropoff points area. If you want, the dropoff points area can be on a loop separated from the main AGV network loop or they can be small offshoots from the main AGV network loop.
- Add control points on the AGV paths where the AGVs should dropoff the flow items.
- Press and hold the A key to enter connection mode. When you are in connection mode,
your mouse pointer will change to a plus sign with a chain link symbol next to it:
- Click the control point that is connected to the fixed resource. You will notice as you move your mouse that a yellow line will appear between the object you clicked and your cursor.
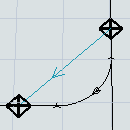
- Hover over the control point that will become the dropoff point so that it is highlighted. Click the control point to open a menu. Select DropoffPoints. A light blue line will appear to show that the location control point is now connected to the dropoff control point.
- Repeat the previous steps as needed to create additional dropoff control points.
When a simulation runs, the AGV will transport the item to the dropoff point and then it will immediately appear in the fixed resource.
Creating Park Points
Park points are locations where AGVs begin when the simulation model first starts running. During a simulation run, an AGV can return to the park point to recharge its batteries if its batteries are running low.
- Before creating a park point, an AGV should first be connected as a Traveler AGV to a control point on the main AGV network. (See the previous section for instructions.)
- Create AGV paths to the park point. Usually, park point paths are small offshoots from the main AGV network loop.
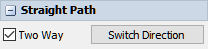
- Click one of the newly created paths to select it. In Quick Properties, check the Two Way check box to ensure the AGV can travel in both directions on this park point.
- Repeat the previous steps to ensure that all park point paths and the paths that join them to the main AGV network are two-way paths.
- Add control points to the AGV paths where the AGVs should park.
- Press and hold the A key to enter connection mode. When you are in connection mode,
your mouse pointer will change to a plus sign with a chain link symbol next to it:
- Click the control point that is connected to the AGV on the main AGV network. You will notice as you move your mouse that a yellow line will appear between the object you clicked and your cursor.
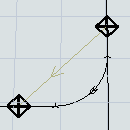
- Hover over the control point that will become the park point so that it is highlighted. Click the control point to open a menu. Select ParkPoints. A dark green line will appear to show that the location control point is now connected to the park control point.
- Repeat the previous steps as needed to create additional park control points. Make sure there is a park point for each AGV in your simulation model.
When you reset the simulation model, AGVs will at first appear on the control point on the main AGV network that the AGVs are connected to. However, once the simulation model begins running, the AGVs will immediately move to a park point.
Creating Next Look for Work Loops
With the AGV process flow template, AGVs travel in a loop around the facility, looking for transportation tasks to work on. In order to create this kind of logic, you need to create a Next Look For Work loop in your AGV network. A Next Work For Work loop is basically a series of control points that are connected to each other in a loop.
When an AGV passes over one of the control points in the loop, it will check for available transport tasks at that location. If it finds an item to transport, it will load that item and take the shortest distance to the item's designated destination. If it does not find an item to transport at that location, it will travel to the next control point in the Next Look For Work loop and check for work at that point. The AGV will loop through all of the connected control points looking for work.
To create a Next Look for Work loop:
- Press and hold the A key to enter connection mode. When you are in connection mode,
your mouse pointer will change to a plus sign with a chain link symbol next to it:
- Click the first upstream control point the AGV will pass over in the Next Look For Work loop. You will notice as you move your mouse that a yellow line will appear between the object you clicked and your cursor.
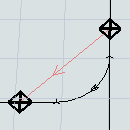
- Hover over the second control point you want to connect so that it is highlighted. Click the control point to open a menu. Select NextLookForWork. A red line will appear to show that the control points are now connected.
- Repeat this process to add more control points to the loop. Make sure that the last control point gets connected to the first control point to create a loop.
When you run the simulation model, the AGVs will enter the system as soon as a transportation task is available. They will then circulate through the AGV network traveling to each control point in the Next Look For Work loop.
AGV Process Flow Template Variables
You can enter values for a few of the process flow variables on the AGV process flow:
- With the AGV process flow template open, click a blank area in the process flow to ensure nothing is selected.
- In Quick Properties under the Process Flow Variables group, enter the settings for the following the three process flow variables.
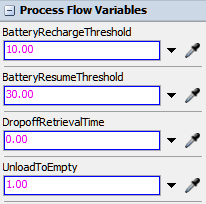
- BatteryRechargeThreshold - Enter the battery percentage
level at which the AGV should stop performing any more work and immediately park and
recharge. If you don't want to simulate battery depletion/recharge, type
-1for this variable. - BatteryResumeThreshold - Enter the battery percentage
level at which the AGV may resume after parking. If you don't want to simulate
depletion/recharge, type
-1for this variable. - DropoffRetrievalTime - If you have added dropoff points to your AGV network, the AGV will travel and unload at a dropoff point. After it unloads at the dropoff point, the AGV will remain at this dropoff point before moving the item to the final destination. The amount of time the AGV remains at the dropoff point is based on the amount of time you indicate for this variable. This time delay simulates the time it would take for someone to come and retrieve the load from its drop off point.
A Starting Point
While the AGV process flow template includes a large amount of pre-built logic that gives you a very sophisticated dispatching mechanism right from the start, nevertheless, the process flow is intended as a starting point, not the end of your dispatching implementation. Every part of the process flow can be reconfigured, rebuilt, or removed if needed. You are encouraged to learn how the process flow works in more depth, to experiment with changes, and, if needed, to build your own, using the insights you've gained from using this process flow.