Running Simulations
What Happens When You Run a Simulation?
The following sections will describe what happens in various components of your simulation model during a simulation run.
3D Simulation Model
Some 3D simulation models can be quite complex. However, at their most basic level, this is what happens in a 3D model during a simulation run:
- Flow items get introduced into the 3D model. Typically, flow items get introduced to the model using a source object, which creates flow items and sends them to the next downstream fixed resource(s). However, it is possible to have process flows create flow items and introduce them into the 3D model as well.
- Flow items begin to interact with the 3D objects in the model. Generally speaking, flow items move from one fixed resource to the next downstream fixed resource.
- If they've been added to the simulation model, task executers (such as operators) interact with the flow items and fixed resources. Task executers might transport flow items or help fixed resources process items.
- When a flow item is complete, it usually leaves the simulation model using a sink object, which removes flow items from the model. However, it might end by being packed onto a rack for storage.
Process Flow
During a simulation run, process flows follow this basic procedure:
- Most process flows begin with a token creation activity
that creates one or more tokens. Tokens typically look like green dots on an activity:
 These activities can create new tokens at regular intervals
or on a schedule as soon as a simulation run begins. They can also listen for events in
a simulation model and create tokens whenever a specific event occurs. NOTE: If the
process flow is a sub flow, it will usually begin with a Start activity.
These activities can create new tokens at regular intervals
or on a schedule as soon as a simulation run begins. They can also listen for events in
a simulation model and create tokens whenever a specific event occurs. NOTE: If the
process flow is a sub flow, it will usually begin with a Start activity. - The token creation activity will then release the token to the next downstream activity. When that activity finishes performing its action on the token, it will release it to the next downstream activity and so forth.
- If a Delay activity needs to hold a token for a certain
amount of time, the token will change color as time elapses, which is similar visually
to a fill line increasing over time:
 When the time
has elapsed, the Delay activity will release the token to the next downstream
activity.
When the time
has elapsed, the Delay activity will release the token to the next downstream
activity. - Some process flow activities will hold tokens while waiting for a certain amount of time to elapse or while waiting for another event in the process flow or simulation model. If an activity is holding many tokens at a time, the tokens might appear to stack visually. If a large quantity of tokens builds up on a process flow activity, they will be replaced by a single token that merely indicates the number of tokens inside of it, as shown in the following animated image:
- Process Flows typically end with a Sink activity (or a Finish activity if it is a sub flow). However, it is possible for activities to loop indefinitely without crashing the software.
Why Run a Simulation?
Your reasons for running a simulation will probably depend on what phase of the model-building process you are currently in. When you're in the middle of building your model's logic, you'll run your model to test that it is functioning the way you intended it to run. Running your model can help troubleshoot a lot of potential problems.
After your model is functioning properly, you might want to verify your model, which means comparing your model with how your business system operates in reality to ensure accuracy.
Once your model is functioning correctly and has been verified, you can run your simulation model in order to:
- Get data from your model. Gather data about your business system and display that information in charts, graphs, and tables.
- Find the optimal business system. Run an experiment to determine what happens in your business system when you change certain variables.
- Sell your model. Show your model in action to get approval from stakeholders on a proposed system.
A Few Important Considerations
Be aware that:
- Simulations can run indefinitely. When a simulation reaches its end time, it's more helpful to think of the simulation as being paused rather than stopped. If you press the Run button on the control bar again, the simulation will continue running indefinitely as long as there are more events to process.
- Simulations will run exactly the same every time, even if it has random events. If you don't change anything in a simulation model, each simulation run will be identical, even if you have set different properties to be random. Random variables will use the same random number streams each time so that you can replicate a simulation and compare what happens when you change a variable in your simulation model.
Overview of the Simulation Control Bar
To run a simulation, you'll use the simulation control bar (also called the control bar for short), located underneath the main menu and toolbar. The control bar contains most of the tools that you will need to run your simulation. The control bar essentially has three different groups of tools you can use to control how your simulation runs, as illustrated in the following image:

See Simulation Control Bar in the reference section of the manual for a more detailed description of the toolbar buttons and options.
Run Control Tools
The Run Control buttons are the basic tools you will use to start and stop your simulation, as shown in the following image:

Run Time Tools
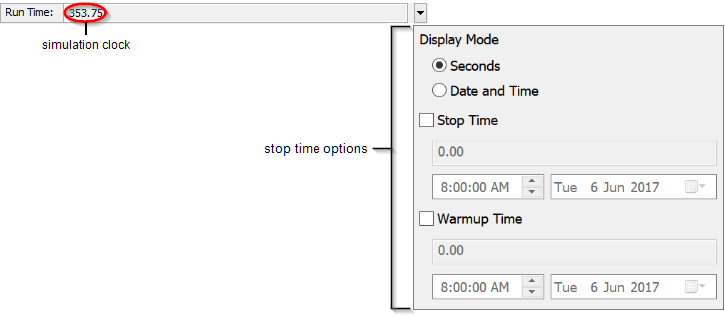
The Run Time tools display how much time has elapsed during the simulation so far. It can also control how time is displayed and when the simulation stops:
Run Speed Tools
The Run Speed tools control how fast or slow the simulation runs.
Starting a Simulation Run
When you're ready to begin the simulation:
- You should always press the Reset button to refresh your simulation model and reset it to its starting position.
- Press the Run button to begin the simulation.
The simulation clock will start running and the 3D model and/or process flow will start to run. See What Happens When You Run a Simulation? for more information.
Skipping Forward in a Simulation
Unfortunately, FlexSim does not have the ability to scrub the timeline or jump to a specific time in the simulation. But there are a few different ways you can you can skip forward in a simulation, as described in this section.
The Step Button
Pressing the Step button will skip to the next event in the simulation.
Increasing the Speed of the Simulation
Another solution to skipping forward is to increase the speed at which the simulation runs so that it gets to the point you are interested in faster. You can also set the simulation to stop at the moment in time you are interested in.
Stopping or Pausing a Simulation
There are two ways you can stop a simulation. One way is to press the Stop button on the toolbar. Another way is to set the simulation to stop at a specific time during a simulation run:
- Click the arrow next to the simulation clock to open the run time tools.
- Change the Display Mode to either seconds or the date and time if needed.
- Check the Stop Time checkbox and enter the time you want the simulation model to stop. (The available time fields will depend on what you selected as the display mode in the previous step.)
- You can also check the Warmup Time checkbox and enter the time you want the warmup to end.
Changing the Speed of a Simulation Run
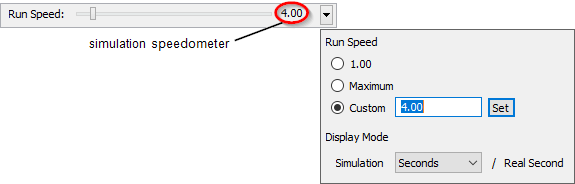
The Run Speed tools allow you to change how fast the simulation runs, as shown in the following image:
The simulation speedometer shows the current speed at which the simulation is running. By default, simulations will run at a rate of 4 simulation units per real-time seconds. You can make that number faster or slower depending on how quickly you want to run the simulation.
You can use the slider button to manually adjust the run speed. Alternatively, you can click on the drop-down to open the speed options. You can select one of these options to change the Run Speed:
- 1.00 will run the model at a speed of one model unit per real second.
- Maximum is the fastest speed.
- Custom allows you to type the speed you would like in the box directly below it. Click the Set button to apply the new custom speed settings.
You can also change the Display Mode of the simulation speedometer so that it is defined as a ratio of some other unit per real second. This can be useful if you have different model events that take place over different time spans. In order to run your model in real time you can set the Display Mode to Simulation Seconds per Real Second and then set the run speed to 1.
Alternate Ways to Run a Simulation
You can also run simulations using the Experimenter tool. See The Experimenter and Optimizer Tool for more information.