Task 3.2 - Add Multiple Finish Activities
Task Overview
One of the nice things about building model logic in process flow is that there is often more than one way to build the same logic. In this tutorial task, you'll build a slightly different version of the model you built in the previous tutorial task. In this model, you'll base the processor's process time on the type of flow item it is processing. Flow items with a product type of 1 will be assigned a faster process time than flow items with a product type of 2. You'll also assign different colors to the flow items based on their product type.
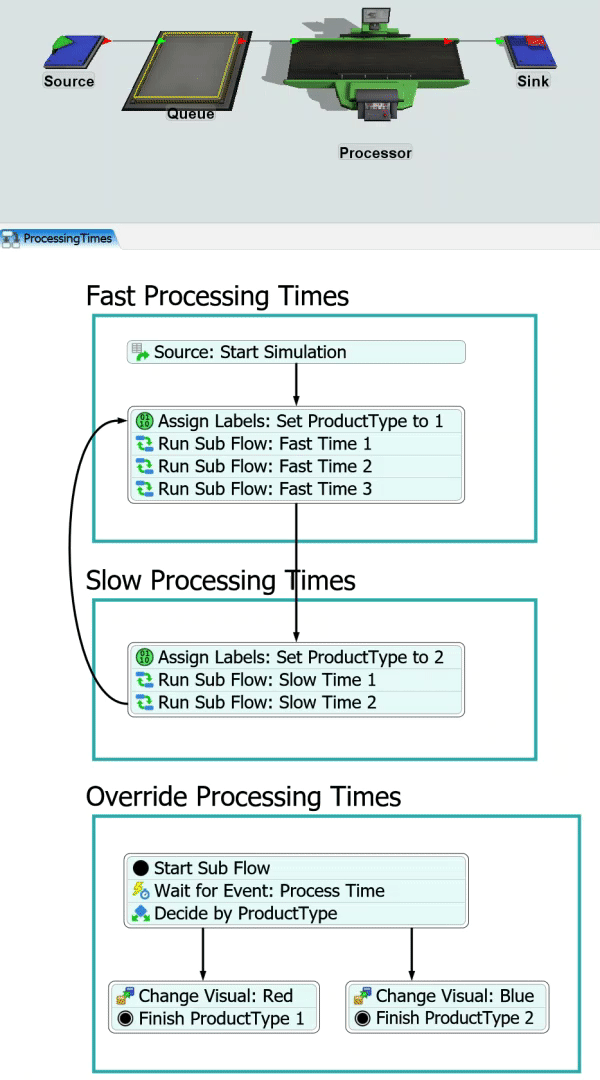
You'll create this logic by adding a Decide activity in the sub flow that will send tokens to one of two Finish activities based on the value of the productType label on the tokens. The two Finish activities will assign a different processing time to the flow item. When you're finished, your 3D model and process flow will look similar to the following image:
Step 1 Add and Rename Activities in the Process Flow
In this step, you'll make a few changes to add a few more activities to the process flow that will control the processor's changing process times.
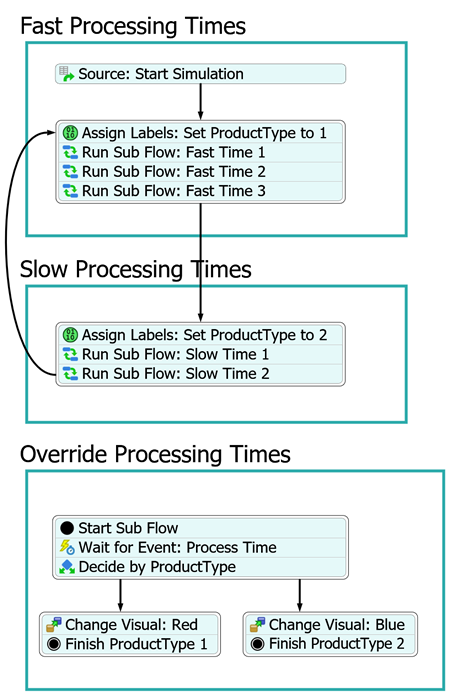
When you're finished, your process flow should look similar to the following image:
For now, you'll merely add, rename, and connect these activities to the process flow. You'll edit the properties to add the functionality in a later step.
To add and connect these activities:
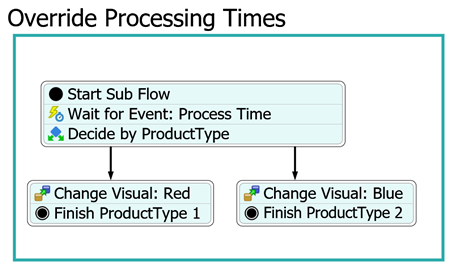
- Click the stacked block in the Override Processing Times shape to select it.
- Click the Scissors button
 between the
Wait for Event: Process Time and the
Finish and Override Process Time activity to separate
them.
between the
Wait for Event: Process Time and the
Finish and Override Process Time activity to separate
them. - From the Library, add a Decide activity (under Basic) to the end of the Wait for Event: Process Time activity's stacked block.
- Add 2 Change Visual activities and position them side by side below the stacked block. (Do not connect them to the stacked block.)
- Move the Finish and Override Process Time activity to the end of the first Change Visual activity to create a stacked block.
- From the Library, add a second Finish activity to the end of the second Change Visual activity to create a second stacked block.
- For clarity, rename these activities as:
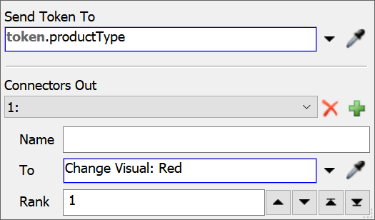
- Create a connector going from the Decide by ProductType activity to the Change Visual: Red activity.
- Repeat the previous step to create a connector to the Change Visual: Blue activity as well.
- For clarity, rename the following activities in the rest of the process flow:
| Activity | New Name |
|---|---|
| Decide | Decide by ProductType |
| First Change Visual | Change Visual: Red |
| Second Change Visual | Change Visual: Blue |
| First Finish | Finish ProductType1 |
| Second Finish | Finish ProductType2 |
| Activity | New Name |
|---|---|
| Assign Labels: Set to Fast | Assign Labels: Set ProductType to 1 |
| Assign Labels: Set to Slow | Assign Labels: Set ProductType to 2 |
Consider saving your model.
Step 2 Edit the Activity Properties
In this step, you'll edit the properties for the new activities in the process flow. The following is an overview of how each activity will function after this step:
| Activity | Explanation |
|---|---|
| Assign Labels Activities | In the previous tutorial task, both of the Assign Labels activity will create
and set a label called processTime. In this step, you'll remove this label
and change it to productType that will be referenced by the sub flow as it
controls the processor's process time and visuals. The first Assign Labels activity
will set the label to 1 and the second activity will set it to
2. |
| Wait for Event: Process Time | This activity will still listen to the processor for the process time event. However, you'll also add a label named MyItem that contains a reference to the item that triggers this event. |
| Decide by ProductType | This activity will evaluate the productType label and send tokens with a productType of 1 to the first Change Visual activity and those with a producType of 2 to the second Change Visual activity. |
| Change Visual Activities | These activities will change the color of the flow items to blue or red based on their productType. |
| Finish Activities | In the previous activity, the Finish activity referenced the
processTime label to provide the processor with a process time return
value. This time, you'll change the values to static values. The first Finish
activity will assign a return value of 2 and the second will assign a
return value of 10. |
To edit these properties:
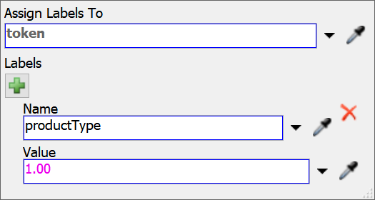
- In the Fast Processing Times shape, click the
Assign Labels: Set ProductType to 1 activity to select
it. In Properties, delete the current text that is in the
Name box and type
productTypeinstead. - In the Value box, delete the current text and type
1.00instead. - Repeat the previous steps for the Assign Labels: Set ProductType
to 2 activity but instead change the Value to
2.00. - In the Override Processing Times shape, click the
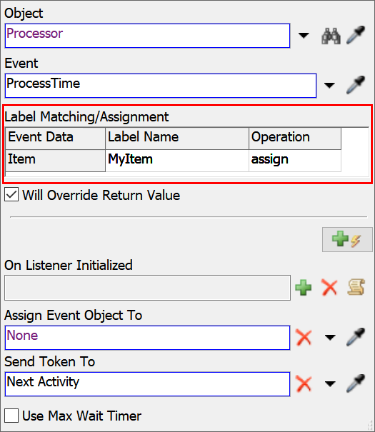
Wait for Event: Process Time activity to select it. In
Properties, find the Label Matching/Assignment
table. In the Item row under the Label
Name column, type
MyItem. - Click in the cell under the Operation column to open a menu. Select assign.
- Click the Decide by ProductType activity to select it. In Properties, click the arrow next to the Send Token To box to open a menu. Point to Token Label, then select productType.
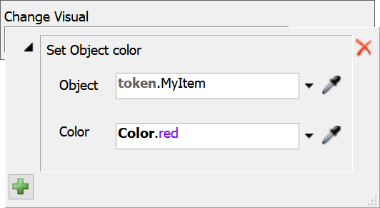
- Click the Change Visual: Red activity to select
it. In Properties, click the Add button
 to open a menu. Select
Set Object Color to open some picklist options.
to open a menu. Select
Set Object Color to open some picklist options. - In the Object box, delete the current text and type
token.MyItem. - Click the arrow next to the Color box to open a menu. Select Red.
- Repeat the previous steps for the Change Visual: Blue activity, but instead select Blue.
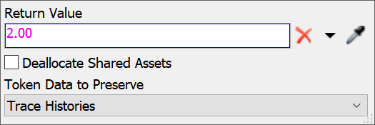
- Click the Finish ProductType 1 activity to select
it. In Properties, in the Return Value box, delete
the current text and type
2.00. (Notice this is the same fast processing time used in the previous tutorial task.) - Repeat the previous steps for the Finish ProductType 2
activity, instead changing the Return Value to
10.00.
Consider saving your model.
Step 3 Run the Model
Reset and run the model.
You'll notice now that the processing times are determined by the productType label, with the fast items having a type 1 and colored red and slow items having a type of 2 and colored blue.
Conclusion
This concludes the Sub Flow tutorial. Hopefully you can see the many potential uses of sub flows to create simple but effective and customizable logic. For example, it would be easy to build off this basic sub flow to add more custom logic. You could see how you could add a task sequence sub flow in between the fast and slow items to simulate product changeover times.