Database Connectors
Overview and Key Concepts
Database connectors allow you to connect to a database, and then import data from the database, or export data to it.
Database connectors are accessed from the Toolbox. To add a database connector, click the
Add button  in the Toolbox. Point to
Connectivity, then select Database Connector.
in the Toolbox. Point to
Connectivity, then select Database Connector.
Setting Up a Database Connection
You define settings associated with connecting to the database, including the address, user name, database name, etc., in the Connection tab of a database connector's properties window.
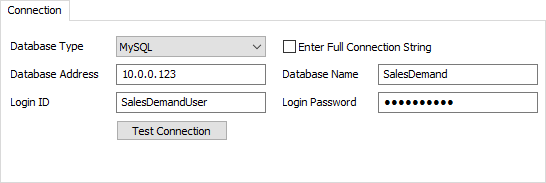
- Database Type - This defines the type of database you are connecting to.
- Enter Full Connection String - If you select this checkbox, you can define the full database connection string yourself, instead of entering just the Database Address and Database Name fields.
- Database Address - This defines the IP address of the database server. If the local computer is the database server, you can put "localhost" here, or explicitly define the IP address if it is not local.
- Database Name - This is the name of the database to connect to.
- Connection String - This field is visible when you've selected the Enter Full Connection String checkbox. Here you enter the full database connection string.
- Login ID - This is the user name to login with.
- Login Password - This is the password to login with.
- Test Connection - Once you've defined the database connection settings, you can press this button to test that the database connection is successful.
Importing Data
Once you've set up the connection settings, you can configure automatic imports from the database. This is done through the Import tab.
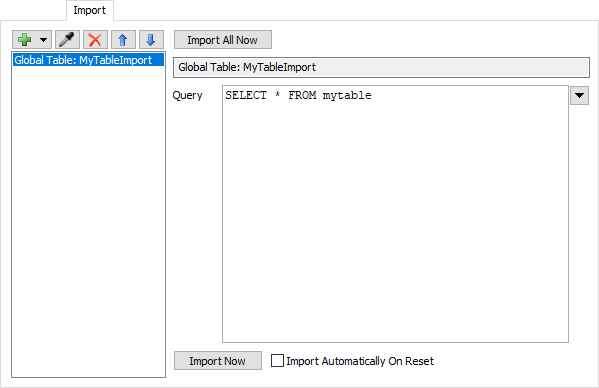
The list on the left shows the set of imports that have been defined. You can configure this list using several buttons above the list.
| Icon | Description |
|---|---|
 |
Opens a menu listing available global tables. The selected table will receive the imported data. You can also select the option to create a new global table. |
 |
Samples some table, or node in the tree, in FlexSim. This will add an entry to the list for the chosen node or table. |
 |
Removes the selected import item from the list. |

 |
Reorders the selected import item in the list. |
When you select a specific import item, several properties appear in the pane on the right.
- Import All Now - Performs a one-time import of all items in the list.
- Query - Defines the query that will be executed, whose result will be imported into the designated table in FlexSim. Use the arrow on the right to select from a list of available database tables. Alternately you can define the SQL query manually.
- Import Now - Performs a one-time import of the currently selected import item.
- Import Automatically On Reset - If this check box is selected, FlexSim will automatically perform an import of this item every time the model is reset.
Exporting Data
You can also configure automatic exports to the database. This is done through the Export tab.
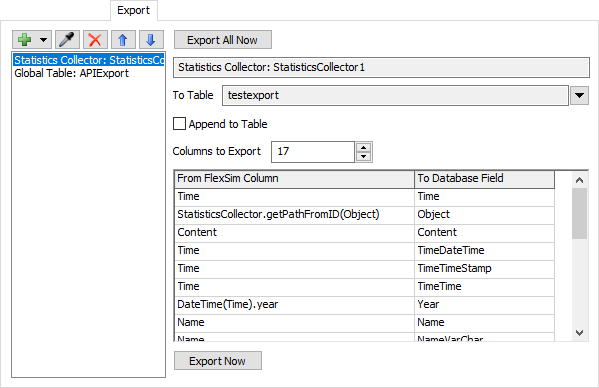
The list on the left shows the set of exports that have been defined. You can configure this list using several buttons above the list.
| Icon | Description |
|---|---|
|
Opens a menu listing available global tables and statistics collectors to export from. |
|
Samples some table, or node in the tree, in FlexSim. This will add an entry to the list for the chosen node or table. |
|
Removes the selected export item from the list. |
|
|
Reorders the selected export item in the list. |
When you select a specific export item, several properties appear in the pane on the right.
- Export All Now - Performs a one-time export of all items in the list.
- To Table - Defines what table in the database to export to. Use the arrow on the right to choose from a list of tables to export to.
- Append to Table - Select this check box if you want the export operation to append to the table, instead of clearing the table before exporting.
- Columns to Export - Define the number of columns that will be exported to the database table. When you choose a table in the To Table field, it will attempt to auto-populate the set of columns for export. However, you can customize this. The Columns to Export field lets you define how many columns to export.
- From FlexSim Column / To Database Field Table - Define here a mapping of FlexSim columns to database table columns. On the left you define the FlexSim column name. On the right you define the database field name.
- Export Now - Performs a one-time export of the currently selected export item.
Communicating with a Database Programmatically
In addition to performing imports and exports automatically, FlexSim provides a FlexScript API that allows you to communicate with a database on your own. The following FlexScript classes are defined.
- Database.Connection
- Database.PreparedStatement
- Database.ResultSet
- Database.DataType
See the FlexScript API Reference for more information.