Property Tables
Overview and Key Concepts
Property tables are a tool you can use to better visualize and change the properties of objects in your model. As you add objects to your model, each object has a defined set of properties that configure the behavior of that object. As the number of objects in your model grows, it can become challenging to see, much less manage all of the different properties for all of the different objects in your model. While the Properties pane enables simple editing of multiple objects simultaneously, property tables can be much more powerful because they let you both see and compare the property values of multiple objects, as well as change those properties, in an Excel-like table interface that is intuitive and easy to use.
The way that property tables enable this is by viewing the model like a database table. Each object represents a row in this table, and the properties of each object represent fields, or columns in the database table. With this database-like perspective, you can query the table of objects, selecting specific properties that you want to view or edit. You can filter your query, either by certain types of objects, or by group membership, or by certain property values, etc. Finally, you can sort the query by those same, or different, criteria. The results of this query are displayed in a table view, allowing easy comparison of the different objects across different rows of the table, and allowing you to quickly and easily change the properties of the objects in the table, either individually or by changing multiple objects at a time.
Creating Property Tables
There are primarily two ways to create a property table. You can either create a property table using the Toolbox, or you can create one using the Properties pane of a specific object.
Creating a Property Table from the Toolbox
To create a property table from the toolbox, click on the Toolbox tab, press the
 button, and choose Property
Table. This will create a basic property table, showing the name of each object in your model.
Further configuration can be done within the property table tab.
button, and choose Property
Table. This will create a basic property table, showing the name of each object in your model.
Further configuration can be done within the property table tab.
Creating a Property Table from the Properties Pane
To create a property table from the Properties pane, click on an object, and find
a desired pane in its properties.
On the title bar of the pane there is usually a  button.
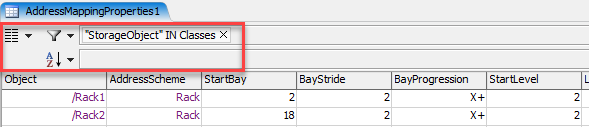
Press that button and choose Create New Property Table. This will create a new property table
with relevant property fields, as well as a filter that filters by that object type. The corresponding row of
the object you selected will also be highlighted in the table.
button.
Press that button and choose Create New Property Table. This will create a new property table
with relevant property fields, as well as a filter that filters by that object type. The corresponding row of
the object you selected will also be highlighted in the table.
Customizing Property Tables
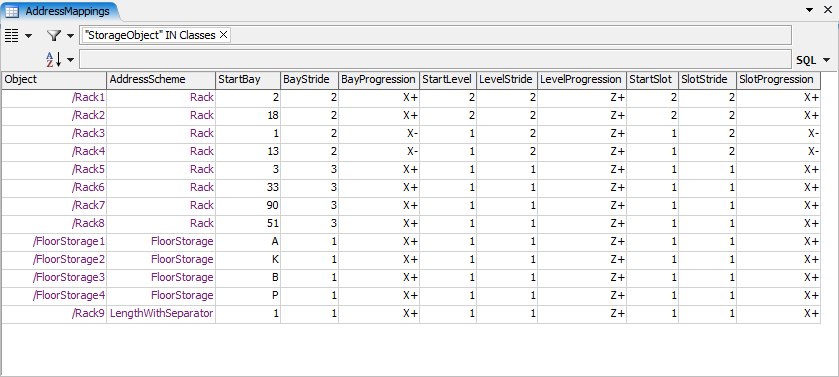
The property table tab includes controls for defining which properties you want to view, how to filter the set of objects for viewing, and how they should be ordered in the table.
Press the  button to define which properties you
want to see in the table. Press the
button to define which properties you
want to see in the table. Press the  button to define the properties by which
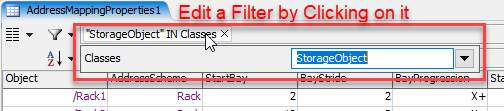
to filter objects for display in the table. Once you've chosen a property to filter by, that property
will appear in the filter edit field, and you can click on it to further define the filter expression.
button to define the properties by which
to filter objects for display in the table. Once you've chosen a property to filter by, that property
will appear in the filter edit field, and you can click on it to further define the filter expression.
Finally, you can click on the  button to define how the table should be sorted.
This works similarly to the way you define filtering.
button to define how the table should be sorted.
This works similarly to the way you define filtering.
Object Label Values
You can also select, filter, and sort by object label values. To do this, press the desired
, , or
button. At the top of the dialog you should see a
Label field. Type in the name of the label and press the
 button.
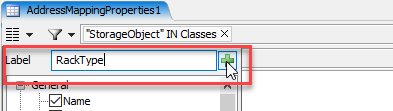
This will add that label to the selection/filter/sort.
Changing Object Properties
Once you have configured the table to show exactly what you need, you can now use the table to not only compare property values across objects, but also to change them, either individually or multiple objects at a time.
To change a single object, you can double-click on the target property cell for that object (or click on the cell and press F2), and type in the value to set it to, then click off the cell. This will immediately apply your entered value to the object's property. Note, however, that some properties do not allow direct editiing like this.
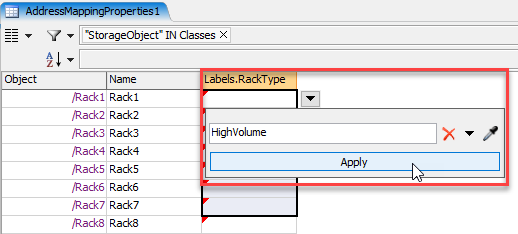
Alternately, you can edit the properties of multiple objects at the same time. When you select
one or more rows of a single property, a
 button will often appear beside your selection.
Press that button to open a dialog for editing the value. Once edited, press that dialog's
Apply button, and the edited value will be applied to all rows that you
have selected in the table.
button will often appear beside your selection.
Press that button to open a dialog for editing the value. Once edited, press that dialog's
Apply button, and the edited value will be applied to all rows that you
have selected in the table.
Using SQL Directly
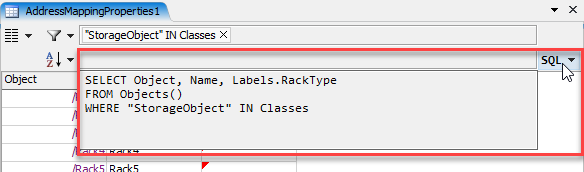
Property tables are an easy-to-use tool for viewing and managing object properties. At their core, however, property tables are just a user interface wrapper around FlexSim's powerful SQL capabilities. On the right side of the property table tab, you will see a SQL button. Press this button to show the full SQL query associated with the table you are viewing.
You can copy/paste this query into a call to the Table.query() command, and you will get the same result as what the property table is showing you. While, for simple scenarios, this doesn't get you much more than you already can do within the property table interface, it does open a lot of possibilities for implementing your own customized functionality, such as:
- Composing inner join queries that relate objects in the model with other data such as global tables
- Aggregating information on multiple objects with aggregation functions such as AVG(), COUNT(), etc.
- Using the SQL UPDATE and DELETE clauses to either change properties or remove objects from the model
- Using the SQL INSERT INTO clause to auto-build your model
Using the Objects() Table
To query the set of objects in your model, you use the Objects() table in your query. For example:
SELECT Object, Name FROM Objects()
The Objects() table is what would be called in standard SQL a table-valued function. You can optionallypass a parameter into this function to define the 'root' node, whose subtree will be searched for objects. The parameter can either be a path, a name of an object, or a reference to an object in the model.
SELECT Object, Name FROM Objects('MODEL:/FirstFloor')
SELECT Object, Name FROM Objects('FirstFloor')
SELECT Object, Name FROM Objects(Model.find('FirstFloor'))
All of the examples above would give the same result. Here, the 'root' node is the object named FirstFloor in the model. On the other hand, if no parameter is passed into Objects(), then the 'root' node is the model. The query will recursively search the subtree of the root object, finding any objects, and will create a 'virtual' table where each object represents a row in the table.
Auto-Building the Model
As mentioned above, you can use the Objects() table, in conjunction with the SQL INSERT INTO clause to actually create objects in the model, and give them property values. For example, copy-paste the following query into a script call to Table.query() and execute it.
INSERT INTO Objects() (Class, Name, Location, OutObjects) VALUES
('Source', 'Source1', ARRAY(0, 0, 0), ARRAY('Queue1')),
('Queue', 'Queue1', ARRAY(5, 0, 0), ARRAY('Processor1', 'Processor2', 'Processor3')),
('Processor', 'Processor1', ARRAY(10, 3, 0), ARRAY('Sink1')),
('Processor', 'Processor2', ARRAY(10, 0, 0), ARRAY('Sink1')),
('Processor', 'Processor3', ARRAY(10, -3, 0), ARRAY('Sink1')),
('Sink', 'Sink1', ARRAY(15, 0, 0), ARRAY())
This will create a connected, fully functioning set of objects in your model. While you likely would not write such a query by hand, this capability enables even model-building to be a fully data-driven activity. You can create a simple script that will read from a table and construct a SQL INSERT INTO query, then run the query to create the objects in the model. While we hope to integrate such functionality into FlexSim's property tables in the future, you already have the tools needed to do this yourself.
Required Fields for INSERT INTO
When you are auto-building your model using the INSERT INTO clause, you must provide at least one of two special fields in the query, so that FlexSim can know what types of objects to create. Other property fields are optional, and, if not provided, will revert to their default property values.
When using INSERT INTO, you must either include the Class field, or the CopyFrom field. The Class field is the name of the class from which to create an instance. This is something like 'Source', 'Processor', 'Queue', etc. This field is also available for viewing in a property table. Alternately, you can provide a special CopyFrom field. This is a path or name of an object that you want to create a copy of. Using this field, you can create and pre-configure an object in your model, and then create copies of that object in the auto-build step.
The example query below is similar to the previous example, except here an object named TemplateSource has already been created in the model. A copy of that source is created using the CopyFrom field. All other objects are created as an instance of a library class.
INSERT INTO Objects() (Class, CopyFrom, Name, Location, OutObjects) VALUES
(NULL, 'TemplateSource', 'Source1', ARRAY(0, 0, 0), ARRAY('Queue1')),
('Queue', NULL, 'Queue1', ARRAY(5, 0, 0), ARRAY('Processor1', 'Processor2', 'Processor3')),
('Processor', NULL, 'Processor1', ARRAY(10, 3, 0), ARRAY('Sink1')),
('Processor', NULL, 'Processor2', ARRAY(10, 0, 0), ARRAY('Sink1')),
('Processor', NULL, 'Processor3', ARRAY(10, -3, 0), ARRAY('Sink1')),
('Sink', NULL, 'Sink1', ARRAY(15, 0, 0), ARRAY())
See SQL Queries for more information on using SQL in FlexSim.