Key Concepts About Warehousing
What are FlexSim's Warehousing Tools?
FlexSim has a robust set of tools for modeling warehousing facilities. These warehousing tools will help you analyze the many aspects that go into complex warehouse and storage design. With these tools you can create realistic multifaceted models for data analysis.
Before creating a complex warehousing model however, it’s recommended that you simplify the model concept as much as possible early on. Warehousing models have many dimensions that can get very complicated very quickly. The first recommended step therefore, is to determine the question and specific data that you are trying to gather from your model.
It is valuable to begin a warehouse simulation with a specific question because this will give your model direction in your design. Eliminate any details from the modeling process that don’t help to answer this question. If an element is not critical to examining the question you’re trying to answer, then you can save yourself extra work by abstracting and making educated assumptions about those elements.
Some examples of incomplete or difficult questions might be:
- How do I optimize my throughput?
- How do I improve my order turnaround time?
These questions are too open-ended and vague. They don’t define enough measures to determine what’s “optimal.” These types of questions often lead to overly complicated models that are challenging to parse through, because any element could potentially affect these vague measures.
A good question, on the other hand, will include both a proposed change and a performance measure to compare against. Some examples of good questions to ask include:
- Will this proposed racking system be able to handle the picking throughput I need?
- Which of these two layouts renders the lowest turn-around time from order to shipment?
- Do we have enough racking in our facility to handle projected inventory levels?
Most important is to figure out what data you need to extract from your model. Once you’ve determined the data that you need from your model, there are several areas of consideration about building a warehouse model: Laying out your warehouse, monitoring inventory, and retrieving product.
For more detailed advice and information, please refer to the article detailing concepts of Project Goals and Scope.
Laying Out Your Warehouse
When designing a warehouse simulation, one of the key elements to determine is the layout of the warehouse itself. How and where are items going to be stored? Where do operators and transports need to be able to access? How are items going to be addressed and zoned?
The Storage System
Whenever you drag out a rack object into a model for the first time, you will notice that FlexSim will create a new object in your Tools folder. If you click on the Toolbox tab on the left panel of the screen, you can find the Storage System object listed there. This Storage System centralizes the logic of your racking and warehousing objects into a single hub. Labels, rack visualization, addressing schemes, and triggers can all be created and controlled from the Storage System object. This document will reference the Storage System tool in the sections below, but for a full complete reference to the Storage System and its features please refer to the Storage System Documentation.
Bays, Levels, and Slots and the Dimensions Tab
The organization of racks is setup in a matrix style grid or table made up of bays, levels, and slots. If you click on a rack object in the 3D view, you can open its properties in the Properties Window. Under the Storage Object section click the Edit Dimensions button and you will see the following table. (It might have some alterations based on which type of rack you clicked on, but the same basic system works across all rack types.)
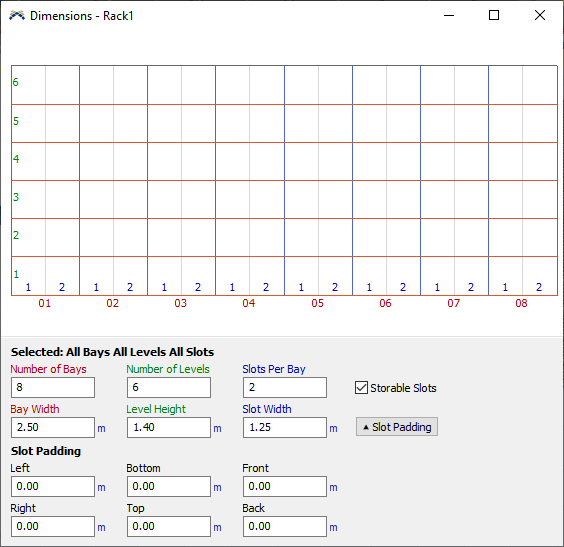
In this view you can see how the bays, levels and slots of a rack are organized. Bays represent the areas along the horizontal axis, levels are the spaces along the vertical axis, and slots refer to further divisions of space within each bay and level “cell.” For more detailed information please see the reference document on the Dimensions Tab of Storage Objects.
Bay and Level Progression
The Pick-Face of a rack is the side of the rack that Operators and Transports will load items from. In a typical warehousing environment this is where Pickers retrieve items from a rack’s shelves. This is where the term “pick-face” comes from; it’s the face of the rack that is picked from. You can consider the pick-face of a rack to be the “front” side of the rack for logical purposes. There you can see how bays and levels are counted. In the default settings, the bay’s count progresses, starting at 1, from left to right, one bay at a time. Levels are counted the same, starting from bottom up to the top. This count is what is referred to as Bay/Level Progression, and the count is what is referred to as Bay Stride.
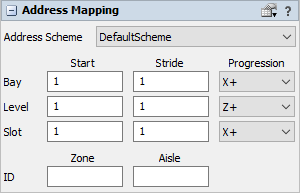
In the Address Mapping section, you can change how the rack will count its Bay and Levels, as well as the Rack to an Addressing Scheme. This document will go into more detail about Address Schemes later on. For more detailed information on setting Bay and Level Progression and Stride, please see the reference documentation on the Storage Object.
Assigning and Finding Locations and Items
Once you’ve determined the layout of your warehouse, the next step is to determine how you are going to assign locations to the items stored in the warehouse. There are multiple ways to do this. If you have an Order Table, or some kind of inventory spreadsheet that contains address information for product, you can set up an Addressing Scheme in Storage System properties window. Alternatively you can use some of the Storage.system commands to create rules or queries to determine the slot for an item.
Addressing Schemes
If you already have a table of inventory data with SKUs and address information (such as an Order Table, or an In-Bound Table for arrivals) then you can implement an Address Scheme from your Storage System tool in the toolbox. If you haven’t done so already, you can drag out any rack object into the model, to initialize the Storage System object in the toolbox. Once a rack is created in a model, the Storage System object will automatically be initialized in a model. You can open the Storage Systems properties window, by selecting the Toolbox tab, and double clicking on the Storage System listed in your tools. Once open, you can select the Address Schemes tab to bring up the information and details for creating Address Schemes.
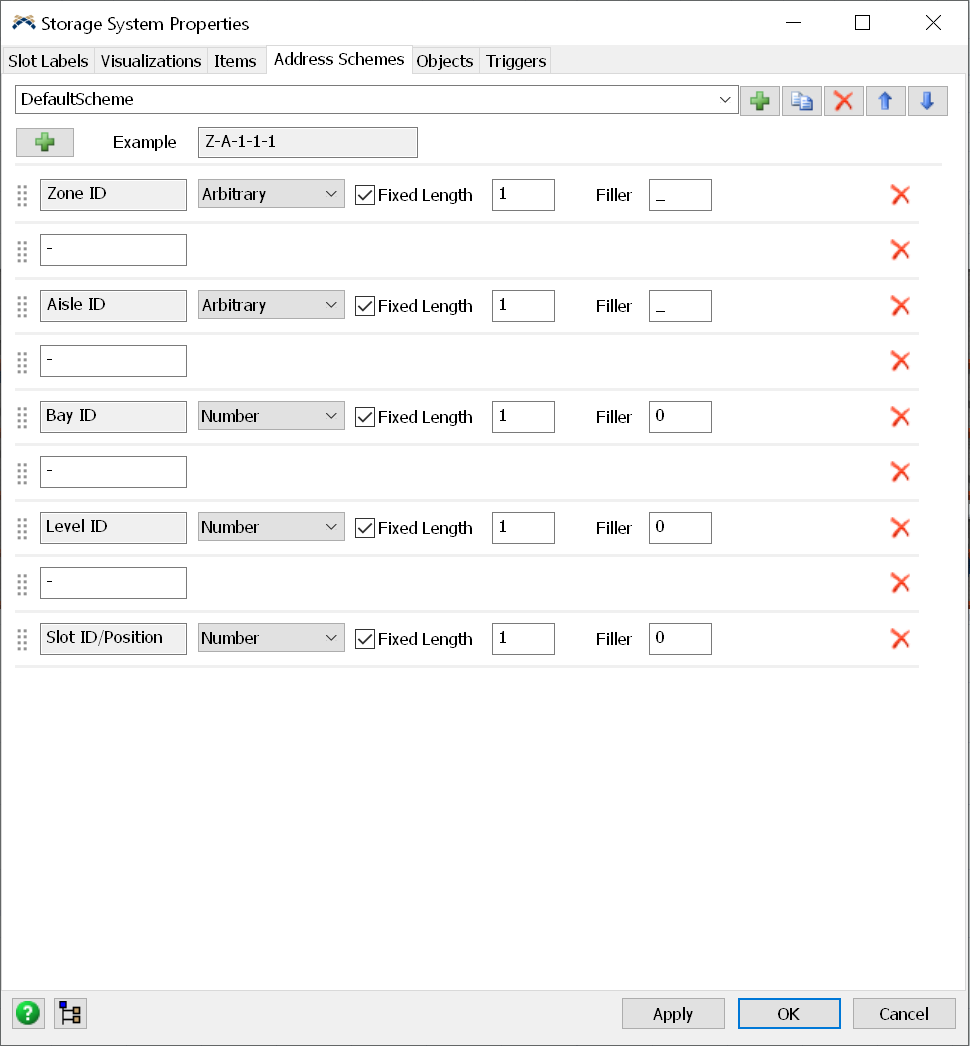
Here in the Address Schemes tab you will find multiple fields to help create and maintain multiple Addressing Schemes for your project. The top field displays the currently selected theme, and next to the field are multiple buttons for creating, copying, deleting, and reordering the Address Schemes. Generally speaking, a warehouse will only use a single addressing scheme. However, you can create as many Address Schemes as your model logic needs. This may be useful if, for example, you want to simulate a facility that has multiple separate buildings that each use completely different addressing schemes.
The next field line has an Example of how your selected address scheme is written. Before you begin to define your own address scheme, it is important to understand the elements that make up the different parts of an address. From the largest grouping to the smallest, addresses may be made up of Zones, Aisles, Bays, Levels, and Slots. The Zone ID represents the largest categorization of location in the warehouse, usually meant to refer to an area in the warehouse that includes a group of racks. Aisle ID refers to the aisle that a group of racks could belong to. Bay ID refers to the bay in the rack, followed by Level ID. And Slot ID is the specific location that an item is going to be assigned to. You should notice that with the default scheme selected, the Example field will read as Z-A-1-1-1. This string of characters provides you with a sample of what an address String for this Address Scheme will look like. In this case the first character represents the Zone. Then a dash, followed by the second character representing the Aisle. Then further dashes separating the Bay, followed by the Level, and then finally the Slot. When searching for a location Slot by address, this string is an example of what will be passed into the search parameter.
For more information please see the Address Scheme Tab in the Storage System documentation.
Once you’ve either created or selected an Address Scheme, you can now assign Racks to be included in that scheme. You click on a Rack object to open its properties on the right, and under the Address Mapping section, you can select your Address Scheme from the corresponding dropdown menu. Once a scheme is selected, you can assign a Zone or Aisle ID.
Objects Tab
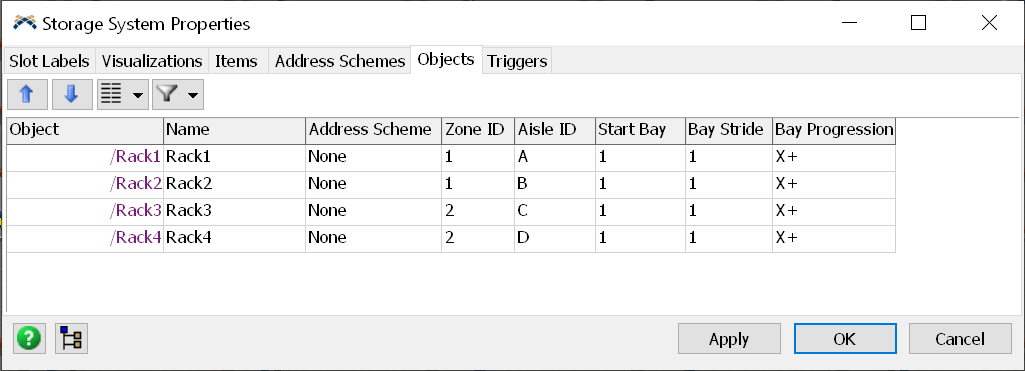
You can also get an overview of every Rack Object connected to the Storage System by clicking on the Objects tab of the Storage System’s properties window. Here you can see and reorder any of the Racks and edit their Zone or Aisle IDs. You can also edit Start, Stride and Progression of Bays, Levels, and Slots. By default, only Bays are visible. However, at the top of this window there is an options button, with checkboxes that will allow you to show or hide which properties for your Rack objects that you’d like to edit.
Getting Slots Using Addresses with FlexScript
Once you have an addressing scheme set up, there are some simple FlexScript commands that you can use, to get a slot and assign an item to that slot.
FlexSim has a Storage class used in FlexScript commands that deal with any of the Storage Objects and Warehousing tools. To learn more in depth about the Storage.System class and its functions and attributes, you can look at the Storage.System FlexScript API.
Using the Storage.system.getSlot() method you can get a Slot based upon the address you pass in. The method expects a string, and it will match the characters of the string against any Address Scheme that has been set up in the model. If the address matches the scheme, it will locate that slot, and return that slot. From there the slot can be assigned to the item.
The following Process Flow is an example of how you could get a slot, assign it to a label on the token, and then assign the retrieved slot to the item.
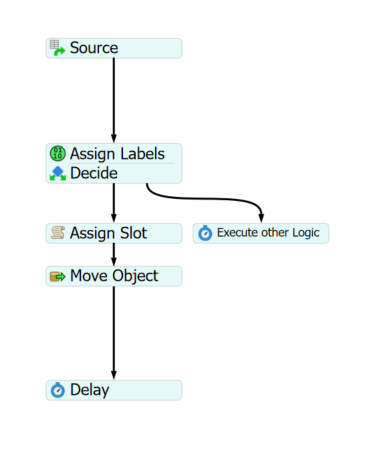
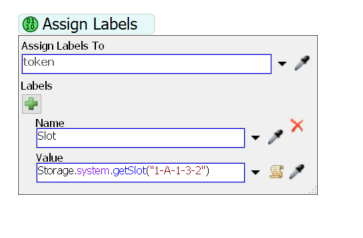
Using an Assign Labels activity we can assign a label to a token. selecting from the picklist options on the value of the label, we can select the Get a Storage Slot by Address selection from the Warehousing menu. You will notice that the value field of the label now has the getSlot() command. It will by default enter a filler label as the parameter value; you can enter your address string or a label with the address string as the parameter value.
Once you have a Slot assigned, it's a good idea to have a check making sure the slot was aquired. This can be done using a Decison activity. Simply use a conditional decision type, and have token.Slot (or whatever your Slot label is) as the condition. This will determine if the Slot was aquired.
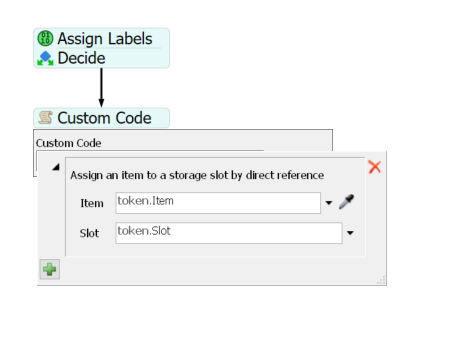
Finally, you then need to assign the aquired Slot to the item. If an item has a Slot assigned to it, the logic in the Racks will be able to determine how and where to place that item. To assign the slot to the item you can use a Custom Code activity. In the picklist options of the Custom Code activity, under the Control section, you will see a Warehousing subsection, select the Assign a Slot (direct) option. The activity will then provide you with two fields to define the Item and Slot respectively.
In addition to Process Flow, you could also write a script to retrieve and assign the Storage Slot as well. The following script is an example of how you might get a Slot and assign it to an item using FlexScript.
Storage.Slot slot = Storage.system.getSlot("1-A-1-3-2");
if (slot && slot.hasSpace(item)) {
    Storage.Item storageItem = Storage.Item(item);
    storageItem.assignedSlot = slot;
}
token.Slot = slot;
This script declares a “slot” variable of the System.Slot class. We assign it a value by using the Storage.system.getSlot() function, passing in a string that matches an Address Scheme in our system. The function will then find that slot based on the address and return it as a value.
The next lines of code then ask if a slot was retrieved, and if it has space for our item using the slot.hasSpace() function. If so, the slot is assigned to the item. Assigning slots to items is a crucial step, because once the item has a slot assigned to it, if the item is then moved to the rack containing that slot, the item will be placed automatically into the corresponding assigned slot.
Setting Up Labels on Slots
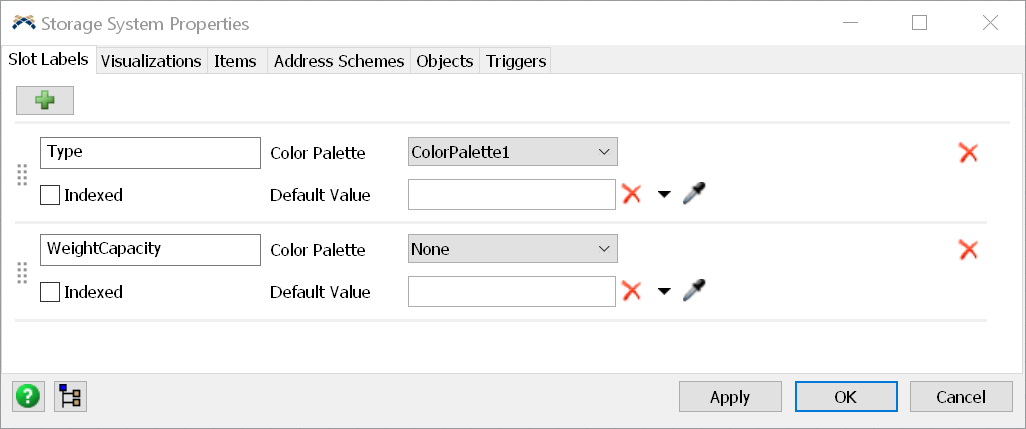
Another way of assigning slots and slot values, is to use labels. In the Storage System object’s properties, you can click on the first tab named Slot Labels. This window will be blank by default, but by clicking on the green “+” sign you can add a label for all the slots in your Storage System. This would be a good way to attach a Type label to the slots, for example. Once a new label is created here, you will notice several fields that give you options for the newly created label. The first field is the name of the label, then you can select a Color Palette from your s election of Color Palettes in your model (See the Color Palette reference documentation for more information). The Indexed checkbox will allow you to select whether the label is indexed or not. (See the Slot Labels reference documentation for more information about indexing.) Finally, the last field will let you determine if the label has a Default Value.
Finding and Assigning Slots from Labels
If your racks and storage system are set up with labels, you can use one of the functions of the Storage class to now search for a Slot to assign to your item. Much like the ability to get a slot and assign it using the address system. The Storage class also has a function to find a slot through a query of the labels instead. Using SQL syntax, you can pass a query as a string into the Storage.system.findSlot() method to return a slot you can then assign to your item
You can set this up in Process Flow much the same way you'd set up getting a slot using the Address method. Again use an Assign Labels activity and use the picklist options when assigning a value to your label. Select the Warehousing section and choose the Find a Storage Slot option.
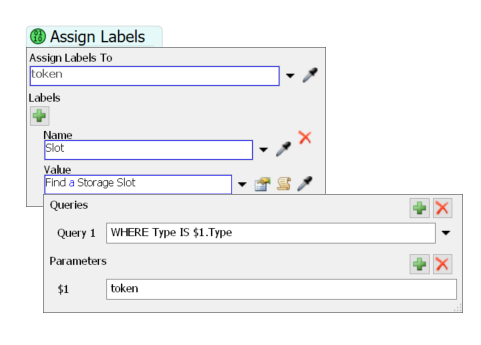
This will provide a gui where you can enter a query, and fields where you can identify objects in your query. If you were to query your Storage System for a Slot by type your query would look something like this:
WHERE Type IS $1.Type
You could then identify $1 as the token with the Type label.
This query will return a Storage Slot where the Type label of the Slot matches the Type label on the token. As documented previously, you could then use a Decide activity to determine whether a slot was retrieved, and a Custom Code activity to assign the retrieved slot to the item.
Just as with the getSlot() method, you could also use the findSlot() method using FlexScript. The script and query might looks something like this.
Storage.Slot slot = Storage.system.findSlot("WHERE Type = $1.Type AND slot.hasSpace($1) ORDER BY RAND()", 0, item);
if (slot) {
    Storage.Item storageItem = Storage.Item(token.Item);
    storageItem.assignedSlot = slot;
}
token.Slot = slot;
This script declares a variable “slot” to act as the slot we are trying to get. We assign it a value, by using the Storage.system.findSlot() function, and passing in a query. The first parameter in the function is a string of the query. This query asks the Storage System to find a slot where the Type label of the slot matches the Type label on the item, and to check if the slot has space for the item, then to randomly order any matching slots as the returned slot or slots. The next parameter in the function is a 0, this is a reserved parameter for FlexScript, and must be 0. Finally, the last parameter is the value that will be represented by $1 in the query, and every optional parameter after would be further represented by $2, $3, $4, etc.
The next lines of the code ask if a slot was returned by the function, and if so, to assign the retrieved slot to item that is going to be stored.
Find Slot Process Flow Activity
Another approach to the above two examples is to use the Find Slot activity to get a slot as well as assign an item to that slot.
Using the Find Slot activity, you can define multiple queries to find slots, using addresses, labels, properties and more. If a slot is not immediately found, the token will remain in the Find Slot activity and will listen to the On Exit of the Storage System. As items exit the storage system, the queries will be reevaluated until a matching slot is found.
The Find Slot activity performs all of the steps listed in the above examples but within one activity.
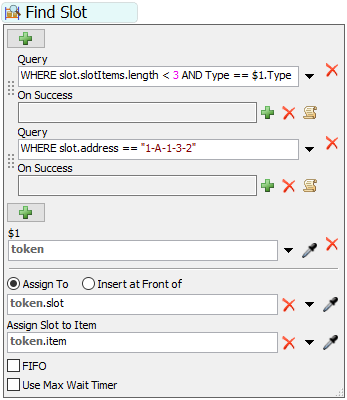
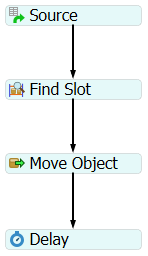
The following process flow is an example of how you could find a slot, assign it to an item and move that item into the storage object.
Finding and Retrieving Items
Just as you can use the Storage.system.findSlot() method to find slots and assign them to items, you can also search the storage system for items using Storage.system.findItem(). The parameter of the function expects a string query just as the function for finding slots does. However, whereas Storage.system.findSlot() returns a reference to a Storage.Slot, Storage.system.findItem() instead returns a reference to a Storage.Slot.Item. Once you've found an item in the storage system, you can execute logic to retrieve that item.
Just as you would create a process flow for finding a slot, you can create a similar flow for finding an item. Create an Assign Labels activity as you would when finding a slot. In the Value field of the Assign Labels activity, use the picklist options to select the Warehousing section, and select the Find Storage Slot Item selection.
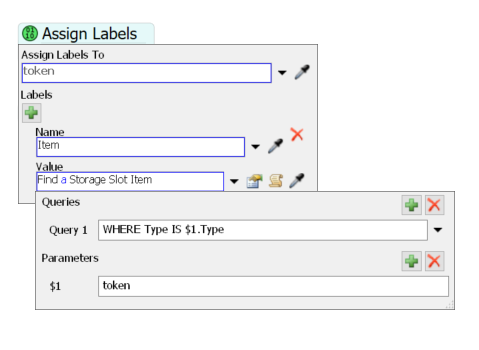
This will bring up a field for writing a query, and fields for identifying terms within your query. If you were to write a query to search for an item by its Type label, the query might resemble something like this:
WHERE Type = $1.Type
The '$1' is being used to identify the token in the process flow in this case. This query will search all the items, in the storage system for an item with a Type label that matches the token's Type label. You could add to this query to further narrow your selection by location or distance, etc.
Likewise, you can use this command within FlexScript. Here is an example script using the Storage.system.finditem() function.
Storage.Slot.Item slotItem = Storage.system.findItem("WHERE Type = $1 ORDER BY RAND()", 0, token.Type);
token.Item = 0;
if (slotItem) {
    slotItem.storageItem.assignedSlot = 0;
    token.Item = slotItem.item;
}
In this example code, we are declaring a variable called slotItem which is an instance of the Storage.Slot.Item class. We call the Storage.system.findItem() function, which runs the query and returns a matching slot item if it finds one.
The next lines of code then assess whether a slot item was returned, and if so, it stores the slot item's associated item object on a token's Item label. From here we now have a reference to the found item through that Item label and can execute logic to retrieve the item or any other logic we want to apply.
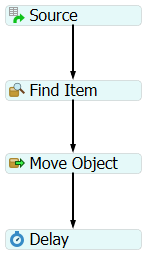
Find Item Process Flow Activity
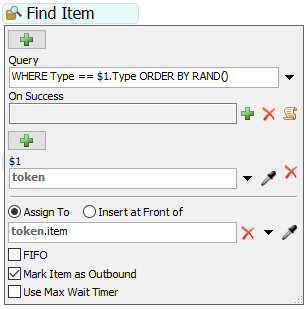
Another approach to the above example is to use the Find Item activity to get an item as well as mark that item as outbound.
Using the Find Item activity, you can define multiple queries to find items using addresses, labels, properties and more. If an item is not immediately found, the token will remain in the Find Item activity and will listen to the On Entry of the Storage System. As new items enter the storage system, the queries will be reevaluated until a matching item is found.
The Find Item activity performs all of the steps listed in the above example but within one activity.
The following process flow is an example of how you could find an item, mark the item as outbound (clear the assigned slot) and move that item out of the storage object.