Task 1.1 - Build a 3D Model
Task Overview
One of the things that makes FlexSim unique is that it gives you the ability to create 3D representations of business systems. While other simulation software can help you to build theoretical models, FlexSim give you the ability to view your business system in a more concrete way that is easier to understand and use. See Reasons to Use 3D Objects for a deeper explanation of the benefits of 3D modeling.
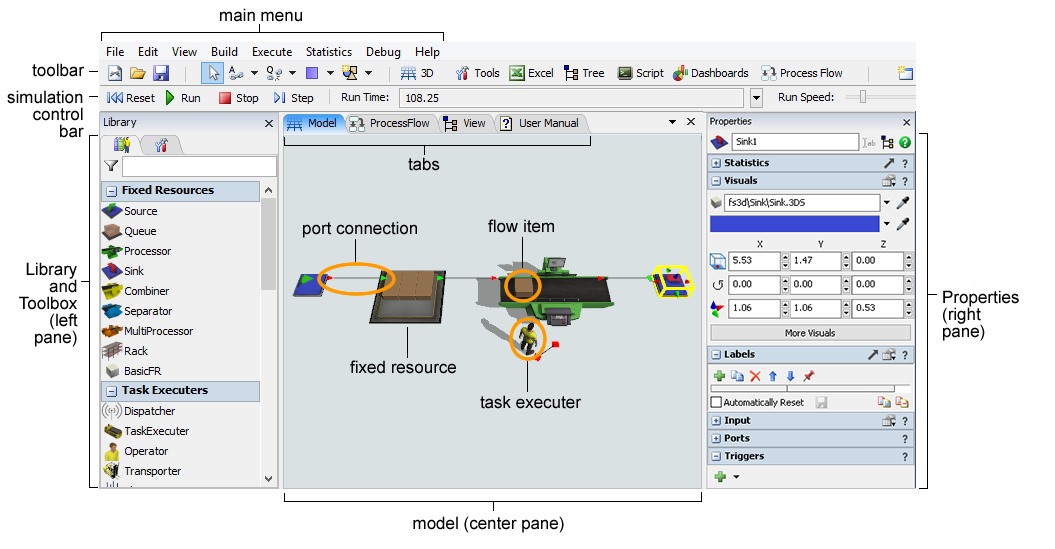
In this tutorial task, you'll learn some of the basics about navigating inside of the FlexSim User Interface while building 3D models. You'll get some hands-on experience with the most important elements of the 3D model interface, as shown in the following image:
Step 1 Add Objects to the 3D Model
The first step in building a 3D model is to build the basic layout of the business system you're trying to simulate. The customer service center that you are modeling has a service desk with one or more customer service representatives. Customers who arrive generally line up near the window until they can be helped by an employee. In this simulation model, you'll also simulate customers who leave early if the wait is too long.
To simulate all of these different elements, you'll add objects to the 3D model. Objects are the basic building blocks of a 3D simulation model. Different types of objects have different purposes and functions within the simulation model. Some of the most common objects are:
- Flow items - Objects that move (or "flow") through the simulation model, usually from one station (typically a fixed resource) to another downstream station. In this simulation model, the flow items will represent customer service center customers.
- Fixed resources - Objects that remain stationary in the 3D model and interact with flow items. Each fixed resource performs a specific function. This simulation model will use a variety of fixed resources that will interact with the customers.
- Task executers - Objects that can move around in the 3D model and perform tasks such as transporting flow items, operating machines, etc. For now, you won't use any task executers in your simulation model. You'll add task executers later in the tutorial.
See Types of 3D Objects for a more thorough explanation.
In this step, you'll start by adding some fixed resources to your simulation model:
| Object | Explanation |
|---|---|
| Source | Sources create flow items. You'll use the source to create customers, which will represent their arrival at the customer service center. |
| Queue | Queues store flow items until they can be sent to another object. The queue will represent the waiting line at the customer service center. |
| Processor | Processors process flow items, which is typically simulated as a time delay. The processor will represent the employee who will help the customer. |
| Sink | Sinks remove flow items from the simulation model. You'll use sinks to represent customers leaving the customer service center. In this model, you'll actually use two sinks: one to represent happy customers and one for unhappy customers (the ones who left early). |
To build your 3D model layout:
- Start a new simulation model. Find the 3D model area, which is located in the center pane in FlexSim. Also find the Library, which is located in the left pane in FlexSim.
- Drag the following objects from the Library into the 3D model:
- 1 Source
- 1 Queue
- 1 Processor
- 2 Sinks
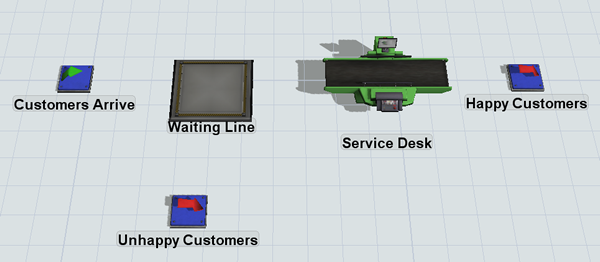
- If needed, move the objects so that they are approximately in the positions shown in the previous image.
- Click the Source to select it. Notice that the right pane changes to display the Properties for this object. Under the Properties heading you will see a field where you can see the object's name. You can edit and type object names here. Go ahead and change the name from Source1 to Customers Arrive.
- Repeat the previous step to rename all of the objects as follows:

| Object | New Name |
|---|---|
| Queue | Waiting Line |
| Processor | Service Desk |
|
Sink (by the processor) |
Happy Customers |
|
Sink (by the queue) |
Unhappy Customers |
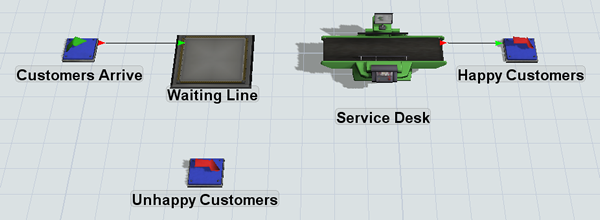
When you're finished, your 3D model should look similar to the following image:
Step 2 Connect the 3D Objects
In this step, you'll connect the 3D objects so that customers move from one object to the next in the appropriate order. In other words, you will create the logic that will help items flow from one fixed resource to another. There are several different methods for doing this in FlexSim (see Connecting 3D Flows for more information). In this step, you'll learn how to connect objects using port connections because it is the easiest and most straight-forward method.
In FlexSim, a port is a point on an object where flow items can be transferred from one object to another. A port connection is the connection between ports on two different objects. Ports create relationships between objects that allow them to communicate with each other and exchange flow items. See Key Concepts About Ports for more information.
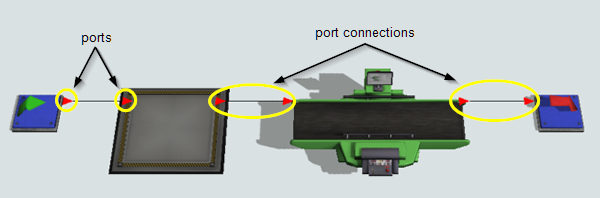
In this model, you'll create input/output port connections from the Customers Arrive source to the Waiting Line and from the Service Desk to the Happy Customers sink. You'll leave the other objects disconnected for now because you will connect those flows using a different tool later in the tutorial.
To create port connections between these objects:
- Click the Connect Objects button
 on the toolbar to
open a menu. Select Connect Objects to enter connection
mode.
on the toolbar to
open a menu. Select Connect Objects to enter connection
mode. - When you are in connection mode, your mouse pointer will change to a plus sign with
chain link symbol next to it:

- Once you are in connection mode, you can connect two objects together. Click the Customers Arrive source object. (You will notice as you move your mouse that a yellow line will appear between the object you clicked and your cursor.)
- Click the Waiting Line queue object to create the port connection between the two objects.
- You will still be in connection mode after connecting these two objects. If you wanted to connect another object to the queue, you would stay in connection mode. But since you're done connecting the queue to objects, simply press the Esc key to exit connection mode.
- You'll turn on connection mode one more time, but this time you'll use a shortcut. Press and hold the A key, then click the Service Desk processor and then click the Happy Customers sink to create another connection.
- Release the A key to exit connection mode.
When you're finished, your 3D model should look similar to the following image:
Step 3 Run the Model for the First Time
In this step, you'll try running the model at this point to see what happens when you run a model. For now you'll just run the model for the first time, but a later step in this tutorial will explain why and how to run a model in more depth. To run the model:
- Press the Reset button on the simulation control bar, which is just beneath the main toolbar.
- Press Play to start the simulation and Stop to pause it.

At this point, you'll see the source (Customers Arrive) create flow items (which look like boxes at this point) and place them in the Waiting Line. Since you haven't created any logic that will move these flow items, they'll simply stack up inside the queue until you stop the simulation.
Step 4 Create a List to Track Customers
In the previous step, you learned how to connect the flows of objects using port connections. In this step, you'll learn how to use a tool called global lists to create more complex flows between fixed resources.
In this model, the flow items will represent customers. When customers enter the waiting line, they will be added to a list of waiting customers, which will track how long customers have been waiting. The service desk will help the customers who have been waiting the longest first. However, customers who have waited more than 200 seconds will get frustrated and leave through the Unhappy Customers sink. To create this functionality, you'll use a global list, which can filter and prioritize flow items using sophisticated sets of criteria. (See Key Concepts About Lists for more information.)
In this step, you'll set up a flow item list and name it WaitingCustomers. You'll create this list using the Toolbox, which is the place where you can access nearly every tool in FlexSim. (See Using the Toolbox for more information.)
When you create a list, you first need to set up its fields. Fields determine which information the list will track. By default, item lists come with four default fields, each with pre-programmed logic. These fields are merely suggestions for what kind of fields you might want on a flow item list. You can delete these fields or add other pre-programmed or custom fields as needed.
One of the default fields is the age field, which tracks the amount of time that has elapsed since that flow item was created by the source. While this field would probably work for this list's logical needs, it might be better to add an ageInQueue field for more accuracy. The ageInQueue field tracks the length of time the item has been on the list. In other words, it will track the length of time that has passed since the customer joined the waiting line. You'll add this field in this step.
To create a global list:
- Look in the left pane where the Library is located. Near the top of this pane, you'll see a tab called Toolbox. Click this tab to open the Toolbox.
- In the Toolbox, click the Add button
 to open a menu. Point to
Global List, then select Item
List. The new list's properties window will automatically open.
to open a menu. Point to
Global List, then select Item
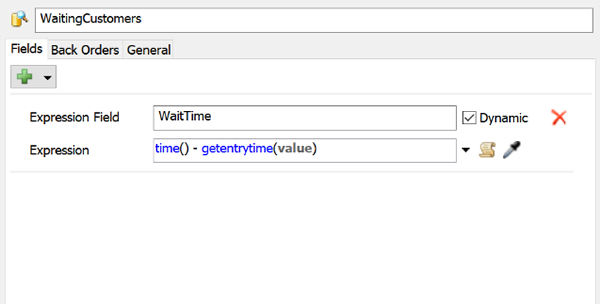
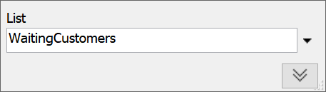
List. The new list's properties window will automatically open. - In the top box, change the name of the list to WaitingCustomers.
- With the Fields tab open, click the
Add button to
open a menu. Select ageInQueue. The new field will show up
at the bottom of the fields.
- Press the Delete button
 next to all the other fields to remove
them to remove since they are unnecessary.
next to all the other fields to remove
them to remove since they are unnecessary. - Now you'll change the name of the ageInQueue field to something more descriptive. Click the Expression Field box, delete the current text, and change its name to WaitTime.
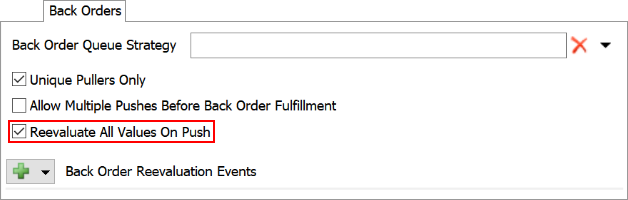
- In the Back Orders tab, check the Reevaluate All Values On Push checkbox.
- Press the OK button to save the changes.

Your new Waiting Customers list should now appear under the Global Lists group in the Toolbox.
Step 5 Edit the Model's Logic
In this step, you'll edit the properties of the 3D objects to create the basic logic of the simulation model. The following is an explanation of the objects you'll edit and the reasons why you'll make these changes:
| Object | Explanation |
|---|---|
| Customers Arrive (Source) | Most 3D models begin with a source object that creates the flow items that will
move through the 3D model and interact with objects. In this model, the flow items
will represent customers coming to the customer service center. The source will determine how frequently customers arrive. For this model, you'll change the arrival rate for customers so that a customer arrives approximately every minute. You'll use a statistical distribution called the exponential distribution to randomly calculate the arrival rate within a range of times averaging around 60 seconds. By default, the source creates flow items that looks like boxes. Since the flow items in this model represent customers, you'll change the flow item class so that it looks like a person. |
| Waiting Line (Queue) | You'll set up this object so that customers (flow items) are added to the
WaitingCustomers list as soon as they enter the waiting line. You'll also change the queue so that the customers form a line, rather than getting stacked up inside the queue. |
| Service Desk (Processor) | This object represents the time it takes an employee to help a customer. For
that reason, you'll set up this object so that it pulls the first customer from the
WaitingCustomers list when it is ready to help another customer. You'll also set the amount of time it takes an employee to help a customer. You'll use the log normal 2 statistical distribution so that it will take approximately 92 seconds to help a customer. |
| Unhappy Customers (Sink) | Sinks remove flow items from the model. You'll set this sink up so that it will search the WaitingCustomers list for any customers that have been waiting longer than 200 seconds. It will pull any customers who meet this criteria and remove them from the model, representing the customer getting frustrated and leaving. |
| Happy Customers (Sink) | You'll use the default settings for this object, so you won't make any changes to it. |
To add this logic to your 3D objects:
- Click the Customers Arrive source to open its properties on the right.
- Under the Source section, click the FlowItem Class menu and select Man.
- Check the Arrival at time 0 box so that a customer arrives right when the model begins running.
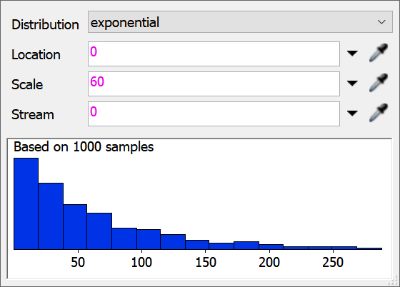
- Notice that the Inter-Arrivaltime is already set to use
the exponential statistical distribution, with customers arriving randomly, averaging
around 10 seconds. Click the Edit Properties button
 to open the distribution chooser and
edit the properties for this distribution. In the Scale
box, change the number to
to open the distribution chooser and
edit the properties for this distribution. In the Scale
box, change the number to 60. - Click the Waiting Line queue to open its properties on the right.
- Under the Queue section, click the Item Placement menu and select Horizontal Line.
- Under the Output section, click the arrow next to the Send to Port box to open a menu. Point to Use List, then select Push to Item List. A box will appear to select the appropriate item list. Confirm that the WaitingCustomers list has been selected.
- Click the Service Desk processor to open its properties on the right.
- Under the Processor section, clear the Animate Items checkbox.
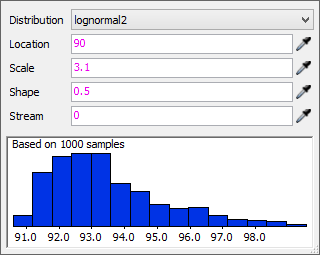
- Click the arrow next to the Process Time box to open a menu. Point to Statistical Distribution, then select Log Normal 2 to open the distribution chooser.
- In the distribution chooser, set the following parameters:
- Location:
90 - Scale:
3.1 - Shape:
0.5
- Location:
- Under the Input section, check the Pull checkbox.
- Click the arrow next to the Strategy box to open a menu. Point to Use List, then select Pull from Item List.
- Confirm that the WaitingCustomers list has been selected. Next to the
Query box, click the Add
button to open a menu. Point to
ORDER BY and select WaitTime.
- Edit the query to change the ASC (ascending) to DESC (descending) since you want to pull the customer that has been waiting the longest.
- Click the Unhappy Customers sink to open its properties on the right.
- Under the Input section, check the Pull checkbox.
- Click the arrow next to the Strategy box to open a menu. Point to Use List, then select Pull from Item List.
- Confirm that the WaitingCustomers list has been selected. Next to the
Query box, click the Add
button to open a menu. Point to
WHERE and select
WaitTime.
- Edit the query to change it to
> 200.
Now that you're done editing the 3D object properties, consider saving your model.
Step 6 Run and Test the Simulation Model
In this step, you'll run your simulation model again. Running a simulation model is an important step in the simulation model building process. In the early phases of model building, it helps you test and troubleshoot your model to ensure that you built it correctly. See Running a Simulation Model for more information.
To run the model, press the Reset button on the simulation control bar, which is below the main toolbar. (Pressing Reset clears the simulation model and returns it to its starting values.) Press Play to start the simulation and Stop to pause it.
When you first run the model a customer will immediately appear in the service desk. Gradually, more customers will appear and form a line in the Waiting Line queue:
If your simulation model isn't behaving in a similar manner or if you are getting error messages, double-check that you have followed all the previous steps correctly.
Also, right now the 3D visuals probably look a little strange and unnatural. Be aware that in the early model building phase, you're more concerned about building out the basic model and making sure it works correctly than in making it look realistic. In a future tutorial task, you'll learn how to improve the visuals of your 3D model to make it look more natural.
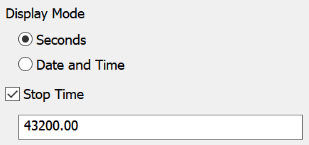
As you work on the next step in the tutorial, it might be helpful to run the simulation model at a faster speed than the default speed. It might also be helpful to run the simulation model for a full day to get representative data from the model. Since a typical day in the customer service center lasts 12 hours, you'll set the simulation to run for 43,200 seconds (equivalent to 12 hours).
To change the speed and stop time of the simulation run:
- Click the arrow next to the Run Time box on the simulation control bar to open a menu.
- Check the Stop Time checkbox and type 43200 in the box below it.
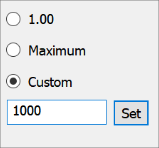
- Click the arrow next to the Run Speed box on the simulation control bar.
- In the Custom box, type 1000 and click the Set button.
Try running the model a second time to see how this affects the simulation run.
Conclusion
In the next tutorial task, you'll learn how to use various tools in FlexSim to get data from your simulation model. Continue to Tutorial Task 1.2 - Get Data from the 3D Model.