Rack
Overview and Key Concepts
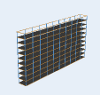
The rack is used to store flow items as if they were in a warehouse rack. The number and size of bays and levels in the rack can be defined by the user. The user can specify the bay and level to place entering flow items. If a transporter object is used to deliver or pick up flow items from a rack, the transporter will drive to the specific cell in the rack where the flow item is assigned. The rack can also be used as storage on the floor of a warehouse, using the bay number to specify an x position to place a flow item on the floor, and the level to specify the y position to place the flow item.
The rack is a fixed resource. It will continue to receive flow items until its maximum content value is met. When each flow item enters the rack, it executes the minimum dwell time function for that item. This function returns the minimum stay time for that flow item. The rack starts a timer for that amount of time. After the timer expires, the rack releases the flow item.
Extra Parameters in Entry/Exit Triggers
The rack passes extra parameters into the entry and exit triggers. Within the triggers, parval(3) is the bay that the flow item is in, and parval(4) is the level the flow item is in.
Place in Bay, Place in Level Functions
The timing of the place in bay and place in level function calls can depend on the configuration of the rack in the model. It depends on whether flow items are being transported to the rack or if they are being moved directly from upstream objects. If they are moved from upstream objects, the placement functions are called when they are received (in the OnReceive event). If they are being transported into the rack, then the placement functions are called when the transport finishes its travel task and starts the offset travel of the unload task. At this point, the transport queries from the rack where to place the flow item. The Rack calls the placement functions so that it can tell the transport to travel to the correct bay and level. If the placement functions are called when the transport asks to place them, then they will not be called again when the flow item actually enters the rack. This new functionality is different than the functionality in FlexSim version 2.6 and earlier, which would call the place in bay and place in level functions both when a transport requested it as well as when the flow item entered.
Flow Item Placement
If the rack is a vertical storage rack, the flow items entering the rack will be placed in their given bay and level and against the y fringe of the rack (yloc(rack) - ysize(rack). They will stack backwards into the rack from that point. If the rack is being used for floor storage, then flow items will be place in their given bay and level on the floor, and will stack vertically from that point.
Visualization
The rack can have several viewing modes to better see products in the rack. In addition to the opacity value, you can hold the 'X' key down and repeatedly click on the rack, and the rack will toggle through different viewing modes. These modes are listed as follows.
- Full Draw Mode - This mode shows each cell as a level with a platform to put flow items on. This is the realistic representation of the rack.
- Back Face Draw Mode with Cells - This mode shows only the back faces of the rack, so that you always see into the rack. It also draws a grid on the back face representing the bays and levels of the rack. This allows you to better view items in the rack, as well as which bays and levels the items are on.
- Back Face Draw Mode - This mode is like the previous mode, except that the grid of bays and levels is not drawn. This mode allows you to easily view items in the rack.
- Wire Frame Draw Mode - This mode draws a wire frame around the shape of the rack. This mode allows you to see flow items in several back-to-back racks. Once a rack is in this draw mode, you will need to 'X' click on the actual wire frame in order to toggle back to mode 1.
Commands
There are several commands you can use to query information on the bays and levels of a rack. These commands are as follows. For more detailed information, refer to the Command Helper.
rackgetbaycontent(obj rack, num bay) - This command
returns the total number of flowitems that are in the given bay.
rackgetbayofitem(obj rack, obj item) - This command
returns the bay number that the flowitem is in.
rackgetcellcontent(obj rack, num bay, num level) - This
command returns the number of flowitems that are in a given bay and level.
rackgetitembybayandlevel(obj rack, num bay, num level, num
		itemrank)
- This command returns a reference to an item in a given bay and
level.
rackgetlevelofitem(obj rack, obj item) - This command
returns the level number that the flowitem is in.
rackgetnrofbays(obj rack) - This command returns the
total number of bays the rack has.
rackgetnroflevels(obj rack [,num bay]) - This command
returns the number of levels in the given bay of the rack.
Events
For information on events, see the Event Listening page.
The rack uses the standard events that are common to all fixed resources. See Fixed Resources - Events for an explanation of these events.
The rack has the following additional events:
Minimum Dwell Time
This event occurs when the Minimunm Dwell Time field is evaluated.
It has the following parameters:
| Parameter | Type | Description |
|---|---|---|
| Item | treenode | The entering item, which will be assigned a dwell time |
| Port | int | The input port number for the entering item |
This event returns the minimum dwell time for the specified item.
On End Dwell Time
This event occurs when an item has reached its minimum dwell time. After this event, the Rack will release the item.
It has the following parameters:
| Parameter | Type | Description |
|---|---|---|
| InvolvedItem | treenode | The item that has just completed its dwell time |
Place in Bay/Level
These events occur when the respective Place in Bay/Level field is evaluated.
It has the following parameters:
| Parameter | Type | Description |
|---|---|---|
| Item | treenode | The entering item, which will be assigned a bay or level |
| Bay Number | int | Applies to Place In Level field. Hold the bay number returned from the Place in Bay field. |
These events return the bay and leve numbers, respectively
States
The rack doesn't implement any states. Use the content graph to get statistics.
Statistics
The rack uses the standard statistics that are common to all fixed resources. See Fixed Resources - Statistics for an explanation of these statistics.
Properties
The rack object has six tabs with various properties. The last four tabs are the standard tabs that are common to all fixed resources. For more information about the properties on those tabs, see:
The remaining two tabs, the Rack tab and the SizeTable tab are unique to the rack object. The properties on these tabs will be explained in more detail in the next two sections.
Statistics
The rack uses the standard statistics that are common to all fixed resources. See Fixed Resources - Statistics for an explanation of these statistics.
The Rack Tab
The Rack tab has the following properties:
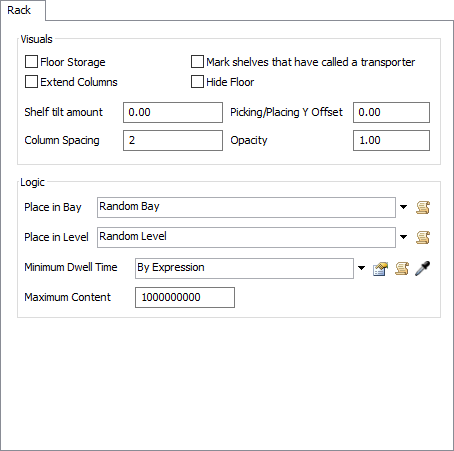
Floor Storage
If this box is checked, then instead of having a vertical storage rack, the rack will simulate storage space on the floor. Looking down from above the rack, bays are vertical columns, and levels are horizontal rows on the rack.
Mark shelves that have called a transporter
This checkbox will highlight the shelve in a red color when it has called the transporter for pickup.
Extend Columns
If this box is checked, the columns will be drawn extending above the top shelf.
Hide Floor
If this box is checked, the floor of each shelf will not be drawn.
Shelf Tilt Amount
This number defines the amount of tilt of items placed in a given cell of the rack, as some racks have products slide down from the back of the rack to the front.
Picking/Placing Y Offset
This value is used to configure how close transport objects come to the rack when they drop off or pick up flow items from the rack. This is especially useful if operators are used to drop off and pick up from the rack, because often they will walk into the middle of the rack to get a flow item. Specify a value of 1, for example, and the operators will keep better distance from the rack when dropping off and picking up flow items.
Opacity
This value allows the drawing of the rack to be translucent, so that if there are several racks in the same area, many of them can be seen because of the translucency of the racks in front. A value of 0 means totally transparent, and a value of 1 means totally opaque.
Column Spacing
This number defines how many bays are between each column.
Place in Bay
This picklist is called when a flow item is entering the rack. It returns which bay the flow item will be placed in.
Place in Level
This picklist is called when a flow item is entering the rack. It returns which level the flow item will be placed in.
Minimum Dwell Time
This picklist returns a value of how long a flow item must stay in the rack before it is released to continue downstream. You can also return a value of -1 from this function so the rack will not release the item at all, and then implement your own releasing strategy using the releaseitem() command.
Maximum Content
This number defines how many flow items the rack will be allowed to hold at a given time.
The Size Table Tab
The Size Table tab has the following properties:
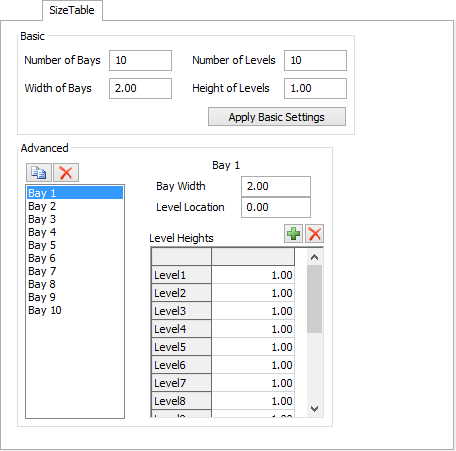
This tab allows you to configure the layout of bays and levels on the rack. If you want a simple grid of bays and levels, then you can specify these settings from the Basic panel at the top. If you want to specified different sizes for different bays and levels of the rack, then you can use the Advanced panel at the bottom to configure each bay individually.
Basic Group
Use the properties in the Basic group if your rack is just a simple grid of uniform cells. You can also use it to set basic settings for the rack before going in and editing individual bays in the advanced panel. Once you have specified the basic dimensions for the rack, click the Apply Basic Settings button, and these settings will be applied to the rack.
It has the following options:
- Number of Bays - This value is for the number of bays (columns) for the rack.
- Width of Bays - This value defines the default width of each bay.
- Number of Levels - This value is for the number of levels in the rack.
- Height of Levels - This value is for the default height of each level. This value can be edited for each level and bay using the advanced edit.
Advanced Group
Use the properties in the Advanced group to configure individual bays and levels on the rack. On the left side of this panel is a list of all the bays in the rack. Select a bay and configure it by using the options and buttons on the right side of the panel. Changes should immediately be shown on the rack in the orthographic/perspective view. If they do not show up immediately, hit the Apply button, and they should appear.
It has the following options:
- Bay Width - This field specifies the width of the currently selected bay.
- Level Location - This field specifies the initial z location of the first level of the selected bay.
- Level Heights Table - Here you can specify the height of each level in the currently selected bay.
| Icon | Description |
|---|---|
 |
This button duplicates the currently selected bay and adds it to the end of the rack. |
 |
This button deletes the currently selected bay in the rack or deletes a level from the end of the currently selected bay. |
 |
This button adds a level to the end of the currently selected bay. |