Task 1.3 - Add a Zone to Collect Data
Task Overview
Up to this point in the tutorial, you've learned how to use the list and resource shared assets. In this tutorial task, you'll learn how to use the third shared asset: zones. Zones are useful for both statistics gathering and adding constraints to a model. This tutorial task will primarily demonstrate the statistical functionality of the zone. You'll design a process flow that will track the total price of all the items that are currently being processed in the simulation model.
Step 1 Add a Zone
In this step, you'll randomly assign each flow item a price between $1 and $100 by adding a label named Price to the flow items. Then, you'll add a zone to the process flow that references this label to calculate the total price of all the items that are currently being processed in the simulation model. These items will each be represented by a token in the zone section of the process flow that you will build in a later step.
To set up this label and create a zone in the process flow:
- In the 3D model, click the Source to bring up its properties on the right.
- Under the Triggers section, click the
Add button
 to open a menu. Select On Creation to add this new
trigger.
to open a menu. Select On Creation to add this new
trigger. - Next to the new OnCreation trigger, click the
Add button
to open a menu. Point to Data, then select
Set Label to open the label picklist options.
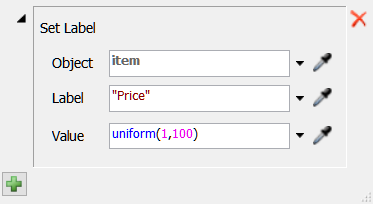
- In the Label box, type
"Price". - In the Value box, type
uniform(1,100). - Make sure the process flow is open and active.
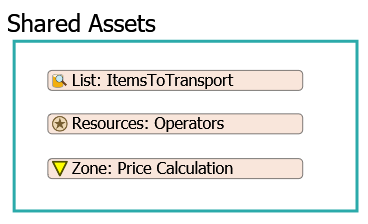
- In the Library under the Shared Assets group, add a Zone to the Shared Assets shape in the process flow.
- Rename the zone to Zone: Price Calculation.
- In Properties for the Zone, click the More Properties button to open its properties.
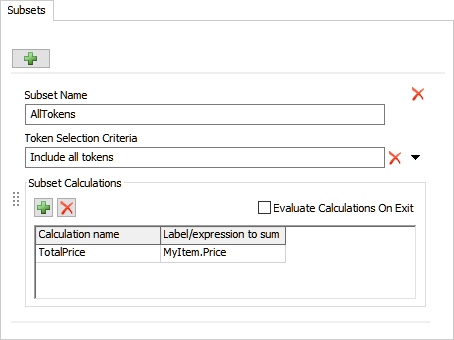
- In the Subsets tab, click the Add button to add a new subset.
- In the Subset Name box, type
AllTokens. - In the Subset Calculations group, click the
Add button
to add a row to the subset calculations table.
- In the cell under the Calculation name column, delete
the current text and type
TotalPrice. - In the cell under the Label/expression to sum column,
delete the current text and type
MyItem.Price. - Click the OK button to save the changes and close the window.
Consider saving your model.
Step 2 Add Price Analysis Activities
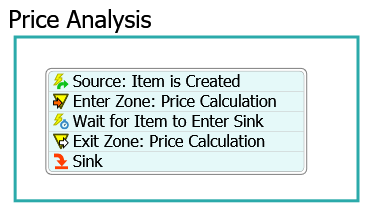
In this step, you'll add some more activities to the process flow. These activities will control the price calculation functionality of the zone. When you're finished, your process flow will look similar to the following image:
For now, you'll merely add and connect these activities to the process flow. You'll edit the properties to add the functionality in a later step.
To add and connect these activities:
- In the Library under the Display group, add an additional Container shape to the new process flow.
- For clarity, rename the Process shape Price Analysis.
- In the Price Analysis shape, add the following activities to create a stacked block:
- An Event-Triggered Source activity (under Token Creation)
- An Enter Zone activity (under Shared Assets)
- A Wait for Event activity (under Basic)
- An Exit Zone activity (under Shared Assets)
- A Sink activity (under Basic)
- For clarity, rename the activities as follows:
| Activity | New Name |
|---|---|
| Source | Source: Item is Created |
| Enter Zone | Enter Zone: Price Calculation |
| Wait for Event | Wait for Item to Enter Sink |
| Exit Zone | Exit Zone: Price Calculation |
Consider saving your simulation model.
Step 3 Edit the Activity Properties
In this step, you'll edit the properties for the activities in the Price Analysis section of the process flow. The following is an overview of how each activity in this section will function:
| Activity | Explanation |
|---|---|
| Source: Item is Created | The Event-Triggered Source is an event-listening activity, which means that it will create a token every time a specific event occurs in the simulation model. In this process flow, the Event-Triggered source will create a token every time the source in the 3D model creates a flow item. It links the token to the flow item by assigning a label to the newly created token called MyItem that will contain a reference to the specific flow item that was created. |
| Enter Zone: Price Calculation | This activity will cause the new token to enter the Price Calculation zone. |
| Wait for Item to Enter Sink | The Wait for Event activity is also an event-listening activity. This activity will listen to the sink in the 3D model. Every time a flow item enters the sink, it will match the token to its corresponding flow item using the MyItem label. |
| Exit Zone: Price Calculation | After the flow item has entered the sink, its corresponding token will leave the Price Calculation zone. |
To edit these activity properties:
- Click the stacked block of activities in the Price Analysis shape to select it.
- Next to the Source: Item is Created activity, click the
Exclamation Point button
 to enter sampling mode.
 - In the 3D model, click the Source to open a menu. Select On Creation to sample this event.
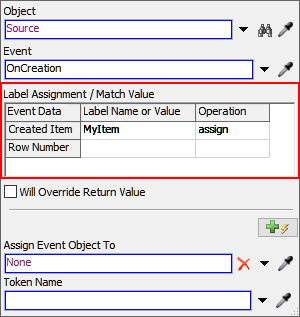
- In Properties for the Source: Item is Created
activity, find the Label Assignment table. In the
Created Item row under the Label
Name column, type
MyItem. - Click the cell in the Created Item row under the Operation column to open a menu. Select assign.
- Next to the Enter Zone: Price Calculation activity,
click the Exclamation Point button
to enter sampling mode.
- Click the Zone: Price Calculation to link it to the zone. A blue line will appear to show that the zone is now linked.
- Next to the Wait for Item to Enter Sink activity, click
the Exclamation Point button
to enter sampling mode.
- In the 3D model, click the Sink to open a menu. Select On Entry to sample this event.
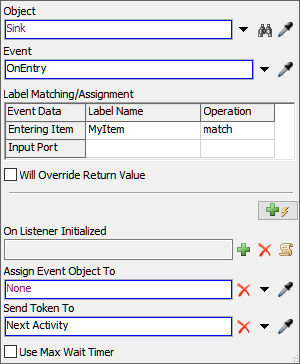
- In Properties for the Wait for Item to Enter Sink activity, find the Label Assignment/Matching table. In the Entering Item row under the Label Name column, click inside the blank cell. Click the arrow that now appears next to the cell to open a menu. Select MyItem.
- In the Entering Item row under the Operation column, click inside the blank cell. Click the arrow that now appears in the cell to open a menu. Select match.
- Next to the Exit Zone: Price Calculation activity,
click the Exclamation Point button
to enter sampling mode.
- Click the Zone: Price Calculation to link. A blue line will appear to show that the zone is now linked.
Consider saving your simulation model.
Step 4 Run the Model and Calculate the Total Price
In this step, you'll run the model and calculate the total price of the items that are currently being processed in the simulation model:
- In the process flow, click the Zone: Price Calculation to select it.
- In Properties, click the View Status button to open the zone's statistics and status window.
- Make sure you have the Subsets tab open.
- On the simulation control bar, click the Reset and Run buttons to start the model.
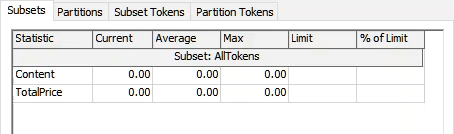
As you watch the zone's statistics, notice that the current TotalPrice calculation fluctuates up and down. This calculation tells you the total price of all the items that are currently in the system. You could possibly use this calculation to see how much money is being lost by having too many items queued in the system, for example.
You could also substitute this calculation for something else. For example, the zone could calculate the current weight of all the items that are currently in the system.
While this tutorial has illustrated the statistical uses for a zone, be aware that zones can also control access to the zone as well. For example, it could stop allowing tokens into the zone once a maximum capacity has been reached or it could add other constraints as needed. You could also use a statistics collector with the zone to calculate the total price of all the items that have been processed in the simulation model. See Key Concepts About Shared Assets for more information.
Conclusion
This concludes the shared assets tutorial. Hopefully you've learned a little more about the capabilities of the three shared assets and have a better idea of some of their broad potential to simulate a wide variety of model logic.