The Flow Conveyor Panel
The Flow Conveyor panel is shown for flow conveyors. For legacy flow conveyors in upgraded models, please see the legacy flow conveyor documentation.
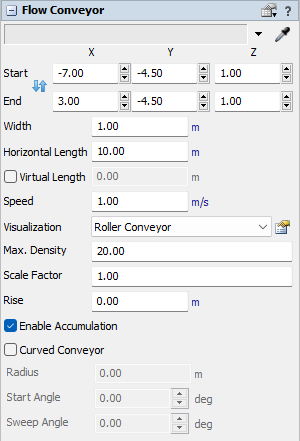
The following properties are on the Flow Conveyor panel:
Start
Defines the X, Y, and Z position of the start of the conveyor. Changing this value will adjust the StartLocation property.
End
Defines the X, Y, and Z position of the end of the conveyor. Changing this value will adjust the EndLocation property.
Reversing Direction
Press the  button to
switch the start and end locations, reversing the conveyor's direction.
button to
switch the start and end locations, reversing the conveyor's direction.
Width
Defines the width of the conveyor. Changing this value will adjust the Width property.
Horizontal Length
Defines the total length of the conveyor. Changing this value will adjust the End property.
Virtual Length
A virtual length lets you specify a length to simulate, rather than using the conveyor's physical length. To use, check the box and enter a length.
Conveyor speed
The speed of the conveyor determines how fast products will reach the end, but also how tall they will be on the conveyor. The actual size of the conveyor is used, so an inflow of 100 per time unit on a conveyor of 20 length units wide will be 5 length units tall. Changing this value will adjust the Speed property.
Visualization
Defines the conveyor's visualization. This can be a globally defined visualization, or a custom visualization that applies only to the current conveyor. The visualization's properties can be changed by clicking the properties button to the right of the dropdown. Changing this value will adjust the Visualization property.
Maximum density
This setting determines how tall product may "stack up" against the end of the conveyor before it starts "crawling back" towards the start. By taking into account the width of the conveyor, the maximum density can be converted into a maximum product height and vice versa. The image below shows how having a relatively small maximum density will make the conveyor fill up relatively quickly. Changing this value will adjust the MaxDensity property.

Scale factor
Scales the height of the conveyor contents (not the actual conveyor object). In the example given under "conveyor speed": if you would set the scale factor to 0.2, the product on the conveyor would only be drawn 5 × 0.2 = 1 length unit tall. This may be useful if you have flows that would otherwise be so small that you cannot see any differences in height or which products are stacked; or when the speed is so low and volume so high that there would be an unrealistically tall "wall" of product running over the conveyor.
Conveyor rise
This is how many length units the conveyor rises along its complete length; in other words, what the height difference is between the start and end of the conveyor. Changing this value will adjust the Rise property.
Enable Accumulation
When the conveyor is non-accumulating, and the calculated outflow rate is less than what it should be to discharge all the material currently at the exit point, the conveyor will stop. You can restart it later, or provide custom logic in the On Output Blocked trigger to avoid the accumulation stop. Changing this value will adjust the IsAccumulating property.
By default the conveyor is accumulating, which means that it will continue to buffer flow until all points on the conveyor have reached their maximum density; then the conveyor will stop and automatically adjust its input and output flow (possibly to zero) to the available downstream capacity.
Curved Conveyor
The conveyor defaults to a straight object, check this box to make it a part of a circle and enabled the Curved Conveyor visualization properties below.
Radius
Defines the radius of a curved conveyor. Changing this value will adjust the Radius property.
Start Angle
Defines the start angle of a curved conveyor. Changing this value will adjust the StartAngle property.
Sweep Angle
Defines the sweep angle of a curved conveyor. Changing this value will adjust the SweepAngle property.