Coordination
What are Coordination Activities?
The Coordination activities provide an easy way to both split a token into multiple tokens and coordinate timing between multiple tokens. They also improve the visibility of your logic by using connectors to visually layout when tokens are created, when they wait for each other, and when they come back together.
Coordination activities have several possible applications, such as:
- Coordinated Task Sequences - You may need multiple operators to perform a series of tasks together. You could use Coordination activities to make a token for each operator, synchronize when they finish certain tasks, and then destroy the extra tokens when the task is finished.
- Concurrent Processes - Perhaps you need to start several processes at once, have them happen concurrently and then wait for all of them to finish. For example, a doctor orders a series of tests and the samples get sent off to separate areas where they are processed in parallel. The doctor then needs to be notified when the results of each test are done. Coordination activities could be used to make a token representing each test that would carry out the test logic concurrently and then have all the tokens rejoin before having the doctor look at the results.
Process Flow Activities Used in Coordination
There are three Coordination activities, as described in the following sections:
Split
When a token enters a Split activity, it splits that token into multiple tokens and releases them through its outgoing connectors. The number of tokens it releases is based on how many outgoing connectors it has.
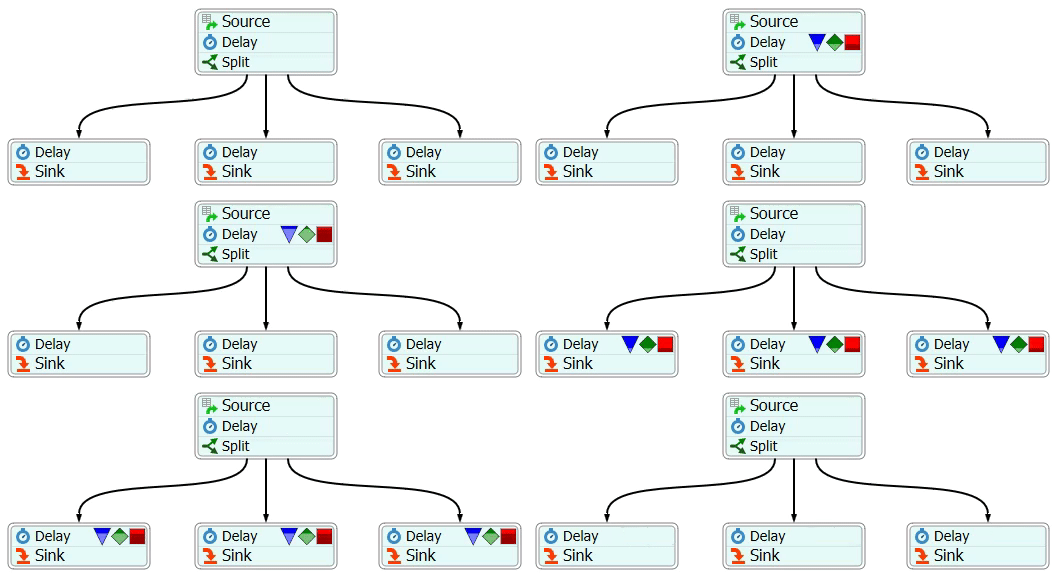
Important considerations when using the Split activity:
- Number of Connectors - The Split activity can have as many incoming or outgoing connectors as needed. The number of incoming connectors will not affect its behavior, only the number of outgoing connectors.
- Labels - The Split activity adds a label to each newly created token that contains a reference to the original token. By default, this label is named SplitID, but you can customize that label if needed. You can possibly use this label with the Join or Synchronize activities to make the tokens wait for each other downstream in the process flow. See Split ID for more information.
See Split for more information about this activity's properties.
Join
The Join activity will wait until it has a token from each of its incoming connectors before releasing a single token.
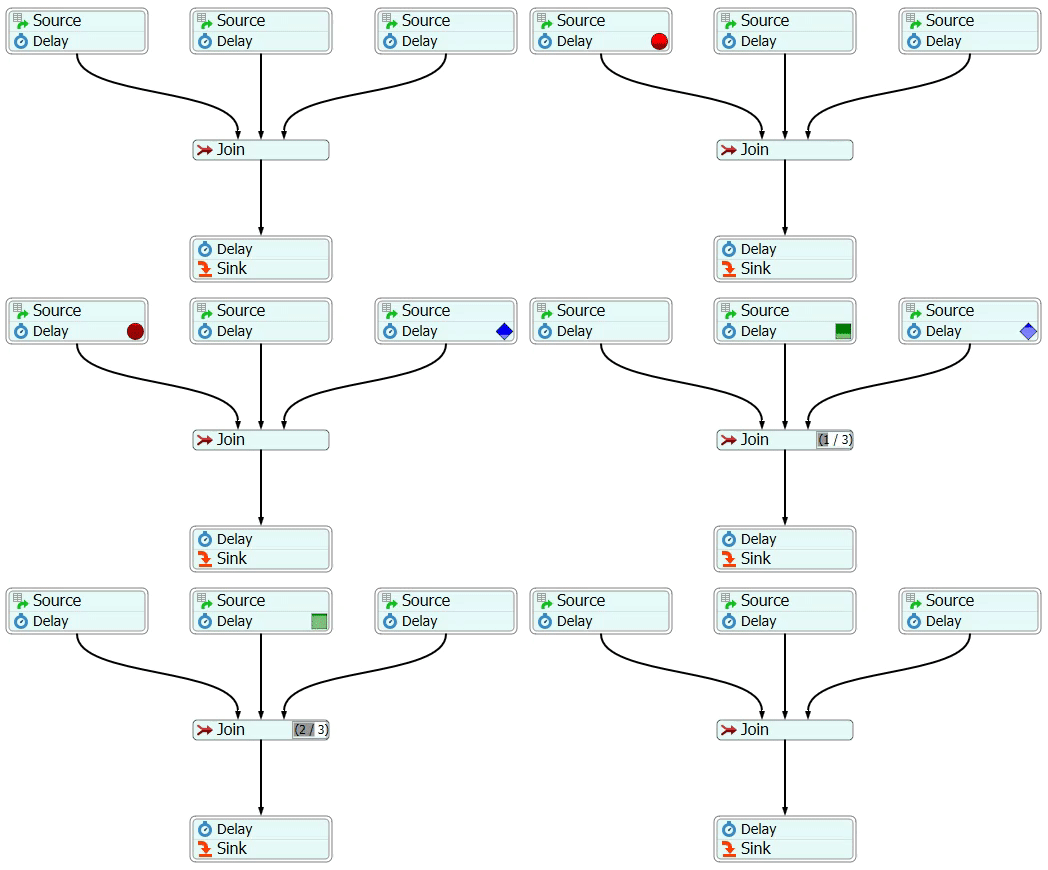
Important considerations when using the Join activity:
- Number of Connectors - The Join activity can have as many incoming connectors as needed, but it can only have one outgoing connector. You can use a Join activity in combination with a Split activity if you need to have a different number of incoming vs. outgoing connectors.
- Partitions - If needed, you can set the Join activity so that it will only join tokens that have matching partition IDs. In other words, you can join tokens that have matching labels if you want to sort tokens into groups based on a common attribute. (See the following section about Waves and Partitions for more information about partitions.)
- Max Idle and Max Wait Timers - The Join activity also has the option to use the Max Wait and Max Idle Timers if you want the activity to release the tokens after a maximum amount of time has elapsed, even if it does not yet have a token from each incoming connector.
See Join for more information about this activity's properties.
Synchronize
The Synchronize activity waits until it has a token from each of its incoming connectors, then it releases all the tokens at the same time. The Synchronize activity is similar to the Join activity, but rather than releasing only one token, it releases all the tokens simultaneously.
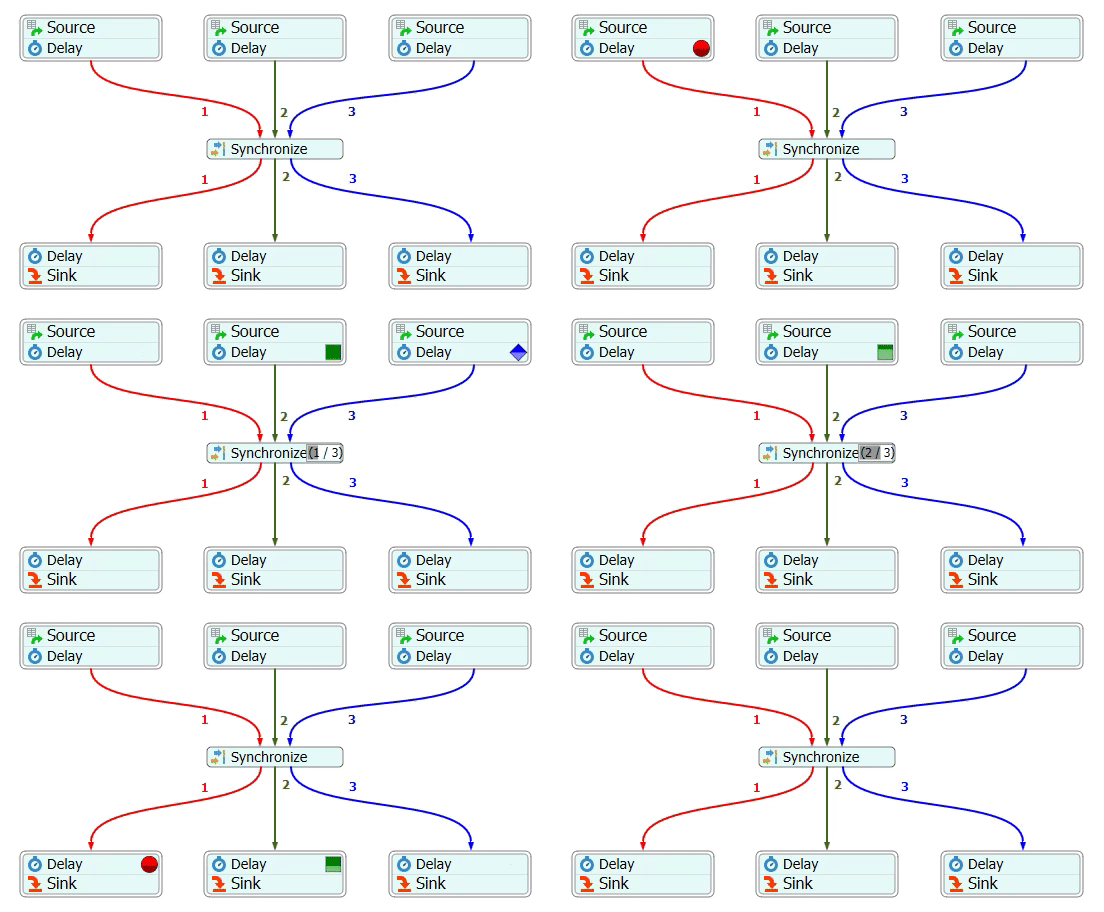
Important considerations when using the Synchronize activity:
- Number of Connectors - When using a Synchronize activity, it is important to have the same number of outgoing connectors as there are incoming connectors.
- Connector Rankings - It's also important to check the ranks of your incoming and outgoing connectors. The Synchronize activity will release the token that came in through the first incoming connector (rank 1) through the first outgoing connector (also ranked 1). The token that came in the second incoming connector will be released through the second outgoing connector, etc.
- Partitions - If needed, you can set the Synchronize activity so that it will collect and release tokens with matching partition IDs. In other words, you can synchronize tokens that have matching labels if you want to sort tokens into groups based on a common attribute. (See the following section about Waves and Partitions for more information about partitions.)
See Synchronize for more information about this activity's properties.
What Makes Coordination Activities Different
If you've been using Process Flow for a while, you're used to controlling the logic and behavior of the activities by editing the activity's properties (settings). This isn't the case with the Coordination activities. While the Coordination do have a few properties that you can customize, the behavior of Coordination activities is mostly determined by their incoming and outgoing connectors.
When a token enters most process flow activities, it doesn't matter at all which incoming connector it used to enter the activity. For example, a Delay activity will treat all incoming tokens the same. No matter which connector the token came from, the Delay activity will apply the same Delay time or statistical distribution for each entering token. In contrast, the Join activity will wait until a token has entered from each incoming connector before it releases a token. In other words, the amount of time an arriving token waits at the Join activity is determined by:
- Which connector it entered through
- Whether other waiting tokens have entered through the other connectors
The number of incoming connectors is also important since that will determine the number of tokens these activities will be waiting for.
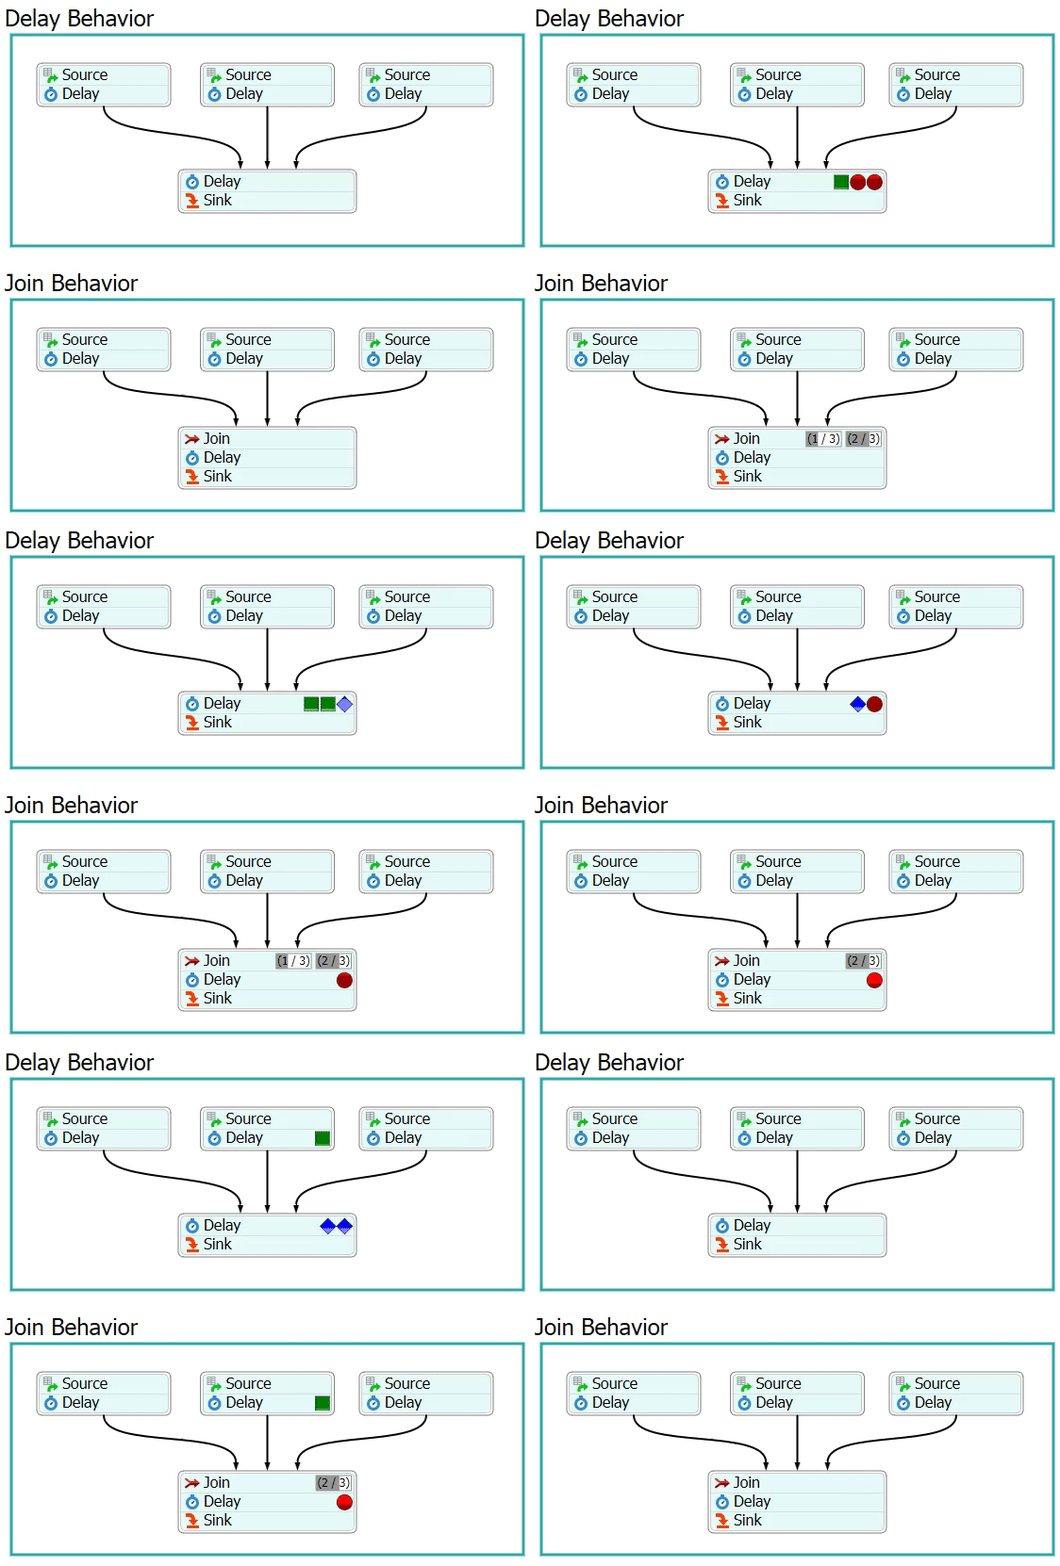
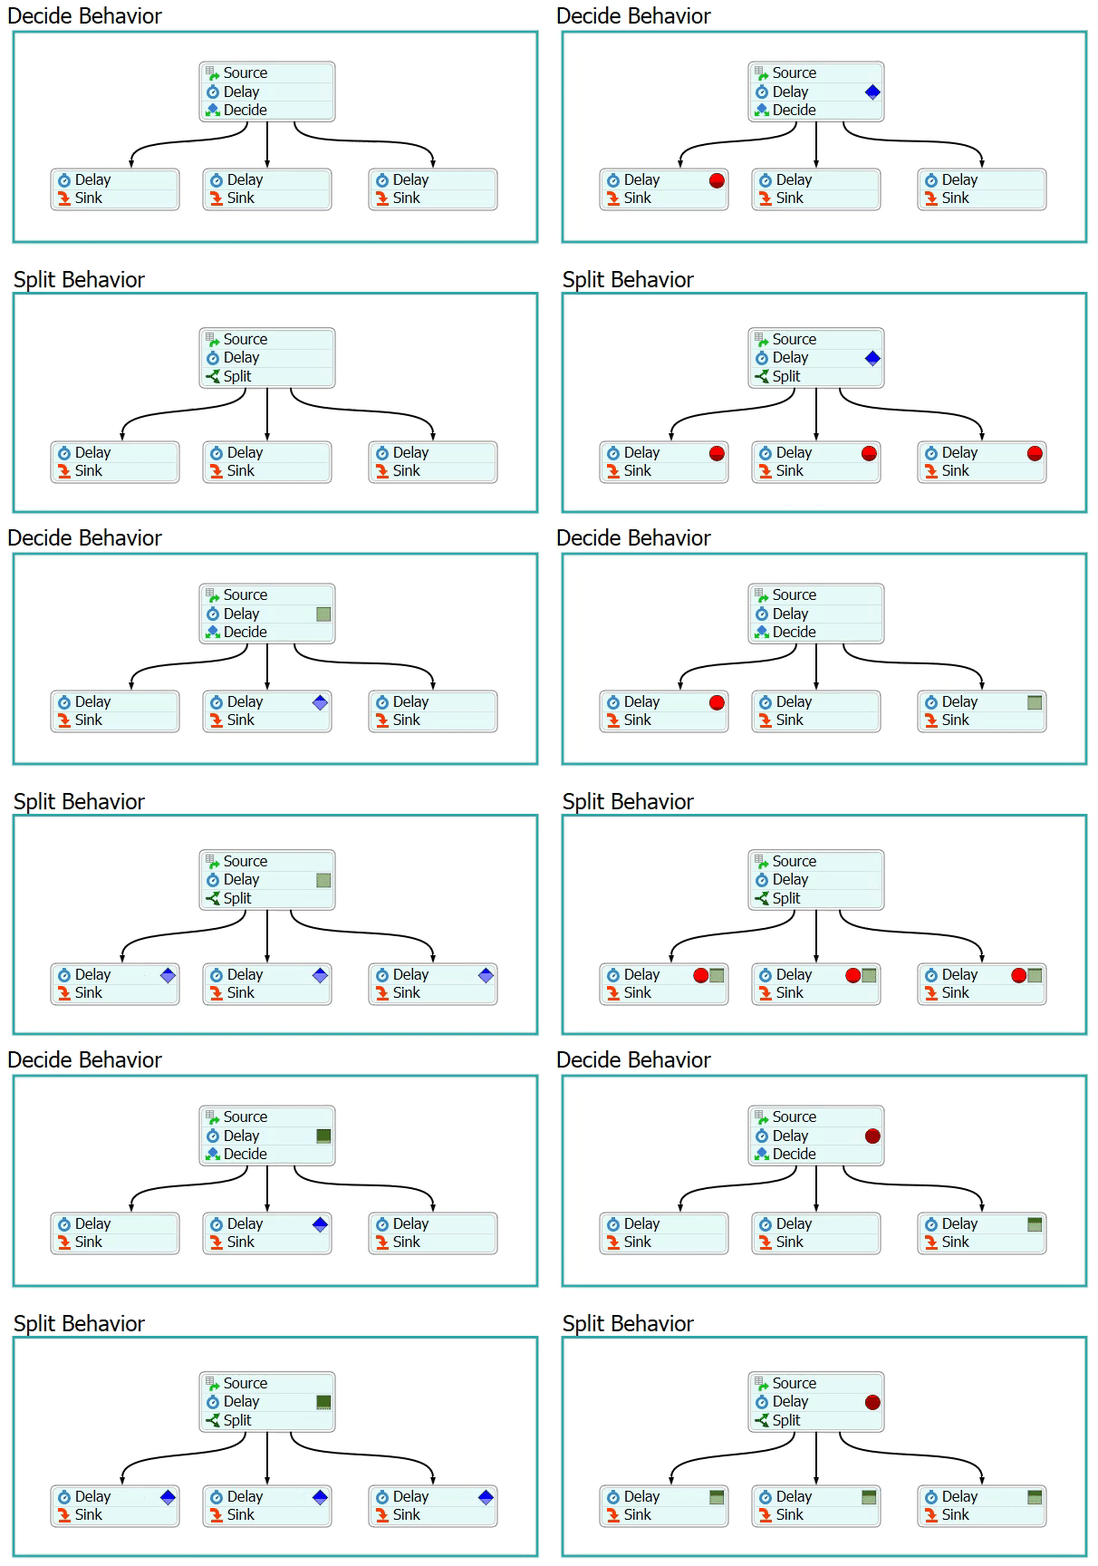
The number of outgoing connectors will affect the behavior of the Split and Synchronize activities. These activities allow multiple outgoing connectors. Most process flow activities don't allow multiple outgoing connectors, but the ones that do can only release a token through one of its outgoing connectors at a time.
For example, a Decide activity might have three outgoing connectors and it will use its activity properties to send a token into one of those three outgoing connectors. In contrast, the Split and Synchronize activities will release tokens through all of its outgoing connectors at the same time. For that reason, the number of outgoing connectors is important because it affects how many tokens are released from the activity at the same time.
Key Concepts About Connectors
The most important thing to pay attention to when using the three coordination activities is the number of incoming and outgoing connectors you have. Depending on which activity you use, the connectors will affect:
- How many tokens the activity needs to collect before they can be released
- How many tokens the activity releases
- Which connector the tokens will be released through
The following table summarizes how connectors affect the behavior of the coordination activities:
| Activity | Incoming Connectors | Outgoing Connectors |
|---|---|---|
| Split |
|
|
| Join |
|
|
| Synchronize |
|
|
Connector Rankings
When using the Join and Synchronize activities, it's important to check the ranks of your incoming and outgoing connectors. The Join activity will only release the token that came in through the first incoming connector (the connector that is ranked 1) and will destroy the other tokens. For that reason, you should check that the token you want to release is the one that will come in through the first connector on the Join activity.
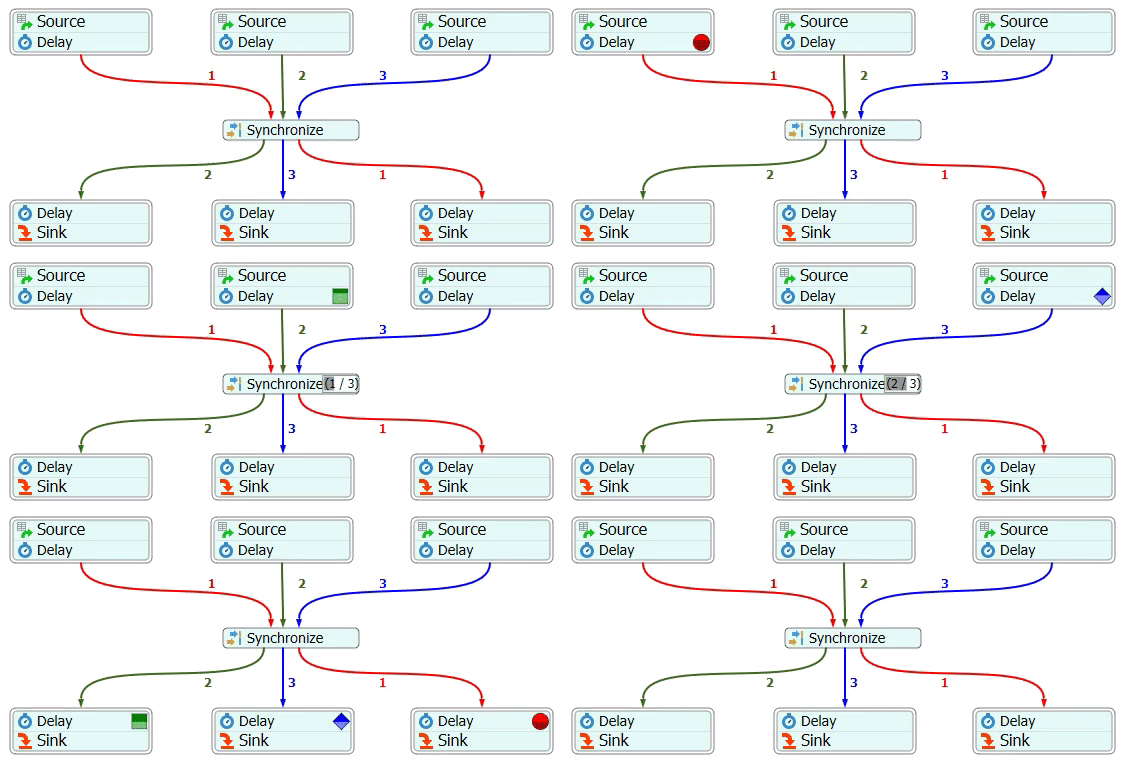
The Synchronize activity will release the token that came in through the first incoming connector (the connector that is ranked 1) through the first outgoing connector (also ranked 1). The token that came in the second incoming connector will be released through the second outgoing connector, etc.
For example, the following image shows a Synchronize activity with three incoming connectors ranked 1-3 from left the right. The outgoing connectors have a different ranking pattern. Notice that the red token comes in through the connector ranked 1 on the left and exits through the connector ranked 1 on the right:
See Changing the Rank Number or Name of Outgoing Connectors for information about editing a connector's rank number.
Waves and Partitions
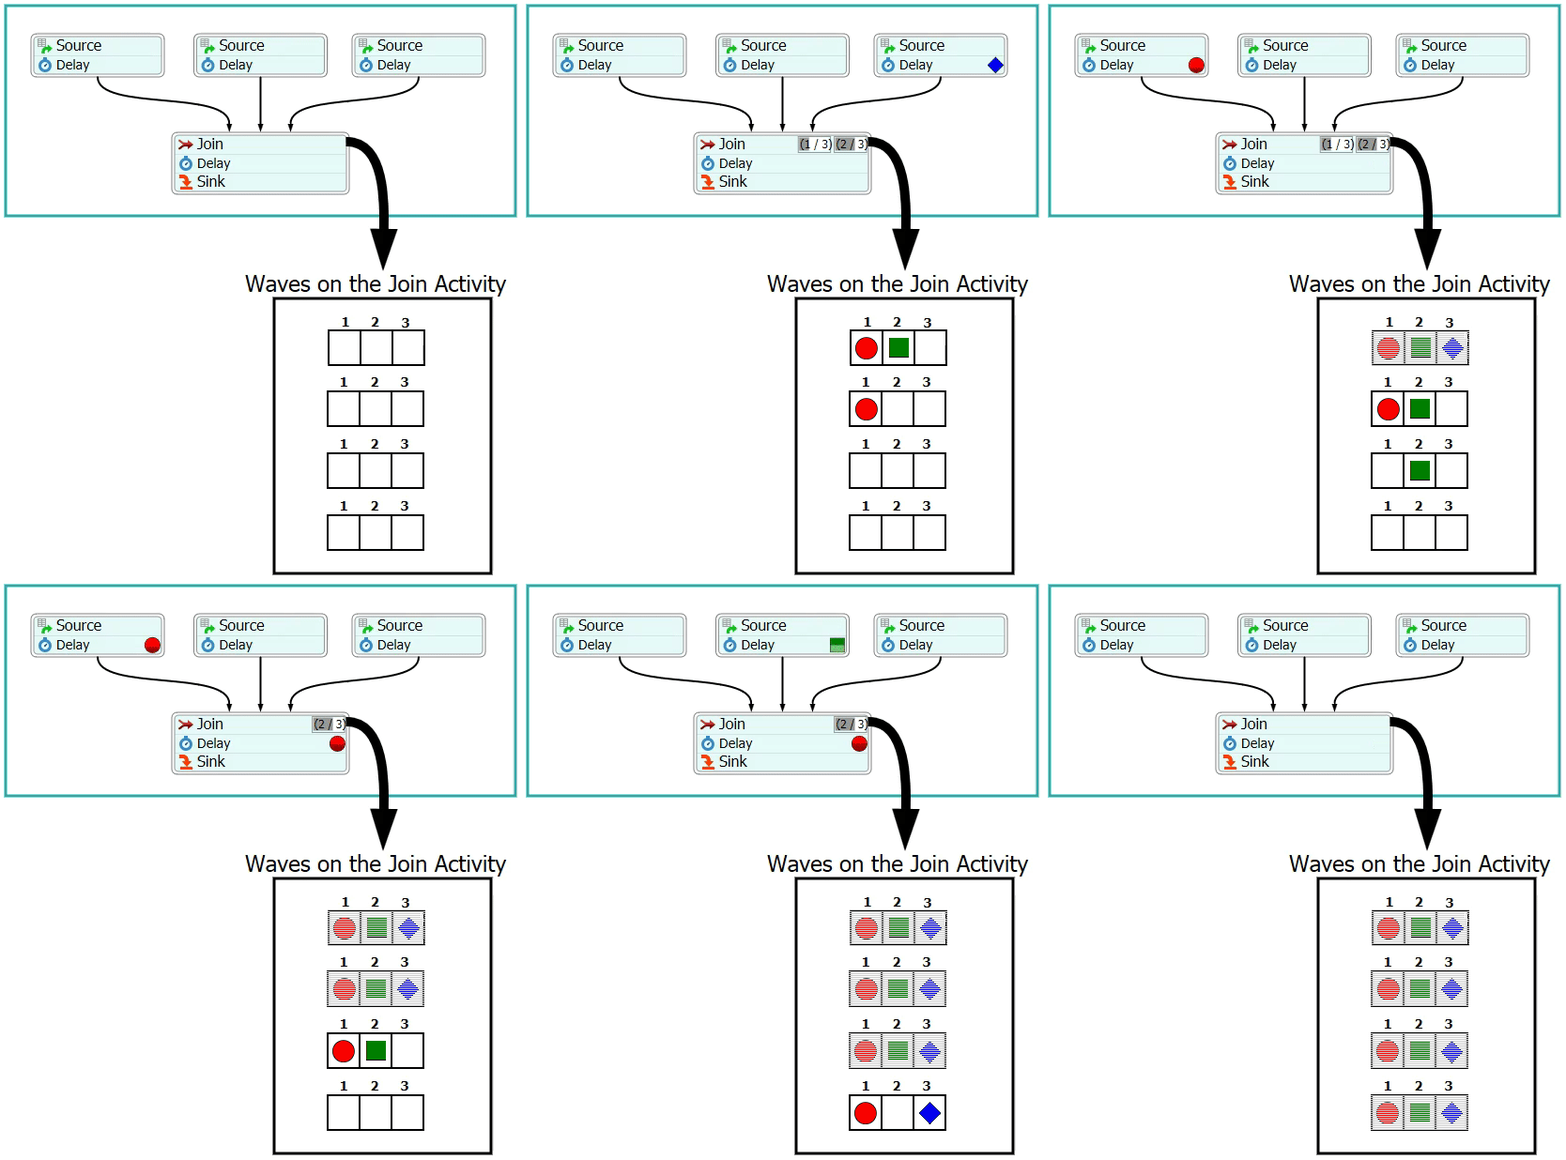
As was discussed in the previous sections, the Join and Synchronize activities can have any number of incoming connectors. However, the number of connectors these activities have will influence their behavior. Both of these activities will wait until it has a token in each incoming connector. When it has one token in each incoming connector, it will release these tokens in a wave. A wave is a group of tokens that are released at the same time.
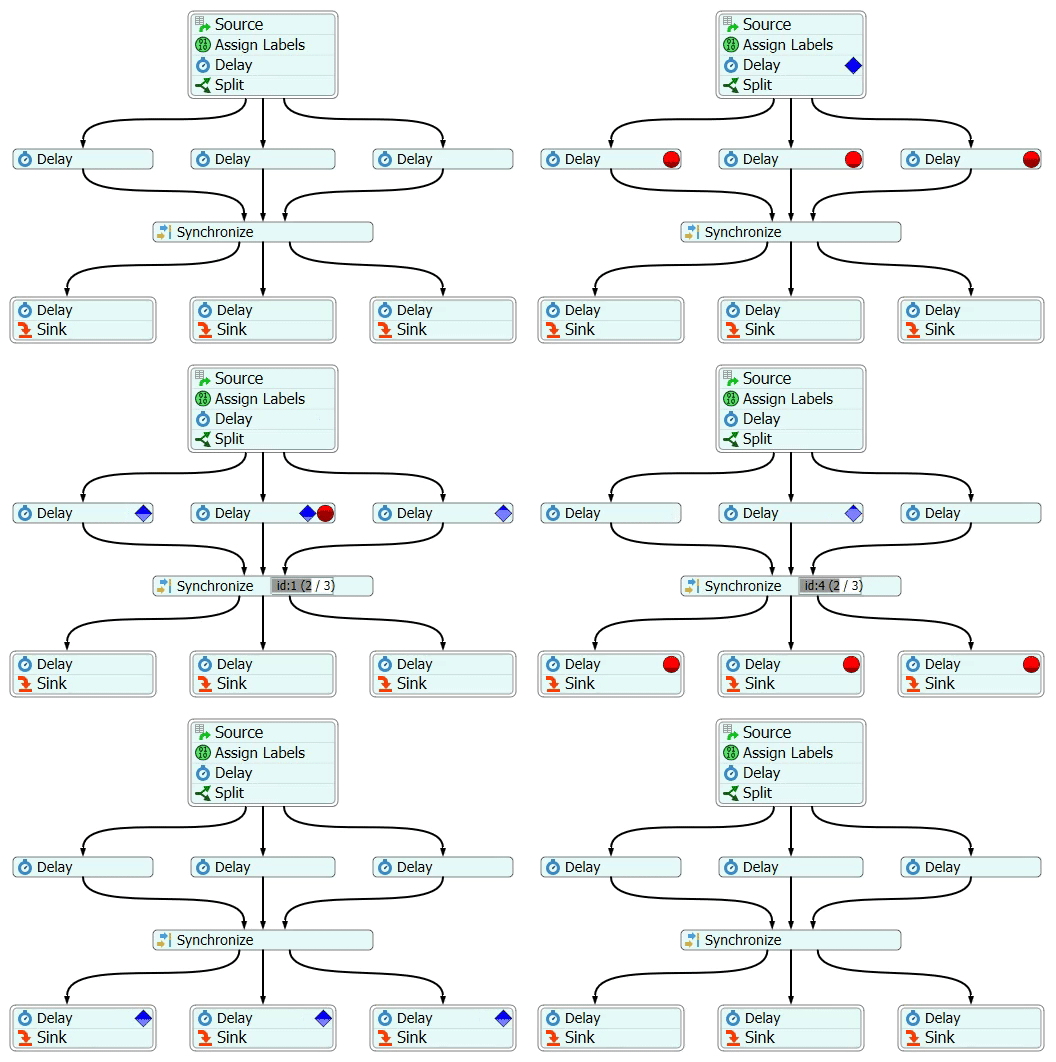
If Join or Synchronize activities receive more than one token through one incoming connector, it will create additional waves. The following image visualizes what happens inside a Join activity as it receives tokens and creates waves:
The Join and Synchronize activities can also create waves with tokens that share a common attribute using a partition ID. A partition ID is defined by a label on the incoming tokens and it can be a number, string, or reference to an object or node. The Join and Synchronize activities can sort incoming tokens into waves based on data from a label on the tokens.
For example, the following image simulates a system with two different product types: A and B. Each incoming token has a label named productType. The Assign Labels activity assigns a value of either "A" or "B". When the tokens enter the Join activity, it assigns them to waves based on 1) which connector it came through, and 2) its partition ID (based on the productType label). It will release a wave after it has a token from each connector with matching partition IDs:
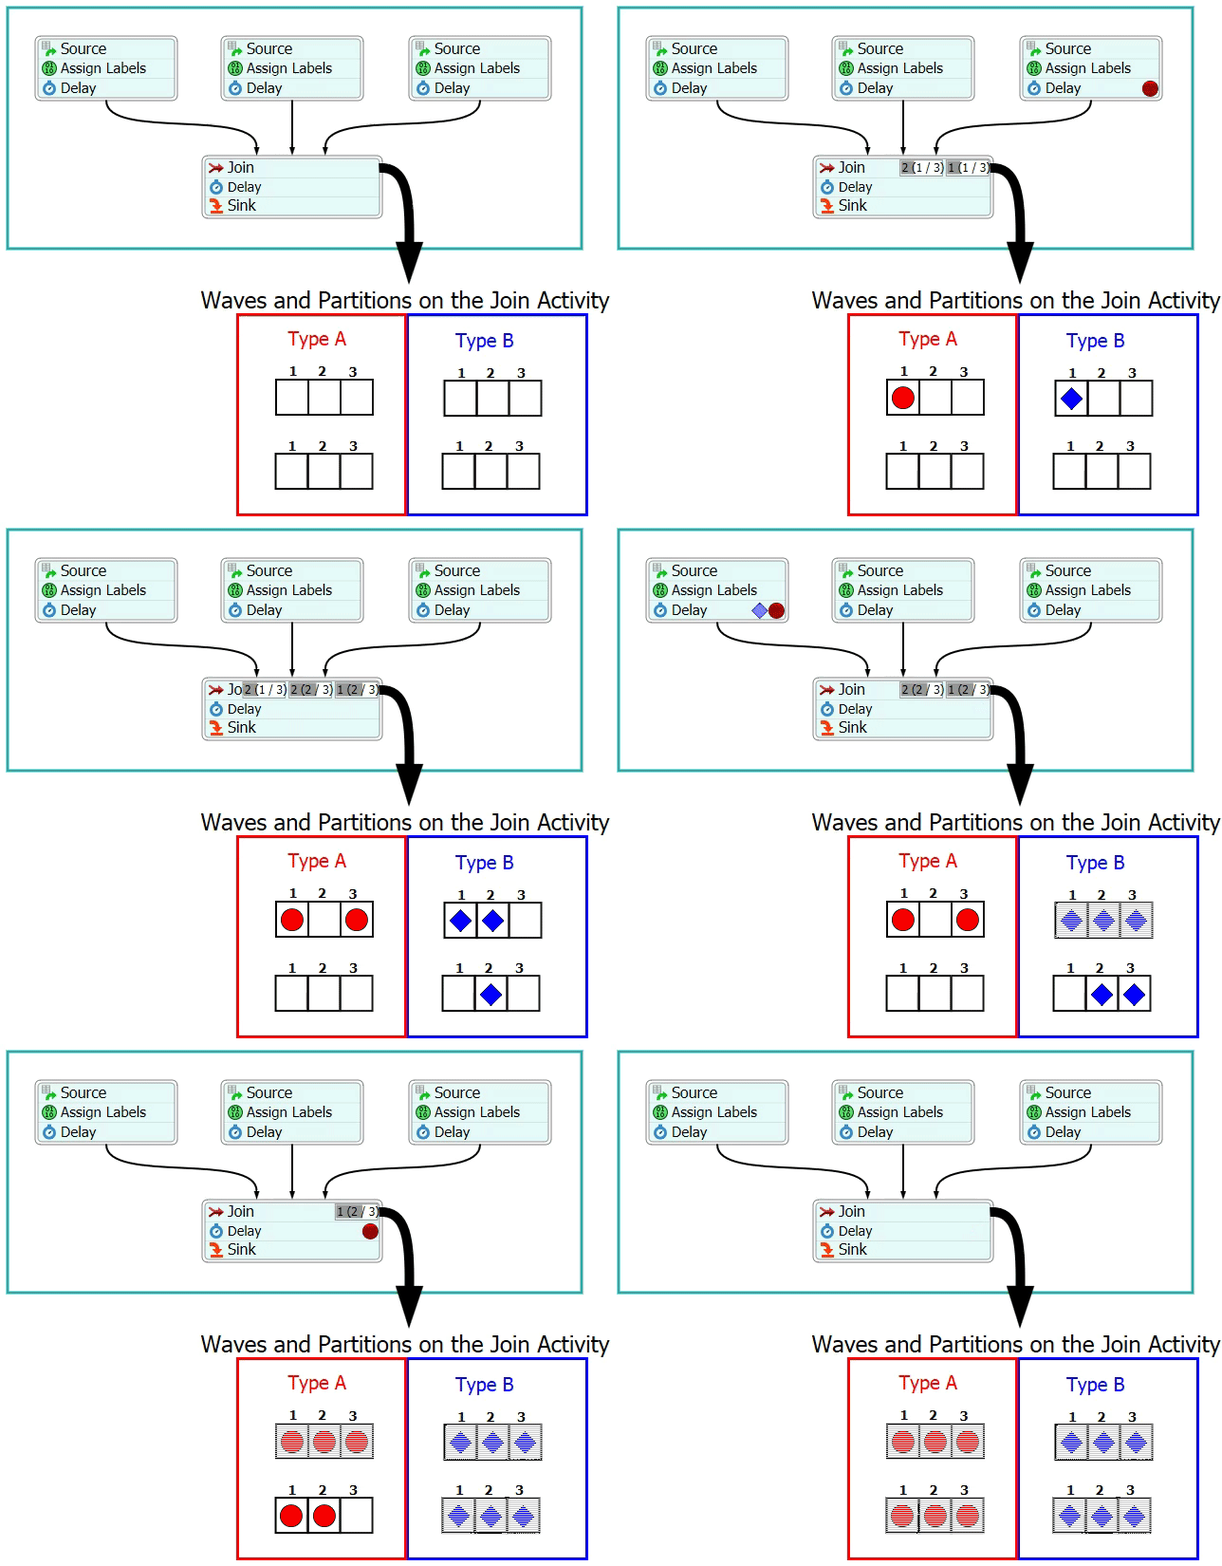
If needed, the values on the partition ID label can used mixed datatypes. In other words, it won't matter if some of the values are numbers and some of the values are strings or object references, etc. The Join and Synchronize activities will simply assign any tokens with a unique value to a new partition. For example, the Join and Synchronize activities will put tokens with a number value of 5 into one partition and it will put tokens with a string value of "five" in a different partition.
Defining a Partition ID
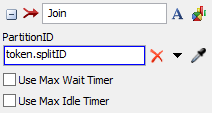
You can define which label the Join and Synchronize activities will use to create partitions using the PartitionID property. For example, the Join activity used in the previous image was set to use a the productType label in the PartitionID box:
Split ID
The Split activity creates a Split ID on all tokens it creates. The Split ID is a label that contains a reference to the original token that was split. By default, this label is named SplitID, but you can customize that label if needed.
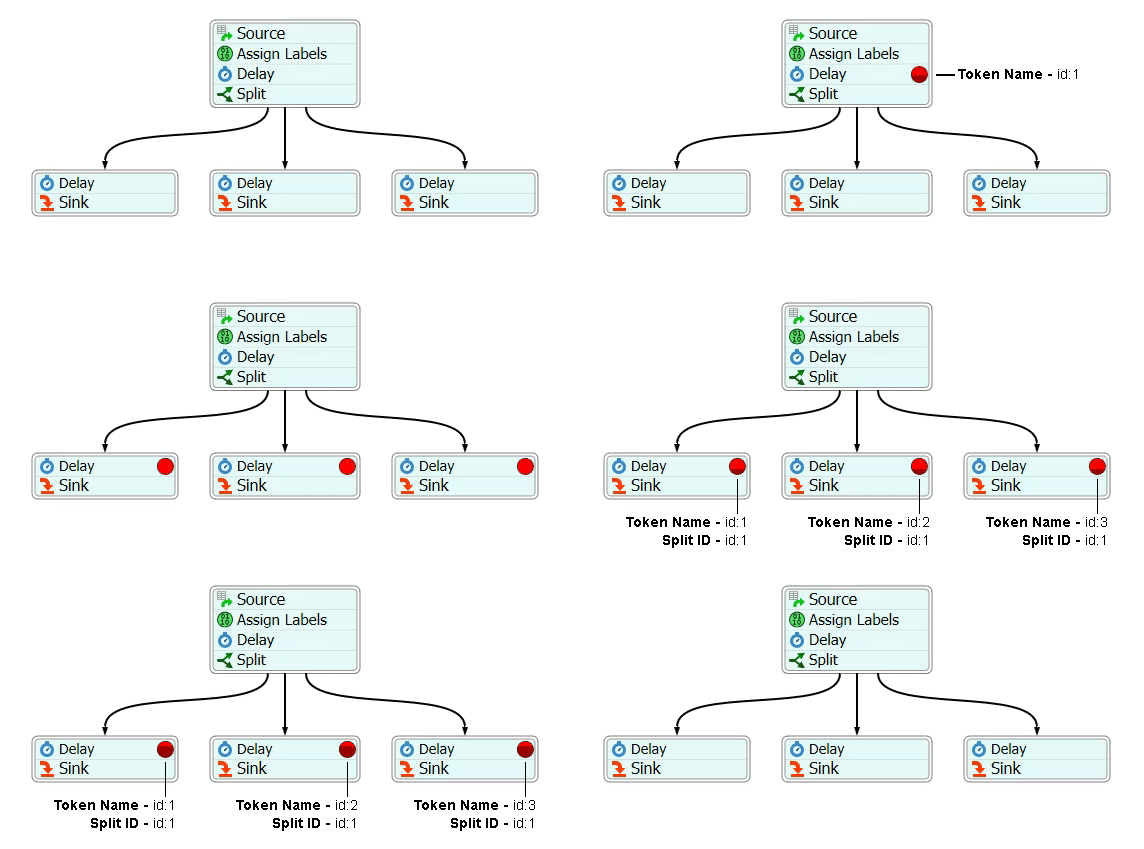
You can possibly use the Split ID label with the Join or Synchronize activities to make the tokens that were split wait for each other downstream in the process flow. For example, in the following process flow, a Split activity assigns tokens a Split ID. Then, the Synchronize activity puts incoming tokens into partitions based on the Split ID label:
