AGV Network
Overview and Key Concepts
The AGV Network helps you to create travel paths while simulating automatic guided vehicles (AGVs) and other task executers.
The AGV module does not add its own AGV object type to the library. Instead you can attach any task executer ( TaskExecuter, Operator, Transporter, etc.) to a control point on an AGV network, and that task executer will travel using AGV-defined logic.
The AGV Types Tab
For information on the AGV Types tab, see AGV Types.
The Control Point Connections Tab
For information on the Control Point Connections tab, see Control Point Connections.
The Accumulation Types Tab
For information on the Accumulation Types tab, see Accumulation Types.
The Deallocation Types Tab
For information on the Deallocation Types tab, see Deallocation Types.
The Conditional Rules Tab
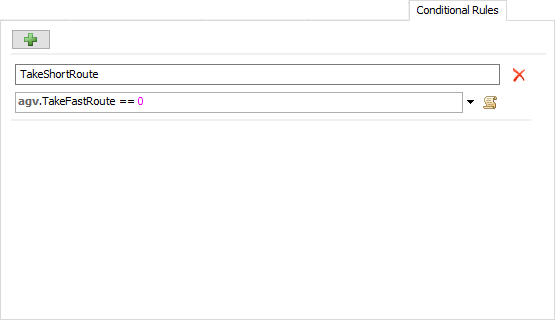
The Conditional Rules tab lets you define boolean conditions for routing on various paths. For example, some paths may only be designated for certain types of AGVs. If you only want AGVs with a certain label value to be able to traverse the path, you can define a conditional rule that checks that the AGV label value matches. Then set the Conditional Rule property of a path to reference that rule. Once configured, only AGVs with matching label values will travel on that path.
Each time an AGV starts a travel task, it evaluates each conditional rule, creating a tuple that acts as a key into a cached map of routes to the desired destination. The AGV network maintains this cache for speed reasons, so that it does not need to recalculate the route every time an AGV needs to travel. Routing tables will be built and cached as needed during the simulation run.
It's important to note that AGVs only evaluate conditional rules at the beginning of their travel operations. This means that if a conditional rule's value changes in the middle of a travel operation, you must preempt the AGV so it will restart its travel operation, re-evaluating the conditional rules and the consequent route.
The General Tab
The General tab has the following properties:
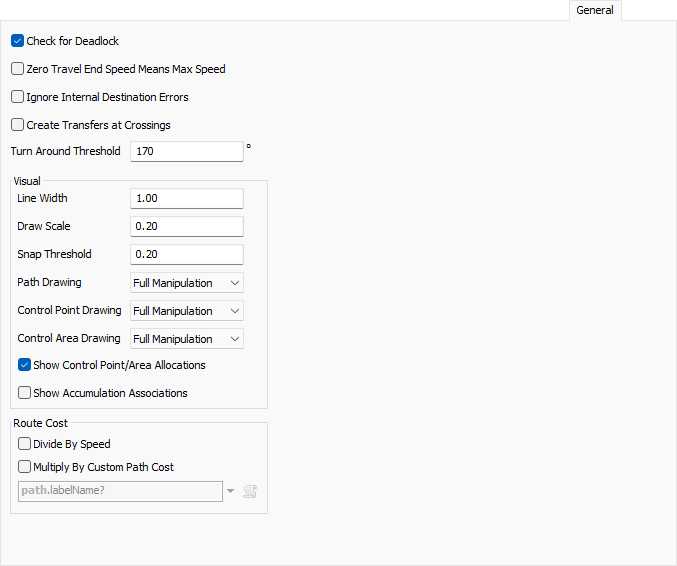
You can get to the General page by right-clicking on a Path or Control Point and choosing AGV Network Properties.
Check for Deadlock
If checked, the Control Point/Control Area allocation logic will continuously check for deadlock cycles. If it finds one, it will stop the model and notify you of the issue. Note that deadlock detection does require additional calculations and may slow your simulation down. You should hence turn it on while debugging, and once all deadlock issues are resolved, turn it back off.
Zero Travel End Speed Means Max Speed
If checked, AGV's will interpret travel tasks with end speed of 0 to mean: end at the AGV's max speed. This behavior is the default with other FlexSim travel mechanisms, such as standard travel networks that use network nodes. However, with AGVs this is not always the desired behavior, so it is an explicit setting that you define here. For more information, see Customizing AGV Travel Tasks.
Ignore Internal Destination Errors
If checked, travel destination errors caused when using AGV.BodyOffset.TrainLeadingEdge or AGV.BodyOffset.TrainTrailingEdge for a destination internal to the train body will not be printed to the system console. The AGV will instead immediately finish the travel task.
This error happens in a very specific case. If you want an AGV train's "leading edge" to travel to a destination on the AGV path network that is internal to the AGV train, then there is technically no way to successfully perform that operation, because whatever edge of the train travels to that destination will be the "trailing edge" not the "leading edge." Thus, giving the AGV such a task is technically an error. However, in some models it would be onerous to try to detect and avoid this error. Thus, you can check this box and the AGV will simply finish the travel task without moving at all.
Create Transfers at Crossings
Defines whether you want transfers to be created when you lay down straight paths that cross each other. The default (unchecked) will only create a transfer if the junction point is at the end of at least one of the paths. Check this and it will create transfers even when they are in the middle of both crossing paths.
Turn Around Threshold
Defines an angle threshold, in degrees, by which agvs will reverse their travel direction. When an agv travels from one path to another, it will check the difference in travel direction for the respective paths, and if it must change direction by more than this amount in transferring to the new path, then it will stop and reverse its direction before continuing onto the path.
If this threshold is above 180 degrees, then an AGV will always travel oriented forward, even when it would normally reverse direction from a previous stop. This should be used in conjunction with the rotate threshold to make the AGV turn with a rotation speed to get oriented in the direction it is going.
Line Width
Defines a baseline width, in pixels, by which Paths and Control Points will be drawn in the model.
Draw Scale
Defines a baseline size by which to scale drawing of Control Points and Path direction arrows.
Snap Threshold
The distance by which objects will snap together in the user interface.
Path Drawing, Control Point Drawing, Control Area Drawing
Defines how the respective objects can be manipulated in the model. As you finish certain parts of your model you may want to restrict what you can change about the objects in it. Options are:
- Full Manipulation - You can click on and move these objects around as needed.
- Clickable Only - You can click on these object but you cannot move them around.
- Not Clickable - You can see the objects in the 3D view but you cannot click on them.
- Do Not Draw - You cannot see the objects in the 3D view.
Show Control Point/Area Allocations
Used primarily for debugging. If checked, the AGV network will draw each AGV's current and requested allocations in the 3D view. This includes allocations of control points, control areas, as well as path transfers. Current allocations are drawn in orange, whereas requested allocations are drawn in red.
Show Accumulation Associations
Used primarily for debugging. If checked, the AGV network will draw a lines between AGVs that are currently traveling on accumulating paths. It will draw a blue line from each AGV to the AGV ahead of it, and to the AGV behind it.
Route Cost
This group of controls lets you customize how travel costs are calculated when resolving routes along the AGV path network. The AGV network uses dijkstra's algorithm to determine the best route of travel. As the algorithm traverses the network, it calculates the "costs" associated with traveling on each section of path. The AGV will then follow the route with the least total cost to get to the destination.
By default, the cost to travel a section of path is equal to the distance of that section. Alternately, if you select Divide By Speed, it will divide the distance by the speed a given AGV will travel along that path. The result is that the AGV will travel the fastest route instead of the shortest route.
You can also select Multiply By Custom Path Cost and enter a path-dependent expression. The algorithm will then multiply the cost by the result of the expression. The most common use for this would be to put labels on various paths in your network that give certain paths priority over other paths. The algorithm will then favor traveling on certain paths over others. Here, an expression result of 1 would use the standard cost, an expression of 3 would triple the cost, and so forth. Note that, if the expression result is 0, it will use the standard cost. Also, if you use A* mode, the path multiplier should always be greater than or equal to 1. This is required for the A* heuristic to guide the algorithm properly to the destination.
Path-based costing is assumed to be static. When the system needs a routing table to a destination, it will only build it once and cache it off. Subsequent routing will use the cached table. This means that you can't simply change path-dependent costs during a simulation run and assume they will work. It will use whatever the path-based costs were the first time the table was built, not on subsequenct changes. However, you can use path-dependent costing, in conjunction with conditional rules, to achieve this goal.
The system creates a tuple by evaluating each conditional rule at the beginning of a travel task. The tuple is a key into a map of routing tables. The system will use a cached table if the table for the given tuple key already exists. If the table does not yet exist, the system will build and cache a new route. Thus, if you want your path costs to be dynamic, you can associate a given path cost configuration with a conditional rule. To use that configuration, set all the path cost values to the configuration, then turn on the conditional rule. Then once the routing table has been calculated, reset the path costs back to their default values, and turn the conditional rule off.
Debugging Route Costs
The AGV system also provides tools to get information on dijkstra's algorithm results. You can right-click on a destination control point and select Show Routing Accessibility. Then hover the cursor over other control points and path transfers in the model. It will show the various costs associated with traveling from the hovered point to the destination.
See Showing AGV Routing Accessibility for more information.
Way Points
Way Points are used to define AGV control logic that will happen when an AGV passes over a control point. However, going forward we advise you to use process flow instead of Way Points for AGV control. FlexSim provides a template AGV control process flow, which can be used as a starting point for defining AGV control logic..
The Way Points tab has the following properties:
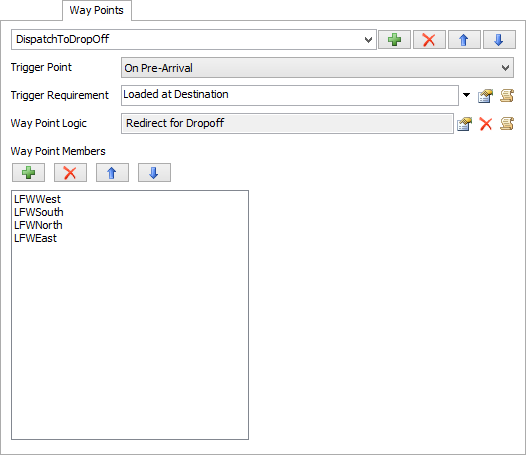
You can get to the Way Points page by right-clicking on a Path or Control Point and choosing AGV Network Properties.
Way Points List
Here you can add, remove, re-order, and rename each Way Point.
Trigger Point
This defines when to fire the Way Point Logic. Options are:
- On Pre-Arrival - The Way Point Logic will be fired at the point when the AGV would otherwise start to decelerate to stop at the Way Point.
- On Arrival - The Way Point Logic will be fired when the AGV arrives at the Way Point. Note that if the Trigger Requirement is met and this Trigger Point is chosen, the AGV will slow to a stop at this Way Point and then fire the Way Point, even if the Way Point is not the AGV's final destination. Hence if you don't want the AGV to slow to a stop, you should use On Pre-Arrival.
Trigger Requirement
A field that should return 1 if the Way Point should be fired, 0 if not.
Way Point Logic
The code for the Way Point.
Way Point Members
The list of Control Points that are part of this Way Point. Here you can add, remove and re-order the members list.
AGV Customization Delegate
In addition to the standard features provided through FlexSim's user interface, the AGV module provides a mechanism for advanced users to customize AGV travel at a much more detailed level. The AGV network uses an "AGV Customization Delegate", which allows for hooks to be placed at certain points in the AGV navigation logic. There is a default, internally defined customization delegate that the AGV network uses, but you can override the logic of this default delegate by adding and configuring a special node at MODEL:/AGVNetwork>variables/customizationDelegate, as follows:
- Navigate in the tree to MODEL:/AGVNetwork>variables/customizationDelegate
- Right click on that node, and choose Edit > Designate this Node (so)
- In a script window execute the script: nodeadddata(so(), DATATYPE_SIMPLE)
- Add a subnode to that node named sdt::attributetree and give it the text: AGV::UserAGVCustomizationDelegate.
- Copy the node and then paste it onto itself. This will instantiate a "UserAGVCustomizationDelegate" class, which has hooks where you can implement customizations in FlexScript.


The various customization hooks are best described within the context of an AGV's overall travel operation. An AGV performs several sequential operations as part of configuring and completing a travel task. They are:
- Resolve Routing
- Build Travel Path
- Set Travel Path Speed Profile
- Lookahead Allocation/Kinematics
The AGV system uses a "lazy" dijkstra's algorithm to cache routing tables, stored by destination. Whenever a change is made to the AGV path network, all cached routing tables are cleared. Then when an AGV must travel to a certain destination, if that destination does not have a cached routing table, it will build a table on-the-fly using dijkstra's algorithm, and then store it off for later reuse. This table defines 'cost' and 'next' routing values for getting from every point in the AGV path network to that destination point. A destination may actually have multiple routing tables, where each table is uniquely addressed by a tuple key based on conditional rules.
The AGV system also allows for more dynamically built tables, where a route to a destination is resolved using the A* algorithm and is completely recalculated on every travel operation. This mode is enabled either when the shouldBuildCustomRoute hook returns 1, or when you have defined dynamic routing constraints in the system.
In both dijkstra's and A* mode, the AGV will call the getPathTravelWeight hook to resolve the 'cost' of traveling on a given section of path.
In this step, the AGV uses the routing table to build a locally-stored travel path to the destination. Here the AGV resolves things like the orientation of the AGV while traveling on each path section in the route, and also builds a list of lookahead allocation points that the AGV must acquire while traveling the path.
In this step, the AGV goes through its travel path and sets maximum travel speeds, acceleration, and deceleration values for each travel path section. It first traverses the travel path forward, calling the customization delegate setSpeedProfile hook. Then it traverses backwards, resolving points where the AGV must start decelerating in order to meet path section speed requirements.
In this step, the AGV repeatedly allocates ahead to its next allocation point, calling the addKinematics and addRotation hooks to add kinematics that traverse the travel path sections up to the next allocation point. It adds kinematics as-if it will not immediately allocate ahead at the next lookahead point, and then schedules a pre-arrival event for the next point at which it needs to allocate ahead. If, at that time, it cannot immediately allocate ahead, then it simply lets the kinematics finish, coming to a stop at the lookahead point. If, on the other hand, the AGV does immediately allocate ahead, then it resets the kinematics to start at the current position and speed, then repeats the process again, adding kinematics to travel to the next lookahead point.
Customization Hooks
Adding the user customization delegate creates empty hook nodes for you to fill out. If you leave a hook unimplemented, then it will simply perform the default logic for that hook. To implement a hook, add text data to the corresponding node, toggle it as FlexScript, implement the proper customization code, and return the required value from the function.
The customization delegate hooks are as follows:
shouldBuildCustomRoute
This hook is executed at the beginning of an AGV's route resolution step. It should return 1 if you want to use a customized travel route, and 0 otherwise. If you return 1, then you must also implement a custom getPathTravelWeight hook. Note that more recent versions of FlexSim have added route cost features that are part of the user interface and use AGV's route caching mechanism. These newer features make this and the getPathTravelWeight hook mostly obsolete, and we advise using those features for customized routing instead of this feature.
The code header for this hook should be as follows:
AGV agv = param(1); // the traveling AGV
AGV.AllocatableObject currentCP; // the Control Point (if any) that the AGV is currently at
Object destination; // the destination object (if any)
getPathTravelWeight
This is executed repeatedly as part of the AGV's route resolution step. As it encounters path sections in traversing the path network, it calls this hook to determine a "cost" of traveling on this section. Generally this hook would return the distance of the path section, or the time to travel the path section, but you can customize it as needed. Note that more recent versions of FlexSim have added route cost features that are part of the user interface and use AGV's route caching mechanism. These newer features make this and the shouldBuildCustomRoute hook mostly obsolete, and we advise using those features for customized routing instead of this feature.
The code header for this hook should be as follows:
AGV agv = param(1); // the traveling AGV
Object path = param(2); // the path whose travel weight is being queried
double fromDist = param(3); // the 'start distance' on the path
double toDist = param(4); // the 'end distance' on the path
setSpeedProfile
This hook is called as part of the speed profile setting step. It allows you to define the max speed, acceleration and deceleration attributes of a travel path section. If you implement this hook, you should return 1.
The code header for this hook should be as follows:
AGV agv = param(1); // the traveling AGV
Object path = param(2); // the path whose travel weight is being queried
double fromDist = param(3); // the 'start distance' on the path
double toDist = param(4); // the 'end distance' on the path
Unfortunately, as of version 22.2, the FlexScript API does not provide a mechanism for setting these attributes directly on a travel path section (perhaps check the API directly to see if this has changed in future releases). However, you can call setsdtvalue() on the travel path section, with the values "peakSpeed", "acc", and "dec" to set these attributes.
addKinematics
This hook is called repeatedly as part of the lookahead allocation/kinematics step. It is called once for each travel path section up to the next lookahead point.
The code header for this hook should be as follows:
treenode kinematics = param(1); // the kinematics node to add kinematics to
AGV.TravelPathSection section = param(2); // the travel path section the AGV is to travel on
double atTravelDist = param(3); // the travel distance at which this kinematic will start
double dist = param(4); // the total distance that should be added to the kinematics, i.e. the distance to travel on that section
double startTime = param(5); // the start time for adding the kinematics
double startSpeed = param(6); // the speed the AGV will be traveling at startTime
double endSpeed = param(7); // the target end speed, i.e. the speed the AGV should be at when finished traveling the distance on the section
int reason = param(8); // 0: OnBuildKinematics, 1: OnAbort/OnPreempt, 2: OnProximityInterrupt
treenode endSpeedOut = param(9); // set the value of this node if the resulting endSpeed != original endSpeed
double peakSpeed = param(10); // the peak speed of the section
double acc = param(11); // the acceleration for the section
double dec = param(12); // the deceleration for the section
AGV agv = section.agv;
The default implementation of this hook is:
return addkinematic(kinematics, dist, 0, 0, peakSpeed, acc, dec, startSpeed, endSpeed, startTime, KINEMATIC_TRAVEL);If you implement this hook, your code must satisfy the following:
- You must add kinematics with the addkinematic() command using KINEMATIC_TRAVEL.
- Distances defined with addkinematic() should be exclusively defined on the x axis, i.e. the 3rd and 4th parameters of addkinematic() should always be 0.
- The cumulative distances of the x parameters of all addkinematic() calls should be exactly dist (param(4)).
- The earliest start time for any addkinematic() call must be no earlier than startTime (param(5)).
- If adding multiple kinematics with addkinematic(), then those kinematics should not overlap in time.
- The final end speed must be less than or equal to the passed endSpeed (param(7)). If your kinematics result in an end speed that is less than the passed endSpeed, then you must set endSpeedOut->value to the resulting end speed.
- You must return from this hook the final end time at which the AGV has traveled the full distance.
addRotation
This hook is called as part of the lookahead allocation/kinematics step. It is only called when the AGV must stop and rotate to a new direction, based on its rotate threshold.
The code header for this hook should be as follows:
treenode kinematics = param(1); // the kinematics node to add kinematics to
double rotation = param(2); // the angle, in degrees, that the AGV must rotate
double rotSpeed = param(3); // the AGV's rotation speed
double startTime = param(4); // the time at which the AGV has come to a stop and can start rotating
AGV.TravelPathSection fromSection = param(5); // the path section that the AGV is transitioning from
AGV.TravelPathSection toSection = param(6); // the path section that the AGV is transitioning to
The default implementation of this hook is:
return addkinematic(kinematics, 0, 0, rotation, rotSpeed, 0, 0, 0, 0, startTime, KINEMATIC_ROTATE);If you implement this hook, your code must satisfy the following:
- You must add kinematics with the addkinematic() command using KINEMATIC_ROTATE.
- Distances defined with addkinematic() should be exclusively defined on the z axis, i.e. the 2nd and 3rd parameters of addkinematic() should always be 0.
- The cumulative distances of the z parameters of all addkinematic() calls should be exactly rotation (param(2)).
- The earliest start time for any addkinematic() call must be no earlier than startTime (param(4)).
- You must return from this hook the final end time at which the AGV has rotated the full rotation.