Task 2.1 - Simple pipeline
Task Overview
We will build the following model:

Batches of 1000 m³ of random products (product IDs 1 through 10) are produced into a suitably sized tank. Once full, the contents will be pumped into a pipeline with one receiving tank on the other end. The tank has a capacity of 5000 m³ to accommodate the situation in which multiple batches of the same type are produced in sequence. However, once the product flowing out of the pipe changes, the receiving tank first has to empty into some other process that we will not model.
Step 1 Create the basic model
Create a new model, with as units seconds, meters and liters and setup the basic model: connect a flow source, tank, segmented flow pipe, another tank and a sink together. Create a second segment in the flow pipe which is rotated by 90 degrees. Set the following basic properties:
- The source has a maximum outflow rate of 100.
- The first tank has a maximum capacity of 1000 and maximum inflow and outflow rate of "unconstrained".
- The flow pipe has a maximum flow rate of 10 and a content of 750.
- The second tank has a maximum capacity of 5000 and maximum inflow and outflow rate of "unconstrained".
- The sink has an inflow rate of 100.

When the model is run, nothing interesting happens: this is a static situation in which all the flow rates are maximized. Let's create a ProcessFlow and add a few activities to make the first tank fill completely, then empty completely.
Start by dragging in a Schedule Source into your ProcessFlow which controls the first tank. After the source, you can add an Assign Labels activity to assign the tank to a label. This label can be used in other activities to reference to the tank. The first step is to make sure that at t = 0 the tank has open input and closed output. By default, all FloWorks objects start with all their inputs and outputs opened. This can be achieved by using the Switch to Filling ProcessFlow activity. Then the logic during the run can be added. The next step is waiting till the batch is complete. Therefor the Wait for Event activity can be used followed by the Switch to Releasing activity to empty the tank. This is the next event on which you want to wait, before the tank will be filled again. The logic in your ProcessFlow will look like this:

Step 2 Producing and sending batches of different products
The production tank now fills and empties with the same product every cycle. To create the multi-product model, we will sample a new product every time the tank starts filling a new batch.
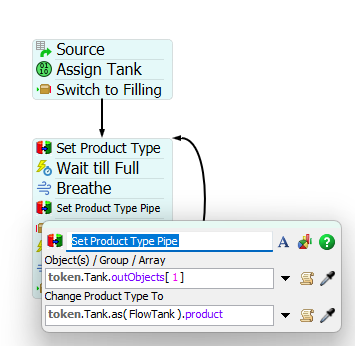
Add the Set Product Type activity to the ProcessFlow at the moment the tank is empty. For the product, sample a random value between 1 and 10 (with equal probabilities) by entering the expression duniform(1, 10) into Change Product Type To field.
![]()
When you run the model now, in general you will see a different product color being produced in the tank for every new cycle. Of course, due to the nature of statistics, sometimes you may get two consecutive batches of the same product.
We will also want to change the inflow product of the pipe when the production tank starts emptying. To achieve this, the Set Product Type activity can be used when the model switches to release product from the tank.
Finally, you will notice that the product is automatically passed from the first flow pipe into the next. This is because flow pipes have the “Pass product downstream” option enabled by default in their "On Product Out Change" trigger, as you can see by inspecting the Triggers panel in the pipe's Quick Properties.
If you have followed all the steps correctly, you should now see randomly colored batches move through the pipelines into the receiving tank. In the next step you will implement the batching logic on the receiving side.

Step 3 Batching in the receiving tank
The receiving tank will have similar logic to the producing tank. When it is empty, or when the model is reset, it will open its inputs and close its outputs. Add this logic to the ProcessFlow now.

In contrast to the previous tank, however, this one does not decide for itself when to switch from input mode to output mode. This will be determined by the On Product Out Change trigger on the flow pipe.

The pipe is referenced by using the Tank label in combination with the inObjects property of an object: token.Tank.inObjects[1].
If you are not used to working with these kinds of expressions, try reading them right to left: the object that the action
applies to is the first ([1]) input object of the object on the label – the second Tank in this case. It is considered good practice to use such references as
they are more robust than referencing the tank by its name in the model.
Also remove the On Product Out Change, in step 4 of the tutorial we will control this ourselves in ProcessFlow.

If you run the model, you will notice that the trigger now also fires at the start of the model, when the tank is still empty, and therefore there will be no flow. To avoid this, check the "Suppress initial product out event" box in the Flow Object properties of the second pipe.

Step 4 Setting the product in the receiving tank
You are almost done! When you run the model, you will see different products flowing through the pipeline, into the receiving tank. The latter will continue to accept input as long as the inflow product does not change. When it does switch, it will block the inflow and first empty itself into the sink. The only thing remaining is that the receiving tank doesn't switch products based on the incoming product.
Just like on the sending side, the product needs to be changed at the beginning of the cycle. The idea is similar to what you've done before, except the expressions become a bit more complicated. First let's do it. We'll break this down in just a moment, now reset and run the model and check that you get the desired result.
![]()
What does that expression mean?
You should see the receiving tank now taking on the correct product type every time it starts filling again.
So how does that expression you entered work? Before, we have used the expression token.Tank.outObjects[1] to get at
the first output object of the current object; similarly we can get the object connected to input port 1 with
token.Tank.inObjects[1].
We would like to get the product type of this object, which is a property called product.
So going with the “read-from-right-to-left” strategy, we would like to write token.Tank.inObject[1].product
(“the product of the first input object of ...”). However, there is small catch which has to do with typing:
according to FlexSim, input objects are of the type Object, which can be anything like Queues, Processors, Conveyors, etc.
And of course, Objects don't – in general – have a product. It's just in this particular model that we, as smart humans,
happen to know that the input object is not just any Object, it's actually a more specific type of object
known as FlowObject. This hierarchy is shown in the diagram below, where an arrow pointing from A to
B means that A is actually a more specific type of B, usually inheriting all its properties
(so that you can still call obj.outObjects[1] defined on Object when obj happens to be a FlowObject)
but adding some properties of its own (such as FlowObjects having a .product property that Objects don't have).

By inserting ....as(FlowObject) you tell FlexSim that the whole expression to the left of it,
token.Tank.inObjects[1], is actually a FlowObject on which you can then call ....product.
Conclusion
In this task you have used some FloWorks ProcessFlow activities to control flows and product types. In the next tutorial task, you'll learn how to control flows to create a concept similar to the use of tank pools in chemical processing. Continue to Tutorial Task 2.2 - Creating a tank pool .